Last Updated on September 2, 2022 by Chris and Lindsay
Thinking about starting an epic Class C RV remodel to your house on wheels? Or perhaps you’re looking for ideas and inspiration on how to spruce up and enhance your camper, motorhome, travel trailer or campervan?
We’re excited to share with you the many projects that we have taken on as we have remodeled our Class C motorhome to turn a 22-year-old motorhome into our home on wheels. It does not matter what kind of RV you have. If you are looking for ways to remodel or renovate your RV on a budget then this post is going to be pretty much all you need to build the confidence and knowledge to get it done.
Like you, we started collecting ideas on Pinterest. And we studied some remodeling projects on YouTube. But when it came down to finding examples of entire RV remodels and the details of what it took and how to complete each project, we found that there wasn’t a lot of great information.
So we want to share with you how we stripped our 1999 Shasta Cheyenne 31′ Class C motorhome down to the bare floor and walls and tore out appliances, upholstery and furniture before putting it back together in a much more modern and relaxing version of its former self.
In this post you will not only find general information about the projects we took on, their associated costs and the processes to complete them but also you’ll find links to our YouTube series and related posts on exactly how to take on an RV remodel.
We’ll tell you, starting from bottom to top (or top to bottom) in remodeling our RV was a challenge that somehow always felt beyond our ability to accomplish. But we managed to find ways to complete our RV remodel – sometimes after two or three attempts at various tasks – and we want to try and save you the time, money and frustration as you begin your own projects.
We also want to share that we are definitely NOT experts at remodeling. We do feel confident in knowing the basics of using power tools and creatively problem-solving design issues in small spaces (after 3+ years of living full time in our truck camper).
But when it comes to taking on our whole RV remodel project we felt excited, yet incredibly intimidated, anxious and generally concerned that we wouldn’t be able to fix everything we wanted to fix.
This is to say, if we can do it, you can do it! And on that note, let’s get into the details about what and how we remodeled our motorhome!
NOTE: This post outlines every single thing we did to remodel our Class C motorhome. You may not be interested in some tasks we undertook. So please click below to expand the Table of Contents if you are searching for specific rooms or ideas. From there we’ll link to all the supporting resources to help you achieve the results you want in your remodel or renovation!
Affiliate Disclaimer: This post contains Amazon affiliate links to products we used and recommend during our RV remodel. If you purchase these products through the links we provide then we will receive a small commission for referring you.
Rates start at $50/half hour and consultation packages can be tailored to your wants and needs!
Contact us via email to arrange an initial consultation and discuss consultation packages available!
NOTE: Due to the nature of our travel schedule, we do not offer remodeling services outside of a consultation.
Class C RV remodel: Every project broken down
Before we get started we want to say a few things about this project. First, we call our achievement a “remodel” rather than a “renovation.” While there is some overlap between the two, we see remodeling as taking what was once was and creating something new from it and renovating as refurbishing and bringing life back to the original.
That said, if you are refurbishing an old Airstream or VW bus you may find some great ideas on how to do some of your projects. But really we think you’ll find the most value from us in taking your current RV and finding ways to remove and rebuild custom features around the living space.
Second, we want to reiterate that we are not experts, we did not have sponsors donate material or products and we completed our entire remodel for under $7,500. We did not contract out any work and we used our own tools, did our own research and created our own designs to entirely transform our campervan.
This is to say, you are 100% capable of completing your remodel or renovation and we’re excited that you’re looking to us for encouragement and information that will give you the confidence to complete your overhaul.
Now on to the projects and all of the great resources that will transform your RV into your home.
READ MORE: See our full RV remodel budget breakdown for each project!
Remodeling Projects Throughout all of the RV
The following are a list of tasks or projects that we completed throughout the entire RV. Instead of breaking down all of the details for each project in the different room sections below we’ve decided to separate them into their own category.
Here’s what we did throughout the motorhome:
Paint All Interior walls & cabinets
If you only do one thing to your RV to give it a new look and feel, then painting the interior walls and cabinets will achieve incredible transformation. Which color or color combination you use is clearly up to you.
After sanding and priming, we chose to paint our walls a light grey and most of our cabinets white. This small project made our Class C feel like new!
But it wasn’t easy. And it took far more time than we thought it would. Yet the results are spectacular!
READ MORE: Be sure to check out our post about how to paint your RV walls and cabinets. Or watch the video HERE.
Vinyl Plank Flooring
If you can remember the 90s, the color palettes and interior design and decor for most homes were questionable, at best. Our RV had a very well-worn and fatigued green carpet that ran from the driver and passenger seats all the way through the living room and then back again in the bedroom.
The kitchen and bedroom had weary yellow vinyl sticker flooring and there were places in every room where the flooring clearly needed to be replaced. As such, we opted to tear out all of the carpets and installed a bright grey vinyl plank flooring that ran throughout every room in the RV.
This complemented the freshly painted walls and cabinets and transformed our RV instantaneously.
READ MORE: Learn more about how easy and affordable it is to install vinyl plank flooring to your RV!
Trim
When removing the carpet and installing the vinyl plank flooring there were gaps along the edges of the walls and cabinets that were not only eyesores but also places that would collect dirt and dust over time.
To solve both issues we custom measured and installed quarter round trim throughout the entire RV. Doing so created a beautiful transition between the darker vinyl plank flooring and the brightly colored walls and cabinets.
Switch LED lights
The easiest task we undertook in remodeling our Class C was to switch out light bulbs in every appliance throughout the motorhome. We replaced 2 light fixtures entirely (described below).
But simply switching from incandescent to LED light bulbs not only brightened up our living spaces but also saved us a lot of energy when using the lights.
Paint vent covers
We shared that we’re not experts in remodeling RVs. But even amateurs know that RVs don’t roll off the manufacturer’s lot with stained yellow vent covers and fixtures! Still, regardless of how white they were to begin, nearly all plastic vent covers turn yellow over time.
A quick way to add new life to your older RV is to remove all of the vent covers and give them a fresh coat of spray paint. Which color is up to you and your color palette inside the RV. We chose bright white.
Combined with the bright walls and cabinets and contrasting with the darker flooring, this simple task worked well to help transform the entire RV interior.
RV Kitchen Remodel

Remodeling our kitchen was something we knew we wanted to do as soon as we walked into the RV. It was dated, bland and had an old sink and faucet that did not work. The cabinets and walls were boring and the whole little corner of the RV felt lifeless.
So we decided to basically tear everything out of the kitchen in order to rebuild all of the things we wanted to look and function in a more modern fashion.
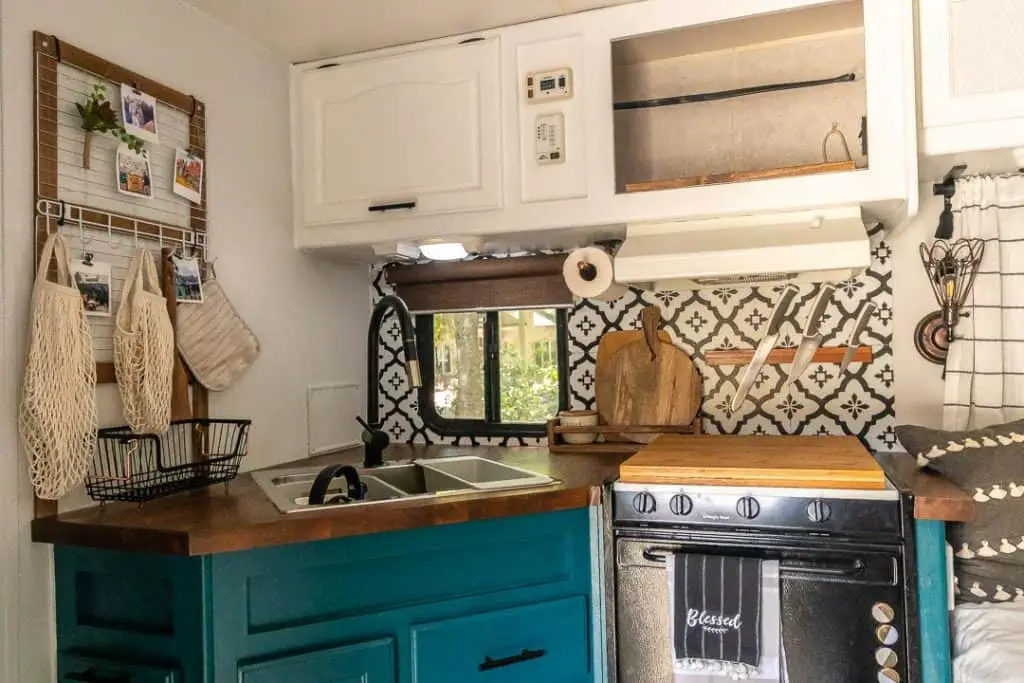
Backsplash
Painting the walls was just a start in the kitchen. This opened up space, perhaps a little too much. To really define the kitchen we installed a decorative vinyl sticker backsplash.
Not only did this help in the kitchen specifically, but it is one of the first things you see when you enter the RV and it helps to define the entire remodel.
Butcher Block Counter + Residential Sink & Faucet
By far our biggest and most ambitious job in the RV kitchen was in replacing the old countertop, sink and faucet with a beautiful butcher block counter and more modern residential sink and faucet.

This was definitely not a necessary task to take on. But we are so glad that we did as this in itself makes the RV really feel like home.
We LOVE how the counter ties the entire room together and the functionality of a larger sink and faucet makes the idea of washing dishes more pleasant.
READ MORE: Be sure to check out our post on how to install butcher block countertops in your RV remodel!
Microwave removal
We’re not a fan of microwaves. In an RV they are not very practical in the sense that they consume a lot of power and serve only one purpose. We removed our microwave in our truck camper to make more storage space.
But as our Class C has plenty of storage space we decided to switch a microwave for an air fryer that serves several different purposes for us.
Whether you leave the microwave, replace it with an air fryer or other appliance or convert it to a storage area be mindful to make sure everything is strapped in nicely!
Window Treatment
Removing the existing window blinds and replacing them with a simple bamboo pull-down shade was a simple and inexpensive way to tie the wall space in our kitchen together.
We love the simplicity of these shades and with just a small window in the kitchen, this was a quick fix.
Hidden Pull-out Trashcan
We definitely borrowed this idea from other RVers. But the idea of hiding away our trash can was not only a matter of aesthetics but also practical in keeping our kitchen waste from the reach of our sweet dogs.
We just swapped cabinet hinges and pull handles so the door opened down and then we attached the perfect-sized trash can to the cabinet door to make our hidden trashcan.
Fridge paint
Refrigerators are boring. With residential refrigerators, you usually have the choice between black or chrome. But with a little paint and elbow grease, you can paint your refrigerator to match the rest of your interior design and decor.
Whether you just trim the edges, paint the doors a particular color or use chalkboard paint so you can write notes to yourself, painting the fridge is a simple way to tie the room together.
Wall Storage & Decor
After painting the kitchen walls white the kitchen felt very, very open. We used a backsplash to define one of the kitchen walls.
But for the other, we decided to build our own custom storage and decor that gave us practical and aesthetic use of the space. The best thing is that building it ourselves not only maximized the space but also cost us less than $5 to complete!
Magnetic knife rack & Stovetop Cover
We fell in love with both of these simple kitchen remodel ideas when we owned our truck camper. But essentially we picked up this magnetic knife rack to hang our knives and this bamboo stovetop cover to replace the metal cover we removed from our stove.
The knife rack is pleasing to the eye on top of being incredibly practical. And the bamboo stovetop cover double or triples as a cutting board and even a serving tray!
RV Bathroom Remodel
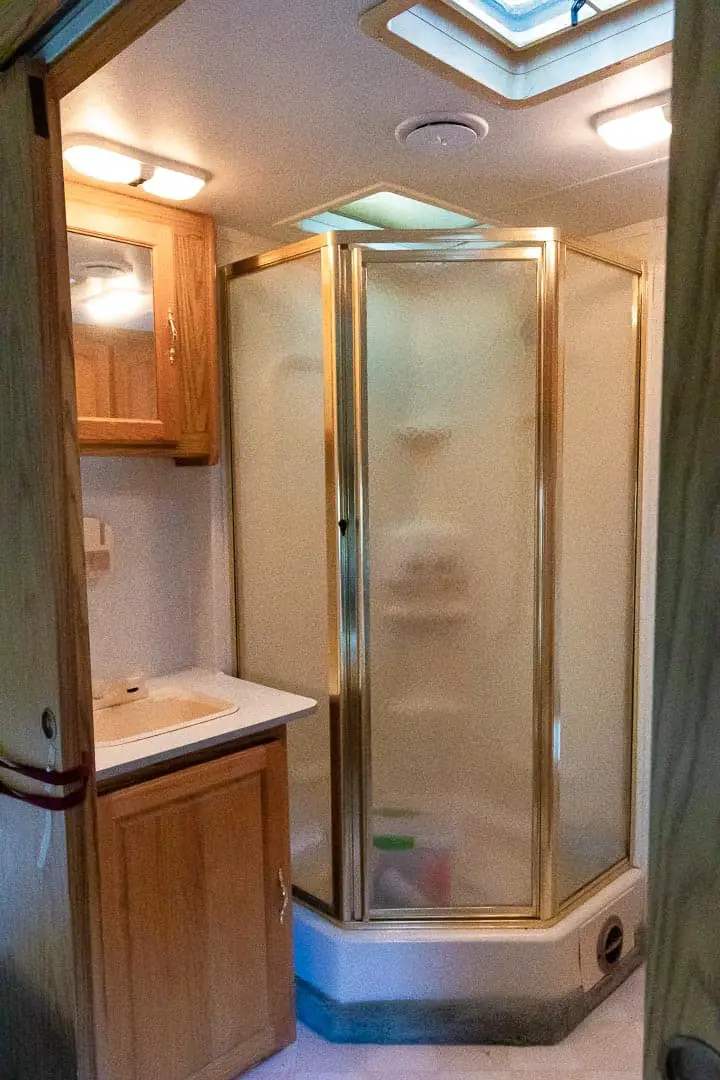
Our Class C had a bathroom that felt nearly twice the size of our former truck camper. But like the rest of the camper, it had a look and feel that was dated and quite boring. Further, the plumbing was broken and would need its own special attention.
These two factors combined to make our bathroom ripe for tearing apart entirely and rebuilding in new and beautiful ways.
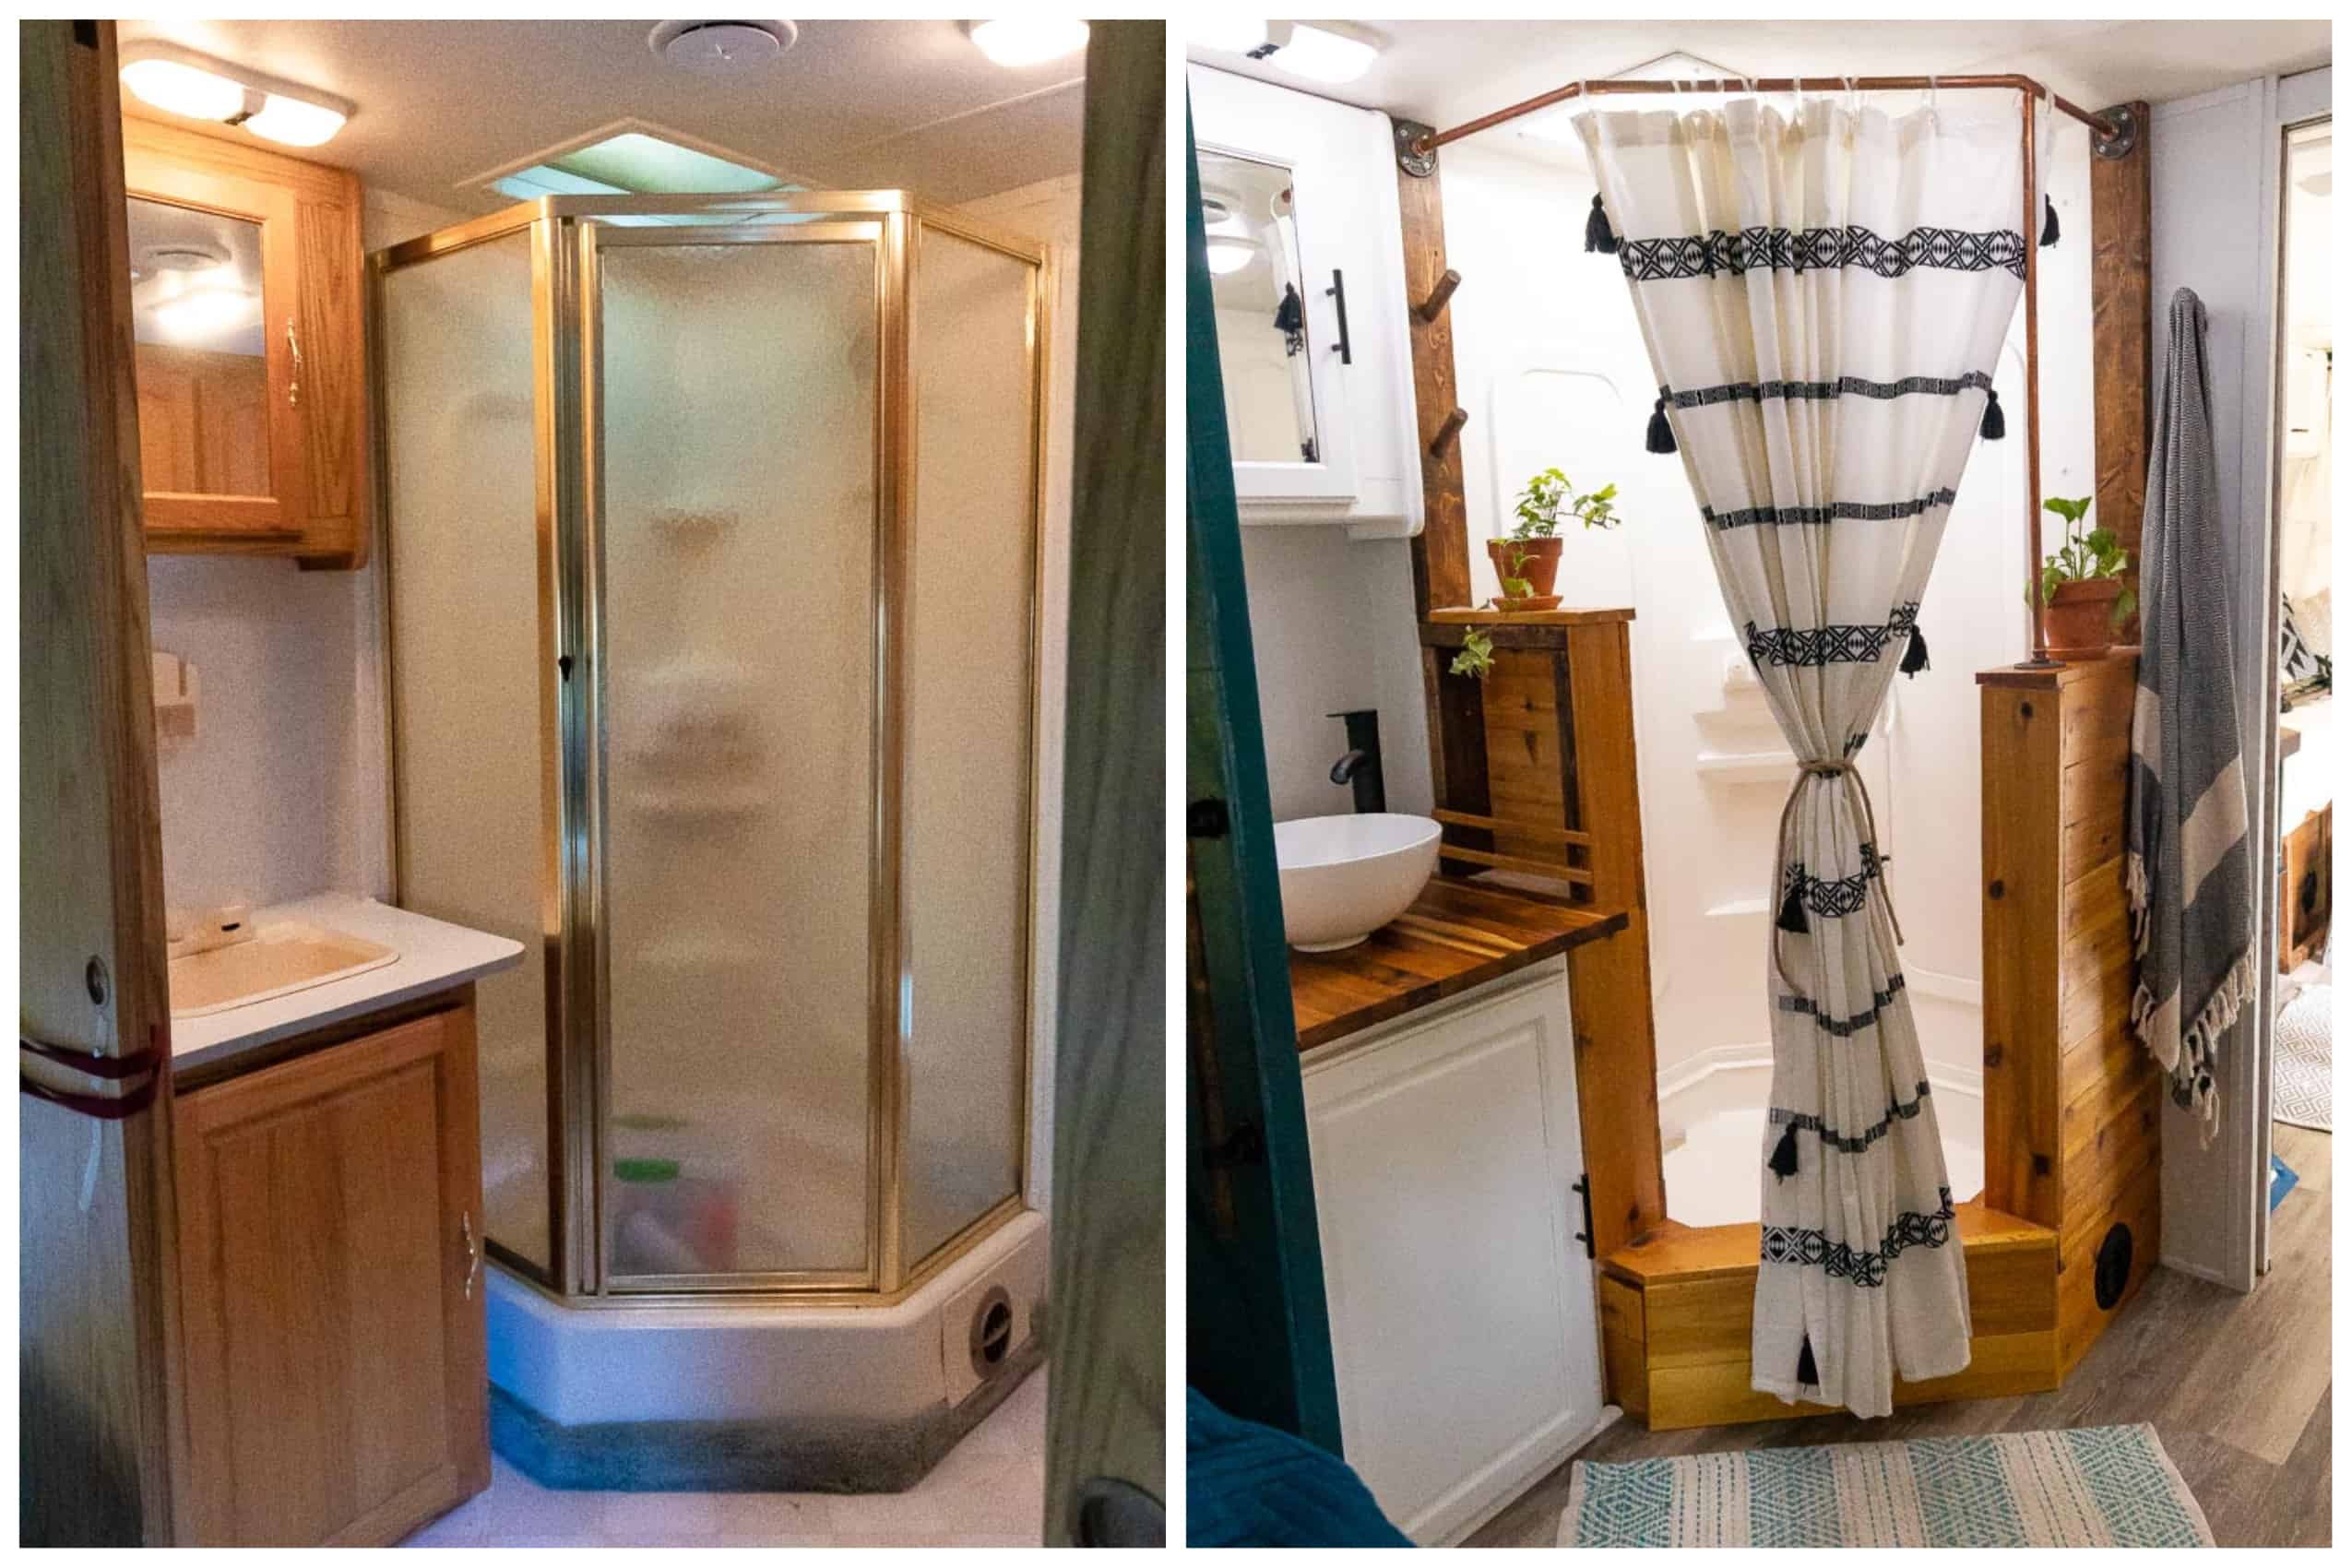
Remove & RebuilT Shower
Rebuilding our shower was not originally on our list of things to do to our RV bathroom. But the more we looked at it the more we envisioned giving it new life.
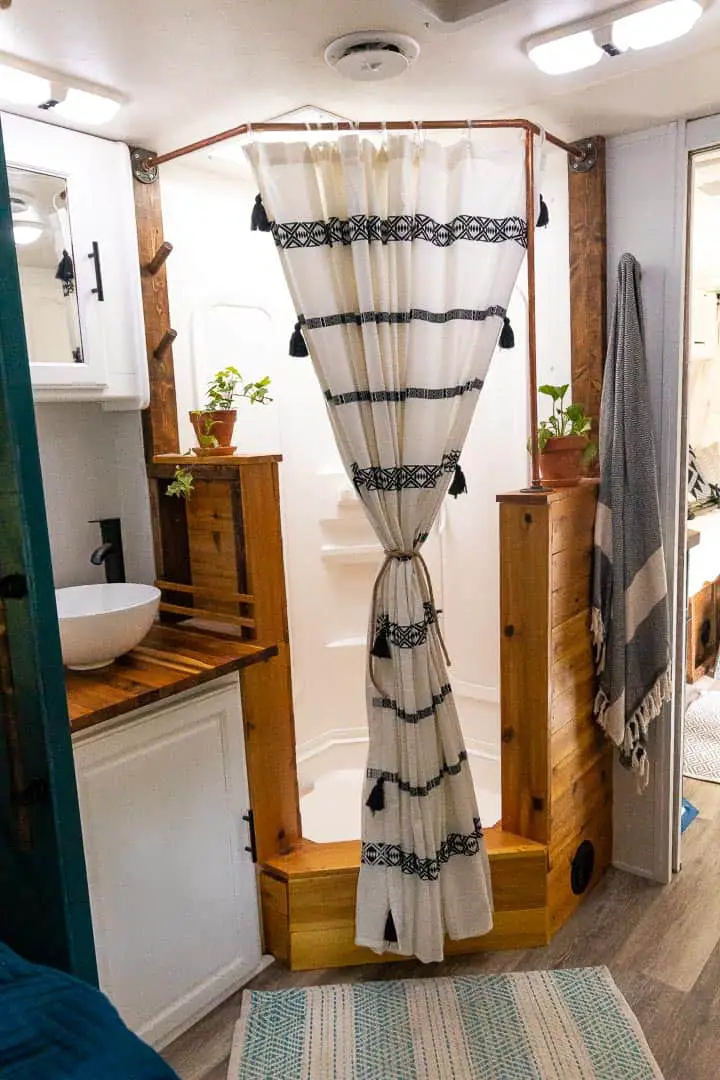
So one day we simply tore the old shower out, down to leaving just the shower shell and shower pan and built our own shower out of 2x4s and beautiful cedar wood planks. We created an industrial-looking copper shower curtain rod and sealed the wood to make it waterproof.
Swap out the showerhead for our favorite Oxygenics one and the shower transformation was just spectacular!
READ MORE: Want to build a shower like ours? Be sure to read our post on how to complete a DIY RV shower remodel!
Paint Shower shell
If you don’t want to go all the way to tearing down and rebuilding your shower a quick, easy and relatively inexpensive way to modernize your shower is simply by using this epoxy acrylic paint on the shower walls and floor.
Not only will the paint seal any existing cracks or flaws in the shower lining, but also it will add a bright eye-popping white to compliment the vent covers and walls throughout the RV.
Built a Composting Toilet
We joke about how the worst part of buying a used RV is dealing with someone else’s poop. The reality is, our toilet was broken and we always wanted a composting toilet to help extend the days that we could dry camp without having to dump our black tank.
But with all of the other projects we were taking on in this remodel we couldn’t afford any of the more popular composting toilets.
So we did a little research and learned that we could build our own composting toilet for a mere fraction of the cost and give it exactly what we want to match the rest of the design and decor within the motorhome.
This was a great decision, though it did take quite a bit of time to study, design and actually build.
Butcher Block Counter + Vessel Sink & Faucet
Another big project we knew we wanted to do from the moment we first bought our motorhome was to remove the existing counter, sink and faucet and replace it in a similar fashion as we did in the kitchen.
We cut and stained a butcher block countertop and installed a vessel sink and residential faucet to tie our remodeled shower together in the bathroom.
Toilet Paper Holder & Towel Rack
When you’ve put as much personal touch as we have into rebuilding our RV bathroom to look and function the way we wanted, simply buying standard toilet paper holders and towel racks was not going to cut it.
For these we used pieces of copper to match the industrial look of the shower curtain holder and built them to fit our exact needs. While simple, these added just enough to tie the whole bathroom remodel together.
Towel Rack dowels
One final, yet all-important, piece of our RV bathroom remodel was to build hand towel holders out of wooden dowels. This was a simple, very affordable project that allowed us to install these racks wherever we thought it would be convenient to hang towels or other bathroom accessories.
READ MORE: Get ideas and find out how we completed each step of our RV bathroom remodel in this post!
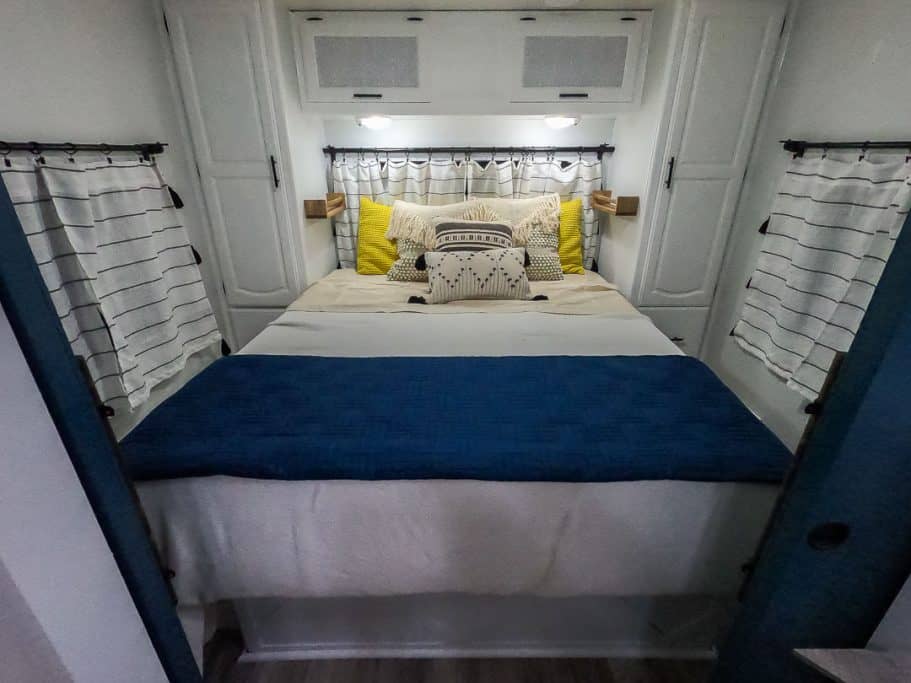
RV Bedroom Remodel
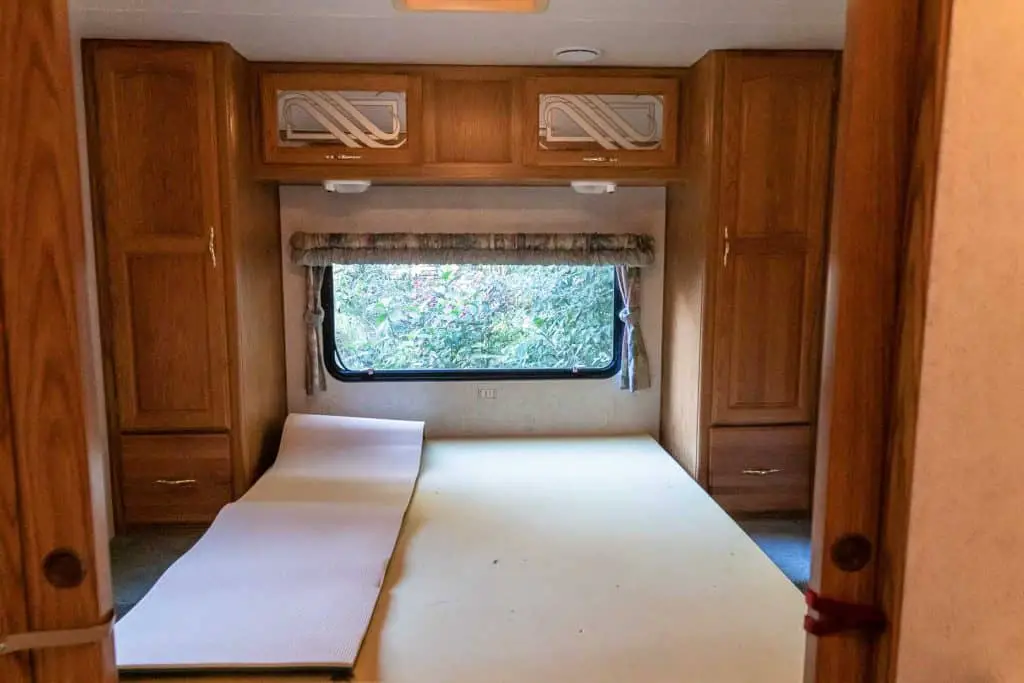
Of all of the rooms in our Class C motorhome that needed attention, our bedroom was one that didn’t need as much love. As the bed took up most of the space in the bedroom, there was very little that we could tear down or enhance in any way.
But we did find some great projects that did a lot of great things to the interior of that part of the camper.
READ MORE: See how we transformed our RV bedroom for under $1,000!
Window treatment (with blackout curtains)
Motorhomes build in the 1990s lacked a lot when it comes to design. Window treatments are no exception.
We removed the dated old blinds and valences and sewed our own curtains to cover each of the 3 windows in our bedroom. We doubled up and created blackout curtains since we wanted both to ensure privacy as well as to keep the bedroom dark at night.
Laundry chute
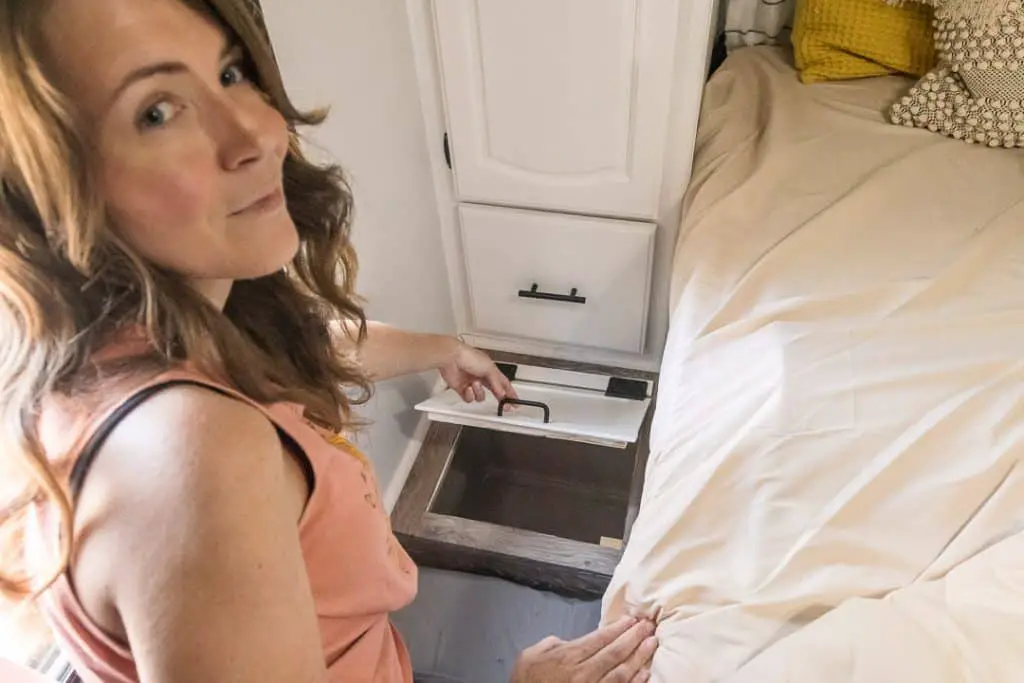
By far the most creative adaptation we’ve made to our Class C RV has been to convert an outside storage bay beneath our bedroom into a laundry chute accessible from both inside and outside.
The process was pretty simple, but can be customized depending on your wants and particular camper setup. But rather than store our dirty laundry inside we can now quickly toss in into the laundry chute where it will patiently await laundry day!
Dog bed/step/Shoe storage
One goal you should have with any remodel of an RV is to try and maximize floor space and storage. Combine this with our love of our dogs and their inability to hop 3 feet into our bed and we decided to build a custom dog bed that also acts as a step and a storage area for shoes.
Walking around the side of the bed was already difficult. So we decided that converting it to a dog bed/step/shoe storage area was far more valuable to us. Our pups could not be more pleased!
Barn Doors
One of the highlights of purchasing this particular floor plan and motorhome setup was that the bedroom was located in the rear of the RV and had a set of barn doors, rather than an accordion or sheet, separating the bedroom from the bathroom.
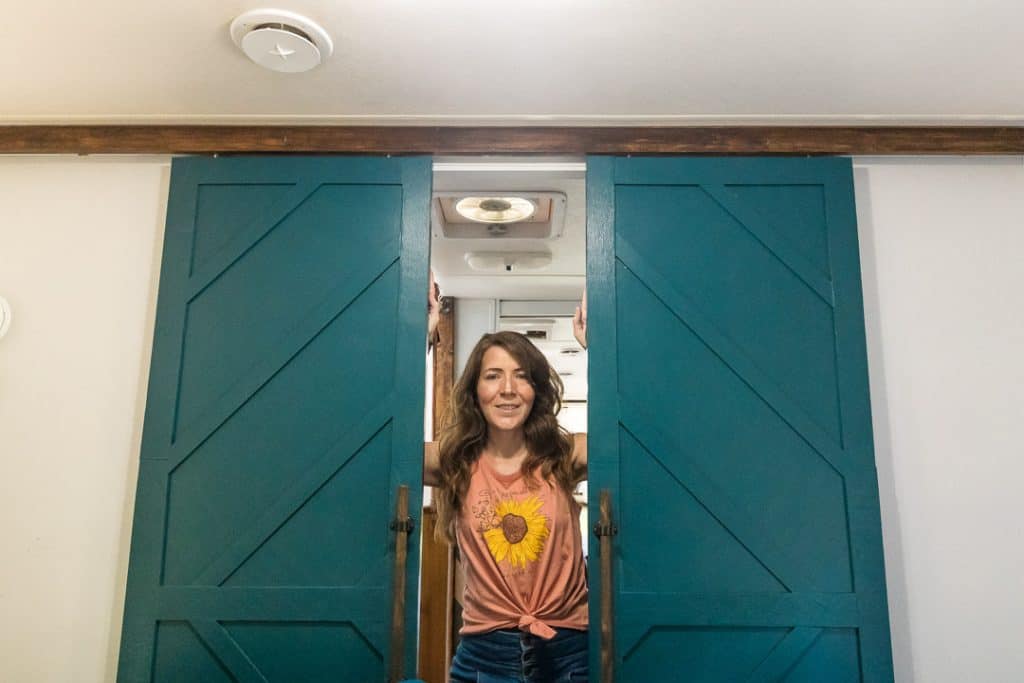
But the barn doors did not function when we purchased the RV so we decided that while we were fixing them we would spruce them up a little.
Using some wood spats and a healthy amount of liquid nails and paint we created simple designs that really make the doors stand out. We also built our own door handles and created a simple way to lock the doors in place when we’re not using them.
After seeing how transformational the barn door design was for the bedroom we decided to follow the same pattern and spruce up the front of our bed. While it does nothing for the function of the bed frame, because this part of the bed is visible through the entire RV we thought it would be a great, easy and affordable way to add a little eye-pleasing detail to the room.
The process and materials were the same that we used in the barn doors so it was a quick project to accomplish.
Roof Vent fan replacement
RV roof vent fans are imperative, especially if you enjoy boondocking. With the right airflow through the camper, you can make sleeping much more pleasant and life in general cooler.
We have always owned and loved Fantastic Fans and we knew that the existing vent fan was dated, discolored and didn’t provide the airflow we knew that we’d appreciate in the room we’d spend 8 or more hours each night.
For this swap out we upgraded to a two-way roof vent fan so we could maximize our ability to cool things off when we needed. And despite the fact we had to spend some time on the roof and the job involved basic electrical wiring, this was an easy enough remodeling task that added more comfort to our full-time RV lifestyle.
Click HERE to read about how to replace your RV roof vent fan. Or watch the video HERE.
RV Living Room Remodel
Since we knew that we would be spending most of our time in the living room area of our Class C motorhome we wanted to make sure that we put a lot of attention into really dressing the room up and giving it the look and feel you may find in any brick and mortar living room.
This would include creating a sort of open-concept space where we’d remove the carpet, dinette and couch and add vinyl flooring, plenty of gorgeous wood and custom furniture to suit our RV lifestyle.
Remove and Build Custom Couch
We build a custom slide-out sofa because as with most of our Class C Motorhome, the existing couch was quite dated and not effective for what we wanted to do with the space. We considered simply reupholstering the cushions to a more modern look that would match our other remodeling projects.
But we also realized that there was a lot of unused space beneath and around the couch. We wanted to upgrade our RV power system to move our batteries inside along with our solar controller and inverter and beneath the couch was the perfect place.
But this meant that we had to custom design and build a couch for our exact needs. While there were some great examples out there, we had to adapt and build a couch with very specific dimensions and functions.
We’ve got some great ideas to help you get started with your couch build.
NOT SURE WHERE TO BEGIN WITH YOUR RV REMODEL?
No worries! We can help you get started on your RV remodel! From offering counsel and assistance in picking out the best RV to remodel to walking you through some of the major and minor tasks you may want to complete, we offer RV remodeling consultation to suit your needs!
Rates start at $50/half hour and consultation packages can be tailored to your wants and needs!
Contact us via email to arrange an initial consultation and discuss consultation packages available!
NOTE: Due to the nature of our travel schedule, we do not offer remodeling services outside of a consultation.
Remove dinette + Add a Desk
An RV dinette is quite possibly the biggest waste of space in an RV. Sure there is functionality in having a bench with a table that converts to an additional sleeping area. But usually, a dinette sticks out so far into the living room space of an RV that you have to do all you can to avoid hitting it when you walk through.
Because we really wanted to maximize the open-concept feeling with our Class C RV remodel we knew we had to remove the dinette to make space for what we really wanted.
Fortunately, the dinette was already removed when we purchased our RV (the previous owners apologized profusely, but we were grateful it was already done for us!).
This allowed us to divide up the space to include a spacious desk, storage bins and a water dispenser station. Plus it left lots of room for us to be able to lay on the floor and stretch or work out and to slide our custom sofa out as needed.
Standing Desk
We don’t know anyone small enough to sleep in the tiny bed in the cabover space in our Class C motorhome. But we do know that working on the road is a primary goal and need of ours.
So we decided to turn the cabover bed into a standing desk. It didn’t take much. We trimmed some of the wood frame and painted it to match the rest of the RV. And we outlined sections for organizers and storage bins related to our office needs.
Now we have a standing desk that stays locked in place when we are driving but that rolls out when we want to use it. This is incredibly functional for us in not having to constantly set up and break down our workstation as we travel.
Sconce Lights
It’s redundant now to say that our 1999 Class C motorhome was quite outdated 20+ years later. But the existing candlestick light fixtures in the living room were more out of a horror movie than a beautiful remodeled RV.
So we unscrewed them from the wall, cut the wires and tossed them in favor of more modern sconce light fixtures that matched the rustic and industrial look of our remodeled RV.
Shoe Organizer Cube
We don’t give IKEA enough credit for how amazing their products are. And while we spent hours upon hours shopping ideas at our local IKEA store for how we could incorporate more IKEA products into our tiny home, we did strike upon the obvious need to build cube storage by our door to store our everyday shoes and dog toys.
While we debated the size and space they would occupy, we ultimately used some leftover butcher block counter to create a tabletop for these cubes and make them fit in perfectly with our desk, sofa and other living area decor.
Water Dispenser
We don’t drink water from our fresh water holding tank. As such we always had 5-10 gallons of drinking water available to us inside our truck camper. When we set out to remodel our Class C we had a hard time figuring out where and how to install fresh drinking water.
Then we realized that we can pretty much design and create anything we need. So we build a simple water stand that holds a 5-gallon container securely in the corner of our living room.
We keep our dog bowls and dog food container beneath it to maximize space. And we purchased an electric water dispenser to make life as easy as possible. This little design fits perfectly in the corner and completes our living room accessories.
Window treatment
Like the bedroom window treatment, we measured and sewed custom curtains to cover our two bay windows in our living room. We decided that we didn’t need to double up with blackout curtains for privacy as in our bedroom.
But we kept the consistent look throughout the RV by using the same fabric.
Separating Curtain
While we still have a vinyl cover we can place over our windshield to provide privacy at night we also wanted to have a curtain to separate our standing office/driving area from the rest of the living room.
This is aesthetically pleasing to the eye. Plus it does allow enough privacy to function as a divider to the outside world. The design and installation was incredibly simple, affordable and easy to do.
Entry Steps backsplash + mat
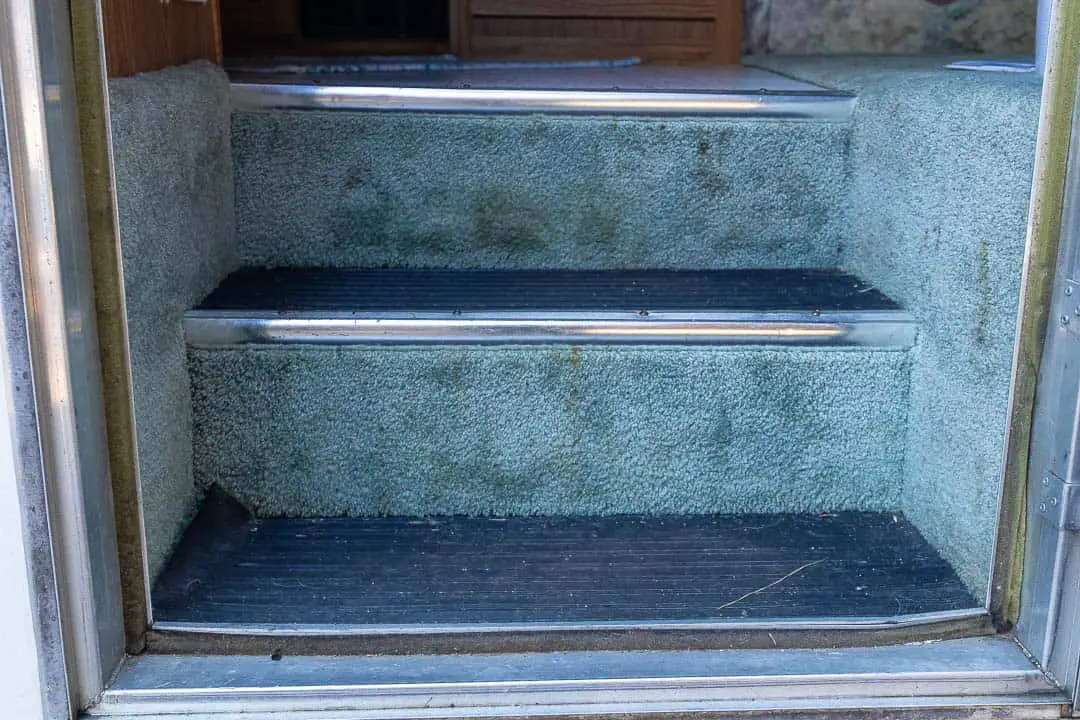
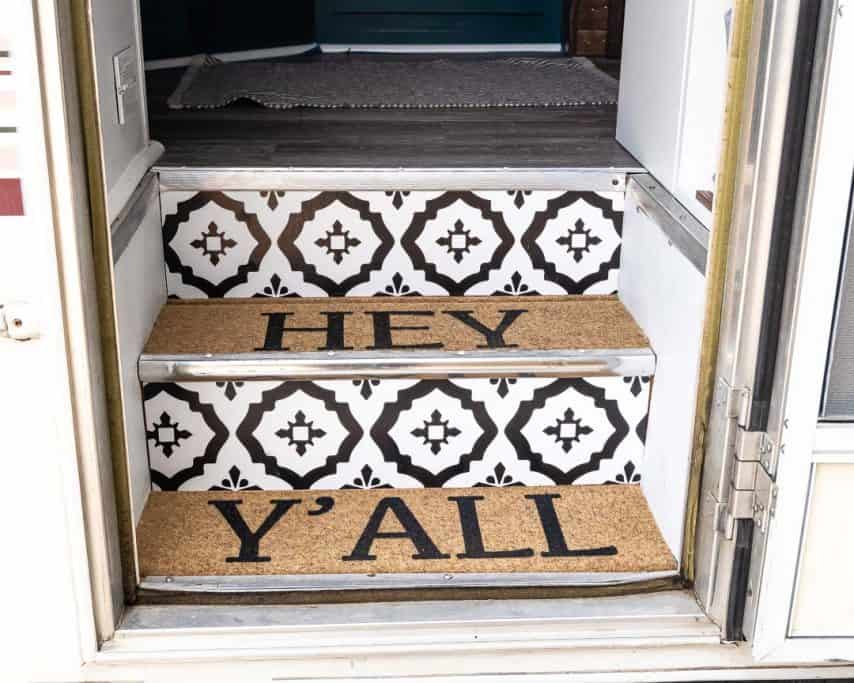
Nothing says “Welcome home” in the South like a floor mat that reads “Hey Ya’ll.” As we looked at the side entryway into our RV we realized it too needed some sprucing up.
So we got rid of an old rubber floor mat, cut a few pieces of wood, slapped on some paint, some vinyl backsplash stickers and found a floor mat with, you guessed it, the words “Hey Ya’ll” that we cut in half and secured to the doorsteps.
We thought this was a very unique way to create a warm welcome into our tiny home on wheels!
Outside the RV
We were fortunate to find such a great deal on an older RV that had no signs of water damage. Water damage, as you know or can imagine, can be a completely disqualifying feature of any used RV.
While there are certainly ways to renovate old water-damaged campers and RVs, the processes and costs are much greater and an entirely different topic full of information.
That said, we knew that we wanted to prevent any potential future water damage, replace old covers, seals and unnecessary components on the roof and siding, and refresh the look of the exterior of the RV both for appearance and for function.
Remove antennae/Fill Hole
We’ve never used an RV TV antennae and, in fact, removed in quickly from our truck camper. And upon hopping on the roof of our Class C the first time, this was the first decision we made.
Removing the antennae was relatively simple – involving removing old roof sealant and a handful of screws and cutting some wires. But doing so left a sizeable hole in the roof that extended all the way into our living room. That’s ok.
Some spray insulation, Dicor lap sealant and Eternabond tape coupled with entire roof resealing and we’re not concerned at all about the hole that once was on our roof.
Cover installs (3 fans, refrigerator, skylight)
While we replaced an entire roof vent fan in the bedroom, we also moved the old bedroom vent fan to the bathroom and removed and tossed the bathroom vent with all the other things leftover from 1999.
Knowing that we were ultimately going to reseal the roof, we wanted to replace any other vent covers that needed it in a proactive way to save time and money later.
So we ultimately replaced our shower skylight and refrigerator vent along with installing 3 roof vent covers to keep rain and other elements from coming in.
Reseal the roof
While our roof showed zero signs of active or past leaks, we could tell that the EPDM rubber was as weary as the interior decorating from the 1990s. So resealing the roof was a must when we purchased the used motorhome.
And while you can spend thousands of dollars having an old rubber roof removed and a new one stretched across, there are simple and more affordable ways to provide the same strength and durability to your roof.
Ultimately we opted to use Henry Tropi-cool roof sealant and in doing so we haven’t had a concern in the world about the condition of our roof!
READ MORE: Read our post on resealing your RV roof and add years to the life of your roof for under $500!
Seal windows and Siding
Since our roof maintenance was complete we also wanted to address issues on the sides of the RV. The first thing we did was to reseal all windows, lights and other accessories and fixtures along our fiberglass RV siding.
We used a great sealant that is easy to use and durable and made sure to not miss a single place where water may have wanted to find a way inside our RV.
Replace vinyl Trim
Along with resealing the windows and siding, we also wanted to replace the vinyl trim strips that concealed and protected screws from allowing water to enter the sides of the RV.
This was a relatively simple and affordable process that took us only a few hours to complete. Not only did it provide us with the security in knowing water would not be able to intrude through the screws on the side of our RV, but also it gave the RV a brighter, fresher look on the outside.
Replace door catches
While we were sealing the windows and replacing the vinyl strips along the outside of the Class C motorhome we decided we would also replace all door catches.
Some of the older door catches were crumbling from years in the sun and rust was getting to the others.
As they are incredibly affordable to replace, we removed the old door catches, slapped some new butyl tape beneath the new ones and anchored them in place with new screws.
clean awning And Tape Holes
We found paperwork that confirmed to us that our awning was added nearly 10 years after the RV rolled off the factory floor. But just because it was significantly younger didn’t mean that it didn’t need some TLC.
So we unrolled the awning, gave it a little bath and found that there were some places where holes and cracks were developing. But clearly, it was not used very often previously.
So we slapped on some Eternabond tape to prevent further decay and have made it a goal to try and get another year or two out of this awning before replacing the fabric.
SOLAR Panels and Power SETUP
We are boondocking junkies. So having ample power is a non-negotiable for us. In fact, having a fully functional onboard generator was one condition for whatever Class C motorhome we chose to purchase and remodel.
But adding solar power was another big investment that we knew would be well worth the upfront cost in that it would leave us worry-free camping virtually anywhere we wanted for any amount of time.
And while our setup may be a little more complex than yours if you are first getting started, a thorough solar power system is highly recommended at any stage in your RV life.
Ultimately we opted for 3 AGM batteries providing us 420 amp-hours of power along with 640 total watts of power from 4 solar panels and a 2000 watt inverter to convert the 12v power to 120V on demand.
SAVE 10% MORE when you shop directly at Renogy.com and use our coupon code “CALLEDTOWANDER” at checkout! Note: Discount does not apply to sale items or batteries.
RV Safety
While this part of our project list comes at the bottom of the post, these were certainly the FIRST things that we did to ensure that our motorhome was safe both during the time that we worked on it and in the time we would spend living in it.
These safety considerations must always be at the top of your list of things to do in either a RV renovation or remodel.
LPG Alarm replacement
Having a functional LPG alarm is necessary not only legally but also for safety and peace of mind. These alarms are almost always hard wired into the RV battery system so that they can be relied upon 24/7.
However, in used RVs, they are often misleading because they may show a green light indicating that they are functioning properly when in fact they have long since expired.
Ours was one such case in which we thought it was functional. But we tested it by releasing propane near the alarm. When it did not start screaming we immediately placed an order for a replacement LPG alarm.
Installing it was simple and we now feel comfortable knowing that we have a brand new functioning LPG alarm.
CO/Smoke Alarm replacement
Carbon Monoxide (CO) is a colorless, odorless gas that can kill you without even drawing your attention to it. CO is present in anything that combusts – whether in exhaust from your vehicle or in using your stovetop or oven.
Because CO is present in the presence of fire you can find CO and Smoke Alarm combinations that will provide the required preventative safety and peace of mind.
While there are some hard-wired CO alarms, many are battery-operated. They are very easy to install and typically twist onto a frame that is secured to the ceiling by 2-3 screws.
Knowing that our CO and smoke alarms were outdated we purchased 2 to replace the ones that were defective and missing in our Class C.
Fire extinguisher
Like LPG, CO and smoke alarms, a fire extinguisher (or multiple) are legally required in a motorhome, travel trailer and campervan. They’re also a common-sense way to prevent catastrophic loss and/or death.
But fire extinguishers are also something that many people easily overlook. Check the date on the bottom of your fire extinguisher to see how old it is and replace it (or have it professionally serviced) if it is out of date.
There are a variety of affordable options and you can’t have too many fire extinguishers in your camper or travel trailer. In remodeling our Class C motorhome we purchased new fire extinguishers for our cab, kitchen and bedroom so they are always within reach.
LP test
One very important thing to do before you turn on any propane appliance is to test it for leaks. Propane leaks are far more than inconvenient. They can be deadly.
As such we recommend that you check all of your propane connections and appliances for leaks prior to igniting anything in your RV. We trust our LP detector (“sniffer”) in every circumstance where we can reach the propane pipes.
You can also use a spray bottle filled with soapy water to search for bubbles that result from leaks. Definitely do NOT use your gas appliances until you have completed these checks.
Plumbing tests for leaks
One final check to do prior to calling your RV remodel or RV renovation complete is to test the plumbing throughout your entire water system. This can be nerve-racking.
And while we placed this at the end, it should really be done at the beginning when you have your RV torn apart and can more easily access the plumbing components in your RV. There are lots of places where a leak can start – from pipe fittings to water pumps to faucets and drains.
And since water damage is the #1 enemy for any RV owner, you’re going to want to make sure you have tested for and repaired any leaks in your plumbing.
NOT SURE WHERE TO BEGIN WITH YOUR RV REMODEL?
No worries! We can help you get started on your RV remodel! From offering counsel and assistance in picking out the best RV to remodel to walking you through some of the major and minor tasks you may want to complete, we offer RV remodeling consultation to suit your needs!
Rates start at $50/half hour and consultation packages can be tailored to your wants and needs!
Contact us via email to arrange an initial consultation and discuss consultation packages available!
NOTE: Due to the nature of our travel schedule, we do not offer remodeling services outside of a consultation.
Thank you, I have this book marked. I am jumping head first into RV life and want to remodel and lean down my RV. I have found another blog like yours that was very helpful.
My biggest concern with doing a remodel is keeping my weight down. I already have a minimalist lifestyle but also want to be able to have my various outdoor gear, like snowshoes and a mountain bike.
Thanks for taking the time to check out this post! We’ll be filling in all of the specific projects as we get them written up! Be sure to check out out YouTube channel as well as we’re releasing all of the videos on how we did every project you see! As for weight, this is always difficult. We gave up some weight in removing some things and added more back when we added some things. Definitely worth considering, but not altogether disqualifying. We don’t advise going over the manufacturer’s weight ratings, but also know that lots of remodels are done in similar fashion where weight is the last consideration. We’d definitely recommend that you invest in upgrading your tires. Even if the axles can hold the weight, if the tires aren’t rated to then that will be your real limiting factor. We put the biggest all-terrain tires on that we could fit and so far everything is going well! Keep us updated on how things go!