Last Updated on September 2, 2022 by Chris and Lindsay
Installing an RV roof vent fan is not as difficult as you may think. Whether you are replacing an existing vent fan or want to upgrade your current roof fan, we’ll help you tackle this DIY repair and save you lots of time and money in the process.
We’ve changed several RV vent fans as part of our comprehensive class C motorhome remodel. And while the task seemed daunting at first, we quickly realized that it is not as difficult as it seems. But anytime you are up against a big, gaping hole in your RV roof no doubt you will be intimidated.
Read along and we’ll share everything you need to know to be able to tackle this project and knock it out in quick time!
Affiliate Disclaimer: This post may contain links to products we think you’ll like. If you purchase any of the products through the links below we’ll receive a small commission. As full-time RVers, we know our RV products well and only recommend those that we either own or would consider owning ourselves.
NOT SURE WHERE TO BEGIN WITH YOUR RV REMODEL?
No worries! We can help you get started on your RV remodel! From offering counsel and assistance in picking out the best RV to remodel to walking you through some of the major and minor tasks you may want to complete, we offer RV remodeling consultation to suit your needs!
Rates start at $50/half hour and consultation packages can be tailored to your wants and needs!
Contact us via email to arrange an initial consultation and discuss consultation packages available!
NOTE: Due to the nature of our travel schedule, we do not offer remodeling services outside of a consultation.
Installing an RV Vent Fan
Before we get into the work of showing you how to install an RV vent fan we need to quickly cover two important parts of the job. First, you have to pick the best vent fan for your recreational vehicle.
Second, you’ll need to gather the supplies you need to do the job without having to stop in the middle. So let’s cover these two things and get you on your roof getting the job started!

Which RV Roof Vent Fan is Right For You?
The first thing you’ll want to consider before you replace or upgrade your vent fan is which fan to install. We recommend either one of two of the most popular vent fans for campervans, RVs and travel trailers alike.

We are huge fans of the value found in this Fan-Tastic vent fan. The best overall fan in our opinion provides you all the airflow you need at less cost.
This easy-to-install RV roof fan fits all standard RV roof vent openings so it is a perfect replacement or upgrade to your existing fan.
It quietly cycles through three speeds and will always keep your RV breezy.
Make sure to pair this three-speed fan with the right RV rain cover to keep your RV dry and the air circulating no matter the weather.
For everyday use, the Fan-Tastic vent is the best overall roof vent fan for keeping cool inside your RV or camper.

The Maxxair rooftop vent fan is the gold standard for airflow in the recreational vehicle place. The most expensive fan on your options, it provides high airflow at a low profile to be a favorite choice for a variety of reasons.
With ten different fan speeds, there is a setting that works for all occasions. This Maxxfan deluxe has taken care of all the details for you.
The fan also includes a remote control that allows you to switch up the fan speeds from anywhere. And it doesn’t need a separate vent cover as it also works as its own rain shield.
The RV vent fan comes with a solid 2-year warranty to safeguard your investment and make sure you can focus on fresh air.
You can’t go wrong with either of these fans. We’ve always gone with the Fan-Tastic fan because we’ve found that we didn’t need the extra speeds and remote control.
But there are good savings to be had by not needing a separate vent cover if you opt to go with the Maxxair vent fan.
You should note that either option is going to fit snugly in the space where you are replacing your old vent fan as manufacturers across the industry make them to fit the standard 14″ x 14″ hole.
READ MORE: If you are interested in other options check out THIS POST on all of the best RV roof vent fans on the market.
Tools and Materials You’ll Need to Install an RV Vent Fan
Now that you’ve decided which vent fan to install let’s quickly cover the tools you will need to replace the RV vent fan on your roof. Most of these items are standard to what we would recommend that you include in your RV toolkit.
But you may find that you need to track a few items down.

Handheld Paint Scraper
This metal paint scraper will come in handy to assist in removing the old roof sealant and butyl tape from your roof once you remove the old vent fan. Be careful using the metal scraper on the roof such that you don’t rip holes into the roof.

Plastic Putty Knife
In addition to the metal paint scraper, you will also find a plastic putty knife will be helpful in more delicately removing the old roof sealant and butyl tape. We recommend having both on hand to use each whenever you find it fit.

Wire Cutter/Crimper
You won’t need to do major electrical work to complete this job. But you will need to both cut old wires and crimp new wires in order to replace the vent fan in your RV. This tool achieves both for you.

Butyl Tape
Butyl tape is your friend when it comes to doing this job right. You won’t need much. But you will need enough to cover each side of the 14″ x 14″ vent space.

Dicor Lap Sealant
Anytime you put a screw in your RV roof you want to have this lap sealant around. So not only will it help with replacing a RV roof vent, but also it will be helpful with general roof maintenance.

Eternabond Tape
Eternabond tape is a revolutionary way to preserve the integrity of your roof. It works as an emergency tape to cover up existing roof leaks. But it also seals the job you’re about to do in swapping our your roof vent.
In addition to these items, you’ll also want to have an impact driver with a Phillips head bit and/or a Phillips head screwdriver. A flathead screwdriver may also come in handy as you’ll pry the old vent from its place on the roof.
You may also need several butt connectors sized to the gauge wire you will be working with (likely 12-16 gauge).
How To Install an RV Roof Vent – Easy DIY Guide
That’s it! Now that you have everything you need it’s time to get into the matter of actually installing an RV vent cover on your roof. So let’s go through this step by step.
Step 1: Remove inside cover
Before you hop on the roof, you’ll want to remove the vent cover inside your RV or campervan. These tend to be brittle plastic pieces that can crack easily, especially with age.
If you’re really in the mood to make a change inside your RV, plan to paint this fan cover while it’s down from the ceiling.
STEP 2: Disconnect wires
Once the cover is removed on the inside you should be able to disconnect the wires to your existing roof vent fan. This will save you a trip up and down the roof later if you do this now.
NOTE: Disconnect or turn off your battery at the battery switch before you cut any wires. While this is only a 12-volt appliance it can still be harmful.
STEP 3: Remove old sealant
Next, you can hop up on the roof and get started on what we think is the hardest part of the job. For this step you’re going to want to use either/or/both the metal paint scraper and the plastic putty knife to scrape up the old roof sealant around the existing vent fan.
Depending on the age of the sealant, this may be a long and difficult task. Be mindful not to tear the rubber roof of your RV.
But know that in the event you do cause a tear or rip you will reseal the roof by the end of the job so it is not the end of the world.

STEP 4: Remove screws From the Vent Fan
Now that the old sealant is removed you should be able to see the existing screws that are securing the RV vent fan to the roof. There is likely to be up to 4 screws per side so be mindful to unscrew them all before the next step.
Also, be careful to back the screws. Take notice of whether there is any rust on the screws or if the wood around the vent is soft as this would indicate water damage you would need to address.
STEP 5: Pry fan up out of roof
Using the metal paint scraper or a flathead screwdriver, pry the old fan gently from the roof. Since you already cut the wires inside the RV the fan should eventually work its way loose.
There is a good chance that the existing butyl tape will be sticky between the fan and the roof so continue to apply pressure prying the fan out. Once it is removed you can set it to the side.
STEP 6: Clean The roof
Depending on how well the existing butyl tape came off with the old fan, you may need to go back over the area on the roof beneath the fan.
While this isn’t absolutely necessary, it is best practice to ensure that the new RV vent fan will fit properly and flush on the roof to prevent future leaks. Use your scrapers to clean the roof.
If you are an overachiever you can use mineral spirits dabbed on a rag to thoroughly clean the rubber.

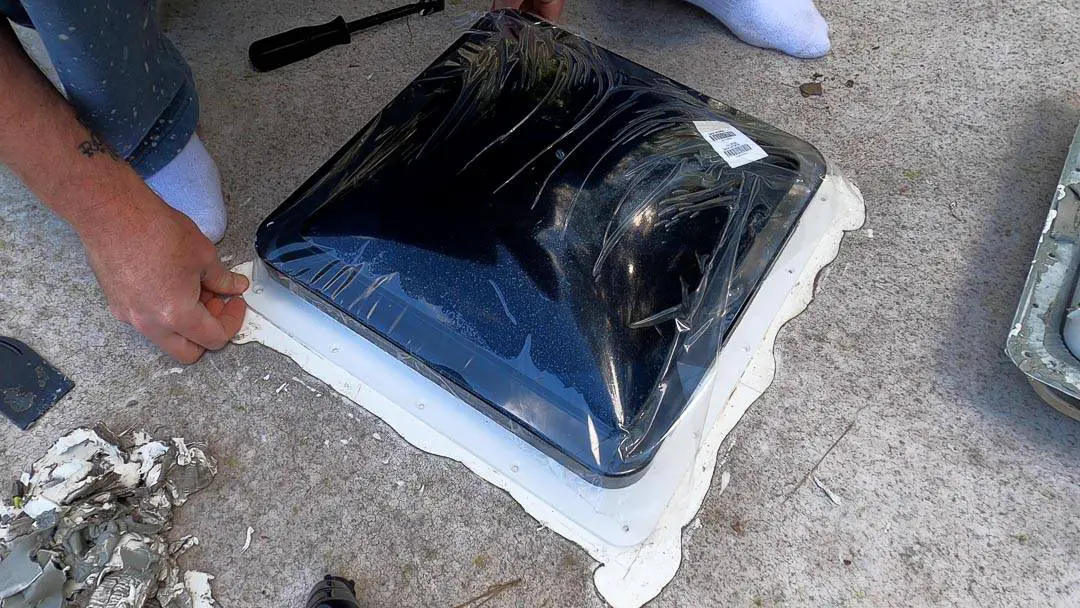
STEP 7: Put new fan in to test the fit
Before you commit to installing a new RV vent fan you want to make sure that it fits properly. Most RV manufacturers keep to accurately measuring and cutting the 14″ x 14″ hole.
But you do want to make sure the new RV vent fan fits as well or better than the old one. At this step, also be sure to align it correctly such that it opens to the rear.
STEP 8: Line The New Vent Fan with butyl tape
Now that you know that the new vent fan will fit you can take it out of the hole, flip it over and press strips of butyl tape to the bottom frame.
Be sure to cover the entire underside of the fan with butyl tape as the tape will create the waterproof seal between the fan and the roof that will prevent water from damaging your RV.
Butyl tape is your friend in this step. Be generous, but try to make sure it is applied evenly and is not too much thicker in one place than another so the new vent fan lays down evenly on the roof.

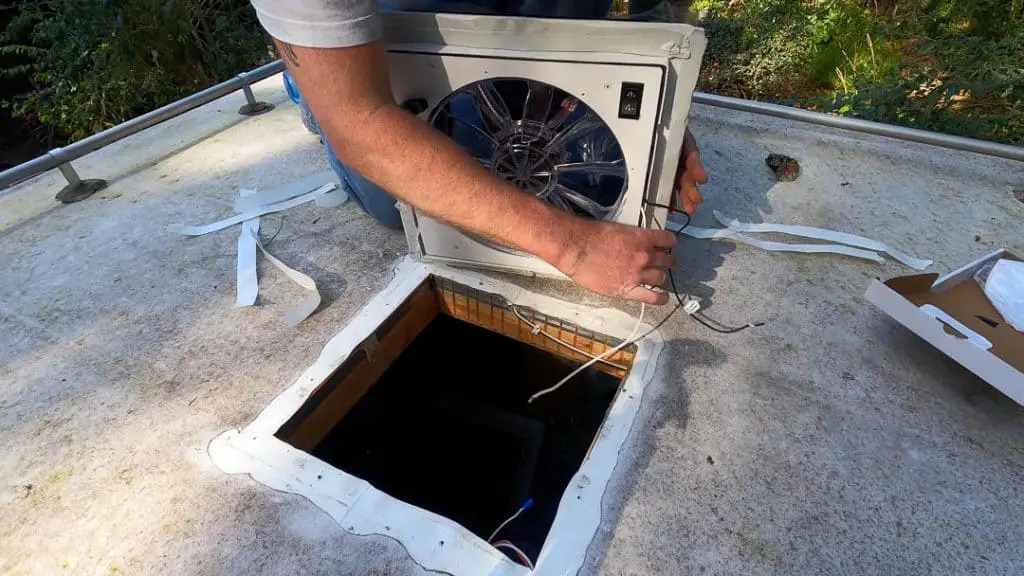
STEP 9: Place the New RV Roof Vent in The roof
With the butyl tape in place, lay the new vent fan into the roof hole as you previously tested. Be sure that it is oriented correctly so that the cover opens to the rear.
This will be important when you install the vent cover (if you need to) or with the aerodynamics of the fan itself (if you opt for the Maxxair roof vent fan).
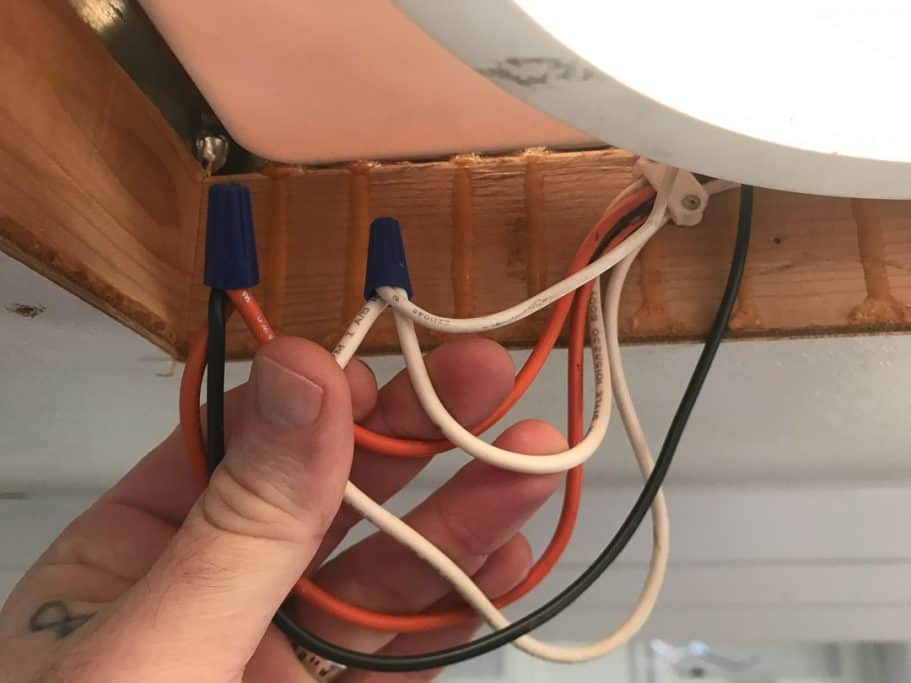
STEP 10: Rewire The fan & Test It
Now you’re going to want to get down off the roof and return inside the RV so that you can connect the wires to your new RV vent fan. Hopefully, the wires are colored correctly and the new fan wires match the existing RV wires.
But to be safe you can check the polarity of the wires to ensure that you are in fact connecting the positive wires and negative wires correctly. Once you have established the correct wires go ahead and use a butt connector to connect the positive wires to each other and the negative wires to each other.
Reconnect the battery and test the fan before you tuck any wires away or screw anything back in place.
STEP 11: Screw the new Vent Fan In Place
Once you have ensured that the new vent fan is wired correctly and works as it should, hop back on the roof and screw the new vent fan in place. Note that you may want to use slightly thicker screws than the ones you took out if the screw holes line up.
This will allow the thicker screw to thread more solidly into the roof. Otherwise, the old screws may have stripped the wood when you removed them, thus making it more likely water could eventually sneak in.
We also recommend that you alternate the sides of the fan that you screw first to have a more even seal (similarly to tightening the lug nuts when changing a tire).
You should gently tighten the screws and see a small amount of butyl tape begin to squeeze out of the side. Be careful not to overtighten. If the new fan is plastic then the plastic may crack.

STEP 12: Cover with lap sealant
The butyl tape should create a reliable seal between the fan and the roof. But it is always best practice to put a dab of self-leveling Dicor Lap Sealant on top of each screw on the fan.
You also want to put a line of lap sealant along the outside edge of the new vent fan where the cover meets the roof. Don’t skimp on the sealant.
More is better in this case as you don’t want to ever have to think about sealing this fan again on the roof. You can gather up your tools now as you are done on the roof for this part of the job today.

STEP 13: Replace inside cover
Now that the new vent fan is installed on the roof and securely covered with lap sealant you can head back inside to put the inside cover back in place.
Be sure to tuck the wires as necessary in a secure way so they are not damaged or come detached in the process. Again, be careful tightening the screws in place slowly so that you don’t crack the vent cover.
STEP 14: Return to roof and add eternabond tape (OPTIONAL)
Wait one or two days to allow the Dicor Lap Sealant to dry. Then return to the roof with your eternabond tape, a scrap piece of wood on which to cut the tape and a box cutter.
Put your finger on the sealant to ensure that it is thoroughly dry. Then cut strips of eternabond tape and lay them over all 4 sides of the RV vent fan install.
Be sure to cover the screws and the seam where the edge of the fan cover meets the roof. We recommend using 4″ eternabond tape for this reason as 4″ should cover more than enough space on the roof.
Press the eternabond tape into place using your fingers or the edge of a credit card or putty knife to ensure it is flush against the roof. The edges of the tape should not peel up.
But if you would like, add another line of Dicor Lap Sealant along the edges of the eternabond to create a seal that is all but guaranteed not to leak.

STEP 15: Re-Install the Vent Fan Cover
Once you put the eternabond tape in place or are content with the Dicor Lap Sealant being dry, you can reinstall your vent fan cover. Of course, if you opted for the Maxxair fan you won’t need an additional cover.
But if you do have to put the cover back in place you can rest assured that the fan is secure and watertight and the cover will allow you to enjoy using your fan even in inclement weather.

Wrapping Up Your RV Roof Vent Fan Installation
That’s it! While most of the job can be done in a matter of an hour or two in one day, adding the eternabond is a great step to ensure that the job is done correctly.
Of course, this will make it more difficult to swap out vent fans in the future, which is why we recommend that you think through which fan is best for you before you install it.
But if you follow these procedures for installing an RV vent fan on your roof then we think you’ll enjoy the comfort of the endless breeze and the peace of mind of knowing that your roof will not leak from the vent fan.
You can apply this process to other vent fans, roof appliances and covers in addition to the RV roof vent fan install as the principles are the same. Let us know how it goes for you and if you learn anything new in the process!
NOT SURE WHERE TO BEGIN WITH YOUR RV REMODEL?
No worries! We can help you get started on your RV remodel! From offering counsel and assistance in picking out the best RV to remodel to walking you through some of the major and minor tasks you may want to complete, we offer RV remodeling consultation to suit your needs!
Rates start at $50/half hour and consultation packages can be tailored to your wants and needs!
Contact us via email to arrange an initial consultation and discuss consultation packages available!
NOTE: Due to the nature of our travel schedule, we do not offer remodeling services outside of a consultation.