Last Updated on September 2, 2022 by Chris and Lindsay
While it may seem easy, learning how to paint RV walls inside your camper, motorhome, trailer or campervan is essential to saving time and money and not making a mess of everything in your RV.
Painting the interior walls of your RV is one of the best ways to change the entire look and feel of your motorhome or trailer when you are doing an RV remodel.
As part of our complete remodel of our 30 foot 1999 Shasta Cheyenne Class C RV we painted the walls, cabinets and doors and couldn’t be happier with the results.
But painting the walls is not an easy task. And while you could do a decent job with just one or two days of effort, we wanted to entirely transform our RV so we painted the cabinets and doors in addition to the walls.
In this post, we’ll share with you how to paint RV walls and cabinets, the tools and materials you will need and the tips and tricks we learned along the way. We hope we can inspire you and provide the information and ideas you need for painting RV walls.
So let’s get started!
NOT SURE WHERE TO BEGIN WITH YOUR RV REMODEL?
No worries! We can help you get started on your RV remodel! From offering counsel and assistance in picking out the best RV to remodel to walking you through some of the major and minor tasks you may want to complete, we offer RV remodeling consultation to suit your needs!
Rates start at $50/half hour and consultation packages can be tailored to your wants and needs!
Contact us via email to arrange an initial consultation and discuss consultation packages available!
NOTE: Due to the nature of our travel schedule, we do not offer remodeling services outside of a consultation.
How to Paint RV Walls in the Interior of Your RV
There are four key processes that will be repeated throughout the entire RV painting project. You’ll want to understand both the importance of each process as well as how to complete each one. We’ll share more details on each along the way.
- Prepare for paint (remove cabinets, blinds, valences and other obstructions)
- Sand (using liquid sandpaper)
- Prime (using Kilz or Gripper primer)
- Paint (using the paint of your choice, recommended two coats)
There are also a handful of tools and supplies that you will need as well as several key processes you will need to become familiar with, particularly if this is the first time you are tackling such a big project.
Tools & Supplies:
| Screw gun | Primer (1-2 gallons Kilz or Gripper Primer) |
| Painter’s Tape | Paintbrushes for cutting edges x 2 |
| Plastic drop cloth | ¾” Roller |
| Liquid Sandpaper | Handheld roller |
| Old cloth/Rag | Roller paint tray x 2 |
| Small paint container | Paint of your choice |
1) Preparing the RV for paint
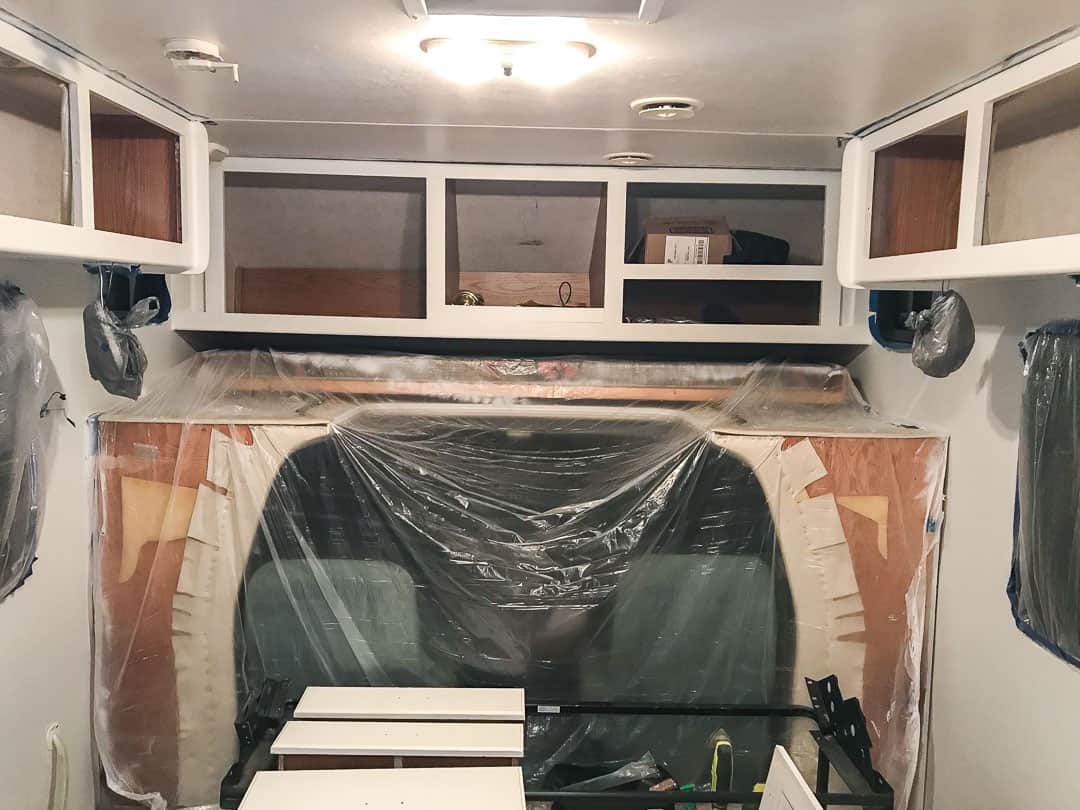
We call this “demo day” and this can be an exciting part of the painting process. Whether you are doing an entire RV remodel or just want to paint the walls, you’re going to need to prepare for the painting process by removing obstructions from the walls.
During this stage, you will get rid of cabinet doors, blinds, valences and power outlet covers and switches. You’ll also want to cover things you don’t want the paint to reach using plastic and painter’s tape.
It’s not a glamorous stage. But before you can get started on painting the walls you need to make sure you protect everything else from accidental drips and drops.
Note: Because we were remodeling our entire RV we did a lot of demo and were not as concerned about spills and drips on the floor as we painted because we intended to remove our carpet and vinyl flooring.
2) Sanding (Using Liquid Sandpaper)
RV interior walls tend to have a vinyl wallpaper that is not only ugly but also tends to be difficult to work with. Traditional sanding isn’t always possible, or advisable, but it is still important to clean the walls before sanding.

Liquid sandpaper is a fantastic way to save time and energy and keep your camper tidy and free of debris from traditional sandpaper.
This is an important step both to clean the walls but also to prepare them for paint and primer.
Use the liquid sandpaper liberally such that the rag is quite moist. Work the liquid sandpaper into the wallpaper in a circular motion (like Karate Kid). You will start to see and feel the abrasion to the surface that you want to enable the new primer to coat and stick evenly to it.
While liquid sandpaper fumes are not overly obnoxious or dangerous, it is still best to proceed with good ventilation. You will only need one coat but you may find you want to apply a second coat just to ensure a quality job.
An Alternative Option: You could lightly sand any surface and then clean the surface using TSP prior to applying primer. TSP will remove dust and debris including any residue to allow the primer to stick to it better. But note that you will have to wash TSP off the surface as well.
3) Applying Primer

The purpose of a primer is to paint an old surface with a blank white coat that will then hold new paint. By sanding and priming old walls you prevent splotches and areas where old paint may show through the new paint.
Because an RV is a small space in which you will live you may opt for an odorless primer. There are oil-based primers you can use but they are highly obnoxious especially in small spaces.
You can pour the primer into a small container when trimming areas with a paintbrush.
And for rolling you will want to pour the primer into a paint roller tray before using the roller. Apply liberally but be sure to return to places to touch up any areas where there may be drips.
We’re big fans of Kilz bonding primer. But Gripper primer is also a popular choice.
Note that Gripper primer and bonding primer claim that you do not need to necessarily sand the walls before painting. But we recommend using liquid sandpaper anyway as it is relatively inexpensive and is quick and easy to apply.
4) Painting
Painting the walls and cabinets in your RV is easy once you have taped off areas you wish to prevent paint from getting on.
Like primer application, pour the paint into a small container to trim with a paintbrush and pour the paint into a paint roller tray when rolling larger surfaces.
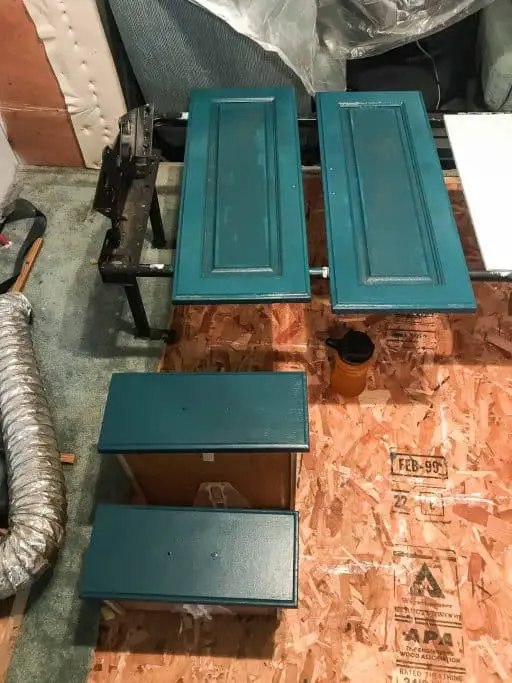
We incorporated 3 colors of paint throughout our camper.
- Walls – Light grey eggshell finish
- Cabinets – White satin finish
- Kitchen Cabinets – Dark teal satin finish
Note on our paint selection: We opted to use Heirloom Traditions brand paint, which can be pricey. But this paint doesn’t require preparation such as sanding and priming, is self-leveling and has a special sealer built into it to give it a nice finish.
Notes On Using a Paint Spray Gun
If you do a good job of taping areas you want to prevent primer and paint from reaching then you could save time by using a paint spray gun to apply the primer and paint.
Keep in mind that each spray gun is different and has varying benefits. But note that anytime you use a paint gun there is a learning curve. You may need to dilute or cut the primer or paint with water.
But each time you do this you must be careful to create the same consistency such that the applications to the surfaces are the same.
Additionally, you will want to be aware of settings and angles as paint guns are designed to apply paint in either a horizontal or vertical orientation depending on the application.
We used a paint gun of mediocre quality and did not like how uneven we applied the primer and paint. As such we chose to instead paint a second coat by hand using a paintbrush and roller.
How to Paint Your RV Interior – Walls, Cabinets & Doors

When you take on the task of painting the entire inside of your RV you will have several stages of completion on which to focus. Completing these will take time and quite a bit of elbow grease.
But they will pay dividends in transforming your motorhome, camper or trailer into a new creation that looks like it rolled off the RV dealer’s lot in 2021.
Tips for Painting RV Walls
The first task you will want to complete is the largest – that is to paint the RV walls. Typically you will want a light color, such as white or a light grey, as this will open up the small space quite a bit.
Keep in mind that depending on the size of your RV and the amount of wall space you have, this may take several days to a week to complete.
But it is the foundation for all of the interior painting that you will do in your RV.
Here are the steps you’ll want to follow when painting your RV walls.
(1) Prep: Remove doors, cabinets, outlet covers, and light fixtures hinges and hardware using a screwdriver and/or impact driver. Tape plastic drop cloth to cover windows, roof, cabinets, shower, counters, bed, etc using painter’s tape. Apply tape anywhere you want to prevent primer or paint from touching. Tape plastic bags around hanging light fixtures.
(2) Sand: If using liquid sandpaper, dip the cloth in liquid sandpaper and scrub the walls with the cloth. Repeat a second coat if desired. If sanding traditionally, be sure to clean the surface before applying primer.
(3) Prime: Prime the walls by pouring the primer of your choice into a small handheld container. Cut the sides, corners and ceiling using a paintbrush. Pour the paint into a roller paint tray and roll the larger areas with a ¾” roller. Alternatively, you can use a paint spray gun if you are familiar with how to use one. Repeat for two coats if desired.
(4) Paint: Paint the walls by starting with cutting in from the sides, corners and ceilings using a paintbrush. Pour the paint into a roller paint tray and roll the larger areas with a ¾” roller. Alternatively, you can use a paint spray gun if you are familiar with how to use one. Repeat for two coats if desired.
Additional Tips:
** Be sure to clean each brush daily/when finished or place it in a plastic bag and into the refrigerator for no more than 2-3 days. Place rollers in plastic bags and into the refrigerator likewise. You may reuse these when you paint the other parts of your RV interior.
** Leave the plastic drop cloth over windows and counters for now. But you can remove it from any cabinets or other areas you will paint next.
Tips for Painting RV Cabinets
Now that the walls are painted you will move on to the cabinets. Depending on the size, location and position of your cabinets you may want to use different colors of paint for each.
Clearly, this is a personal choice. We prefer light colors for the wall and a slightly darker color – a light grey shade – for the higher cabinets.
In our kitchen, we opted for our favorite shade of teal. Regardless, the contrast with the walls helps to define the living space in your RV.
Here are the steps you’ll want to follow to paint your RV cabinets.
(1) Prep: Remove any plastic drop cloth and/or tape that was used to prevent wall paint from getting on the cabinets. Tape recently painted walls to prevent cabinet paint from getting on the walls.
(2) Sand: Sand the cabinets.
(3) Prime: Prime the cabinets.
(4) Paint: the cabinets with the color of your choice. Note that a second color will provide a great contrast for the cabinets against the wall. Apply a second coat if desired.
Once dry, remove all plastic drop cloth and painter’s tape.
Tips for Painting RV Cabinet Doors
The last thing you will want to paint in your RV interior is the actual cabinets and doors you removed earlier in the process. Depending on your color palette and interior decorating preferences, you may opt to be bold with these colors to contrast the walls and cabinets.
Or you may want to stick with the same color for the cabinet doors as you did with the cabinets themselves.
Regardless of your choice in paint color, these are the steps you’ll want to follow when painting the cabinets and doors.
(1) Prep: Remove hardware from cabinet doors including hinges, struts, locks and pulls.
(2) Sand: Sand the front surfaces
(3) Prime: Prime the front surfaces using a primer of your choice, and a paintbrush and/or roller. Let dry and prime the other side if desired. Apply a second coat if desired.
(4) Paint: Paint the front surface using the paint of your choice. Use a brush and/or roller to paint the front. Let dry and paint the other side if desired. Apply a second coat if desired.
Once dry, replace the hardware on cabinet doors. Consider replacing old pulls if desired. Also, reinstall cabinets and doors with screws. Secure struts and locks.
Additional Tips:
** Using a third paint color for the cabinet doors brings a contrast to the living space.
** Replacing the existing pull handles can provide an instant update to the style and decor inside the camper.
Other Tips and Tricks for Painting Your RV Interior
We knew that painting our RV interior was going to be a mess. So we planned to use plastic drop cloths throughout the RV to cover places we wanted to prevent paint from accidentally reaching.
However, we also planned to gut most of our RV interior. So we were not concerned about getting paint on the floors or counters as we were going to replace the carpet flooring with vinyl plank flooring and the counters with butcher block countertops.
Additionally, because painting is a top-down project, meaning you will be making a mess in the higher parts of your camper before the lower parts, we recommend that you consider painting your RV interior in the first stages of your RV remodel.
Good luck and enjoy!
NOT SURE WHERE TO BEGIN WITH YOUR RV REMODEL?
No worries! We can help you get started on your RV remodel! From offering counsel and assistance in picking out the best RV to remodel to walking you through some of the major and minor tasks you may want to complete, we offer RV remodeling consultation to suit your needs!
Rates start at $50/half hour and consultation packages can be tailored to your wants and needs!
Contact us via email to arrange an initial consultation and discuss consultation packages available!
NOTE: Due to the nature of our travel schedule, we do not offer remodeling services outside of a consultation.
Why didn’t you liquid sandpaper the cabinets instead or traditional?
We used liquid sandpaper for all sanding inside the RV – walls, cabinets, doors. We thought we made that clear for each project that required sanding. Liquid sandpaper does not create the mess that traditional sanding does, nor does it require us to wear a mask to avoid irritation from particles. You can easily scrub corners and hard to sand places with liquid sandpaper that would otherwise require special shapes/sizes of sanders and sand paper. And it is safe for use indoors with no obnoxious or toxic fumes. Hope this helps!