Last Updated on September 2, 2022 by Chris and Lindsay
If you want to know to install vinyl plank flooring for RV, travel trailer, van or motorhome remodel we’ll walk you through the parts and process in this post to give you the confidence and understanding to complete the job!
Next to painting your RV interior, installing vinyl plank flooring in your RV is the biggest addition you can make in your overall RV remodel. RV owners of all sorts will tell you that adding a new floor is a DIY project suitable for people at any skill level in working with their hands.
Vinyl plank flooring is the perfect blend of function and form in your RV and is one of the best flooring options. From a functional standpoint, most vinyl plank flooring is waterproof, or at least water-resistant and is very low maintenance.
We’d recommend you splurge on the waterproof flooring if you can afford it. But water-resistant is better than old tiles or carpet which can lead to water damage.
It is also hardy and can take the beating that comes from normal wear and tear as well as puppy paws, spills and other potential damages. Vinyl plank flooring is a great flooring choice because it is more durable than peel and stick vinyl flooring material and much better than gross carpet that comes standard with most used RVs.
It also looks incredible inside your RV – whether you choose to paint the walls and cabinets or not. Typically your vinyl flooring will be a darker color that contrasts with the lighter colors of your walls. But you may have other ideas in mind to give your motorhome, camper or trailer a flooring overhaul.
Vinyl plank flooring in your RV is also relatively easy to install and only takes a few tools to get the job done. You don’t have to have much strength, knowledge or experience with working with your hands to install your own vinyl RV flooring.
In this post we share the tools and materials you’ll need, explain the process you’ll follow and let you in on some tips and tricks to help you complete your RV flooring project.
Although there will be some challenging aspects of installing your RV plank floor, you’re going to really appreciate the fact that you did it!
Affiliate Disclaimer: This post may contain links to products we think you’ll like. If you purchase any of the products through the links below we’ll receive a small commission. As full-time RVers, we know our RV products well and only recommend those that we either own or would consider owning ourselves.
NOT SURE WHERE TO BEGIN WITH YOUR RV REMODEL?
No worries! We can help you get started on your RV remodel! From offering counsel and assistance in picking out the best RV to remodel to walking you through some of the major and minor tasks you may want to complete, we offer RV remodeling consultation to suit your needs!
Rates start at $50/half hour and consultation packages can be tailored to your wants and needs!
Contact us via email to arrange an initial consultation and discuss consultation packages available!
NOTE: Due to the nature of our travel schedule, we do not offer remodeling services outside of a consultation.
How to Install Vinyl Plank Flooring for RV
In this section, we break down the tools and materials you need as well as how to install vinyl plank flooring in your RV.
Tools & Materials:
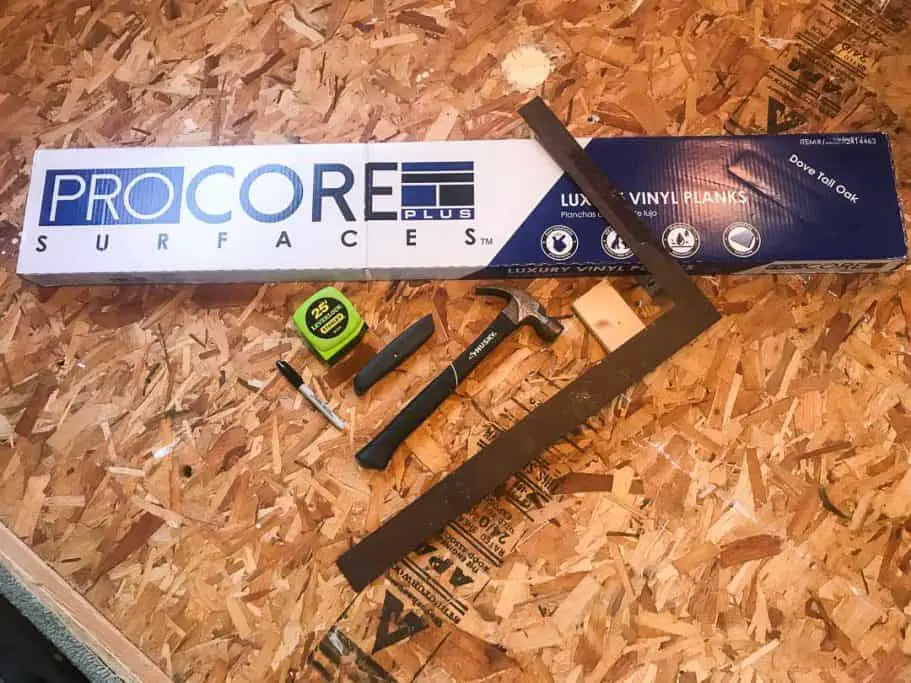
Of all of the flooring options for an RV, vinyl floors are the most suitable for DIY installation, particularly done on a budget. You likely have most of these tools already. If not, they’re fairly inexpensive.
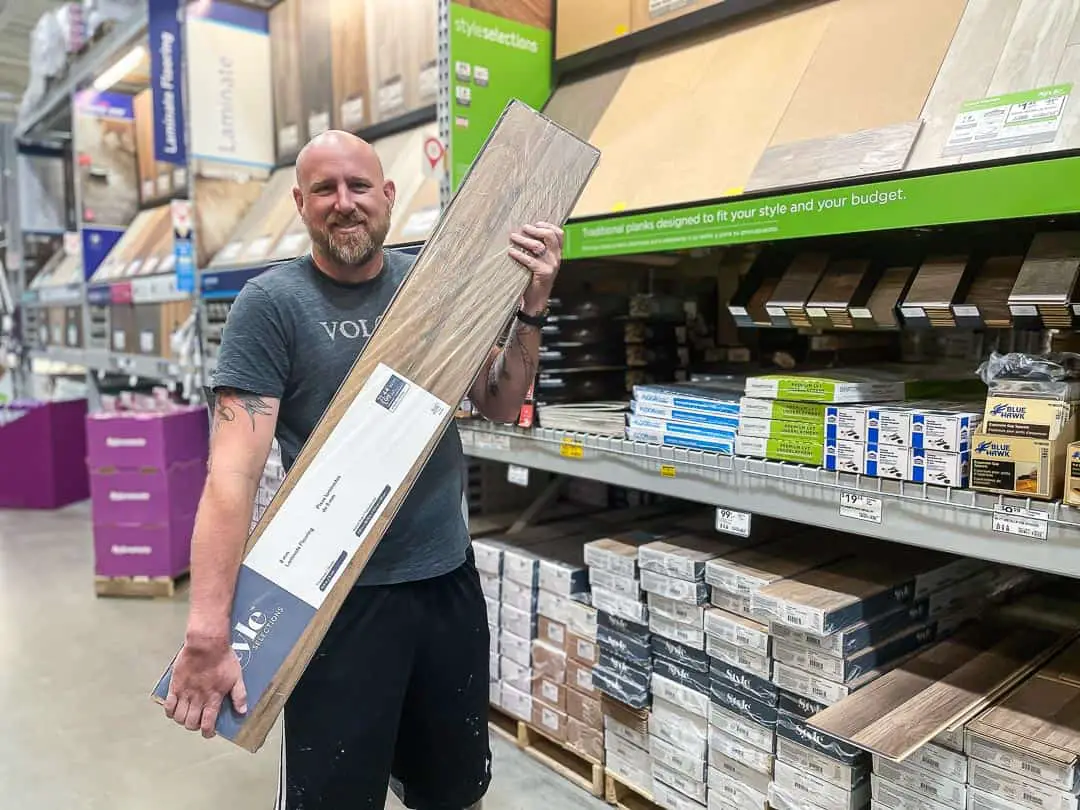
- Vinyl plank flooring (select from your favorite home improvement store)
- Tape measure
- Carpenter’s square or triangle square
- Sharpie marker
- Utility knife or vinyl floor cutter
- Scrap piece of wood (2×4 or 1×4 that is 6 -12″ is ideal)
- Hammer
- Pliers or Channel Locks
- Trim
- Nail gun + nails
| PRODUCT | QTY | PRICE | COST |
| Vinyl Plank Flooring | 5 | $53.20 | $266.00 |
| Threshold – Edging Trim | 1 | $14.98 | $14.98 |
| Floor Trim | 5 | $7.48 | $37.40 |
| $318.38 |
How to cut vinyl plank flooring
The process of cutting vinyl plank flooring for your RV is relatively simple, easy and safe. You can do so with one of two basic tools that make the job easier from the start.
Here are the two methods you can use to cut your RV flooring to size.
Utility Knife or Box Cutter
Most vinyl plank flooring can be scored with a utility knife or box cutter. This means that you can run the blade along the plank several times until you create a ridge in it. It is then able to be bent and snapped along the score.
For this step, a great idea is that you position a spare 2×4 wood block beneath each section of the flooring and then either press down with your body weight or gently tap it with a hammer to force it to snap along the score. Use the utility knife to clean up the cut and separate any of the backing membrane.
For narrow or angled cuts you can also use Channel Locks to grip the flooring and carefully bend it until it snaps in one section at a time.
Vinyl Floor Cutter
If you are making straight cuts perpendicular to the length of the plank then you can easily save time and energy using the floor cutter. Simply measure the length of flooring that you need and line up the plank beneath the cutter and pull the handle down.
While this saves a lot of time for making cuts that shorten the length of the RV flooring or at an angle, it does not work very well if you need to make a narrow, slender cut that runs the length of the vinyl plank.
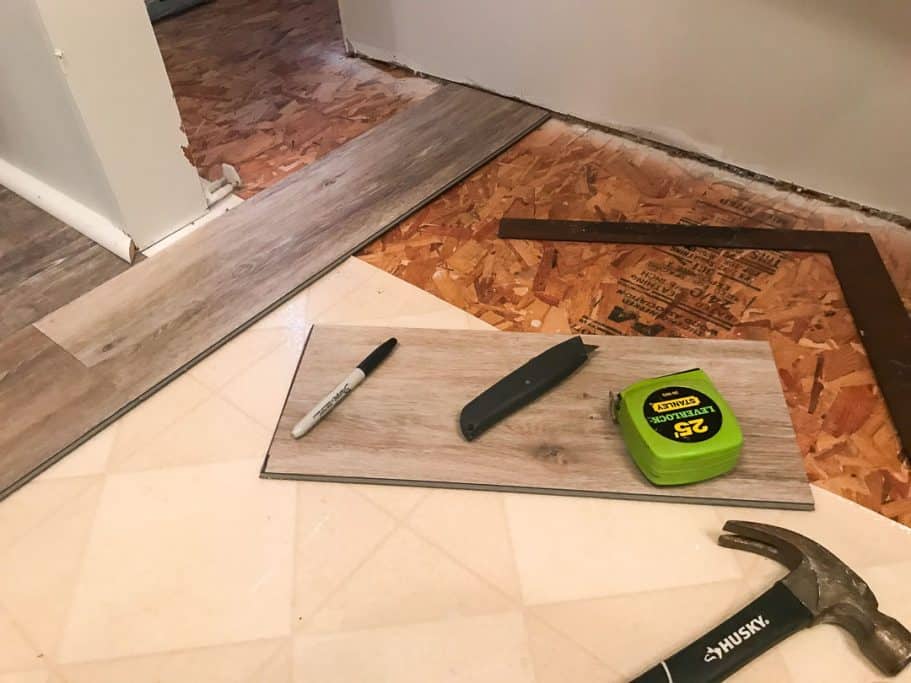
Measuring and marking your cuts
Regardless of which of the following methods you will use, you will need to make specific measurements and mark your cuts. For this, use your tape measure and permanent marker to measure and draw a line across the vinyl plank flooring accordingly.
We recommend that you use a carpenter’s square to help you make straight cutting patterns on the flooring. But note that if you are a little off on your measurements you can count on adding quarter-round trim along the edges to cover up any small gaps.
Installing Vinyl Plank Flooring in your RV
Once you understand how easy it is to measure and cut the vinyl planks, adding the new flooring in your RV should take relatively little time to install. With the method described below, you will be able to finish most of the new flooring without having to make any difficult cuts.
We’ll save those for the end once you’ve accomplished a little work on the RV flooring upfront.
Remove old gross carpet or flooring.
Older RVs, in particular, are notorious for having outdated flooring. Our 1999 Shasta Cheyenne motorhome looked as though it was, in fact, from the 1990s with its green shag carpet and yellowed laminate vinyl tiles.
The carpet stretched through the living room and bedroom and the vinyl tiles filled the kitchen and bathroom. And while this may have worked years ago, it definitely needed some updating.
We used box cutters, pliers, a hammer/pry bar and a screw gun to remove the old carpet flooring. After ripping up the carpet we decided there were no fewer than ten thousand staples and nails that attached the carpet to the sub floor.
And it is important to try to get every last nail, staple, screw or other obstruction out of the subfloor to be able to lay down the vinyl plank floor evenly across the camper.
We did decide to leave the old flooring in a place where the vinyl tiles adhered very well to the floor in the kitchen and bathroom.
Begin Flooring
The first vinyl plank is the easiest to install. You should make the first plank start on the side opposite the door (if you have a side door entryway) and work your way across the floor.
While vinyl plank flooring is considered a floating floor, in that you want to give it room to move subtly with variations in motion and temperature, it is wise to screw a small screw into the floor to hold it in place.
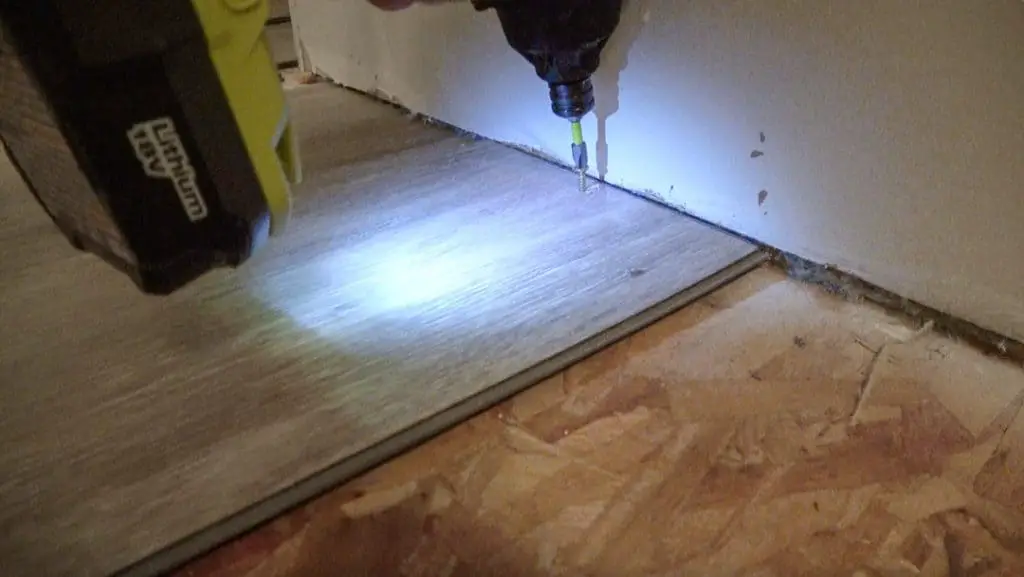
Put the screw in an obscure part of the plank where it can be covered up by trim or other appliances or furniture later. This screw will hold the flooring in place as you begin the process of installing the new flooring in your RV.
By starting opposite of the doorway you will likely save the most challenging cuts for last as you trim around the edge of the entryway.
Add the next plank in the vertical column
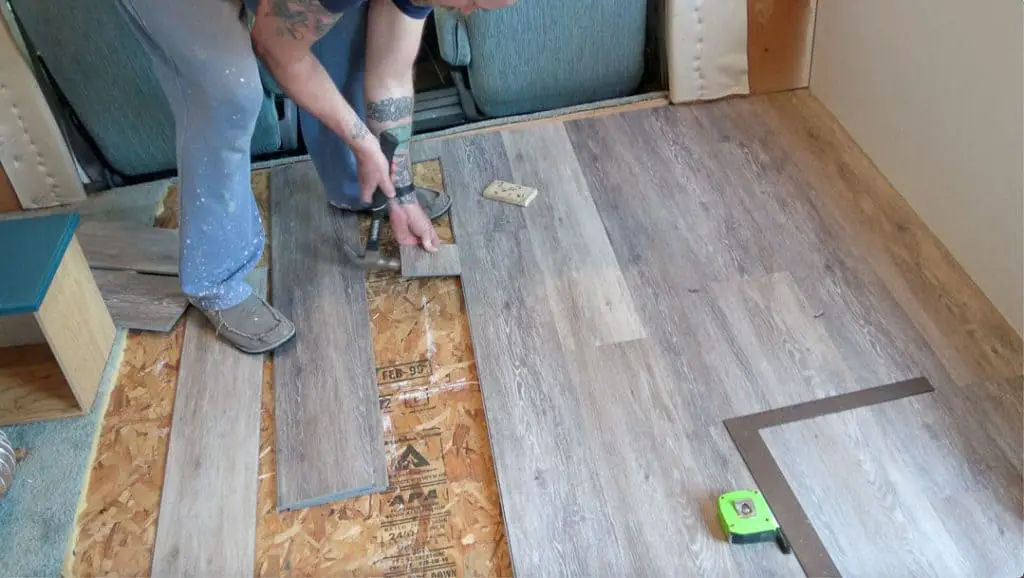
While it may seem more productive to snap the next vinyl plank into position to the side of the first one, instead you need to make a run along the floor on top of the first one to make a long, vertical column lengthwise.
To connect the vinyl planks you will want to match the ridges of the first plank with the ridges of the second plank and gently snap them together. If you need, you can use a rubber mallet or hammer to press them into place. If you use a hammer, be sure to place a small piece of wood or cloth on top of the planks so that you do not smash or break the flooring.
Continue to add planks in this way until you reach the point you can no longer add any other planks lengthwise before you need to make a custom cut to the next plank. You can save them until the end and make all the custom cuts last. Or you can make the cuts to finish the column before moving to the next.
We’ll come back to the custom cuts shortly and move on to the next row.
Move to the next column
When starting the next row you will want to create an offset so that you can stagger the columns along the floor. For this, you can either plan how they will stagger by measuring a specific length of plank and then cut accordingly.
Or you can take any scraps you may have and use that as the offset. The idea is, you will want to start the second column with only part of a vinyl plank. This will lock into the first column where you will gently tap it into place.
Add the next plank in the column lengthwise and continue with this second column until you reach a point where you will need to make a custom cut. Again, save this for later or do it right away.
Note, at some point, it is likely that you will have one column that extends into the next room. For our RV, this occurred where our kitchen meets the bathroom. One column extended into the bathroom from the kitchen.
In this event, you may have to work backward in the new room to fill in the missing columns. Do this before adding a second column into the room.
Continue to make new columns
Continue the next column using another piece of a plank such that you continue to stagger columns across the room. Keep building the column lengthwise and continue this until you have covered most of the installation.
Make custom cuts
If you have saved the top ends of the vertical columns for last, then you will have a mostly complete RV floor that just has missing pieces on the ends. In this section, we’ll discuss some of the techniques to finish the installation with these custom cuts.
A common area where custom cuts may need to be made is in the bathroom around the toilet and shower. We recommend that you use a marker to draw a ring around the toilet base so you know how much of the vinyl flooring will be covered up by the toilet when you reinstall it. Then remove the toilet itself so that just the toilet flange remains and make custom cuts as described below.
Remember, once you have completed all of the custom cuts and the floor looks finished, be sure to go back and remove any screws you used to hold the floor in place. As a floating floor, it does not need to be secured to the subfloor.
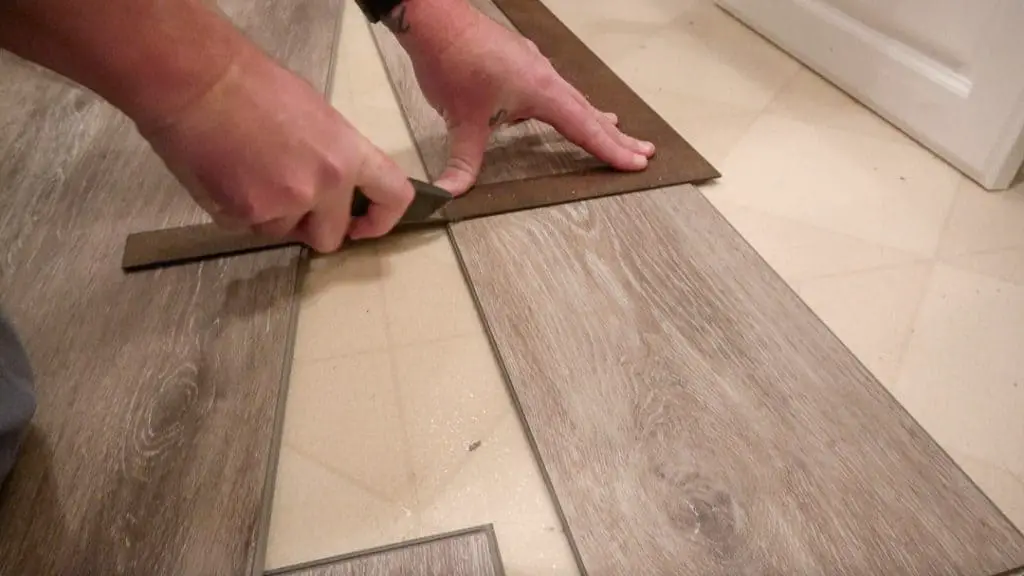
Angled Cuts
A common cut we had to make to finish the flooring in all of our rooms was a diagonal cut to fit the flooring flush into an angled cabinet or wall. To make correct angled cuts you will need to do some simple geometry.
Measure the long side of the missing piece. Then use your Sharpie to mark this length on either a new plank or a scrap of an old plank. Then measure the short side of the missing piece and mark this distance on the plank as well.
With both marks indicated on the installation plank, use your carpenter’s square to draw a straight line between the points. Cut the installation plank and match it to the hole in the floor, tap it gently into place and move on to the next custom cut.
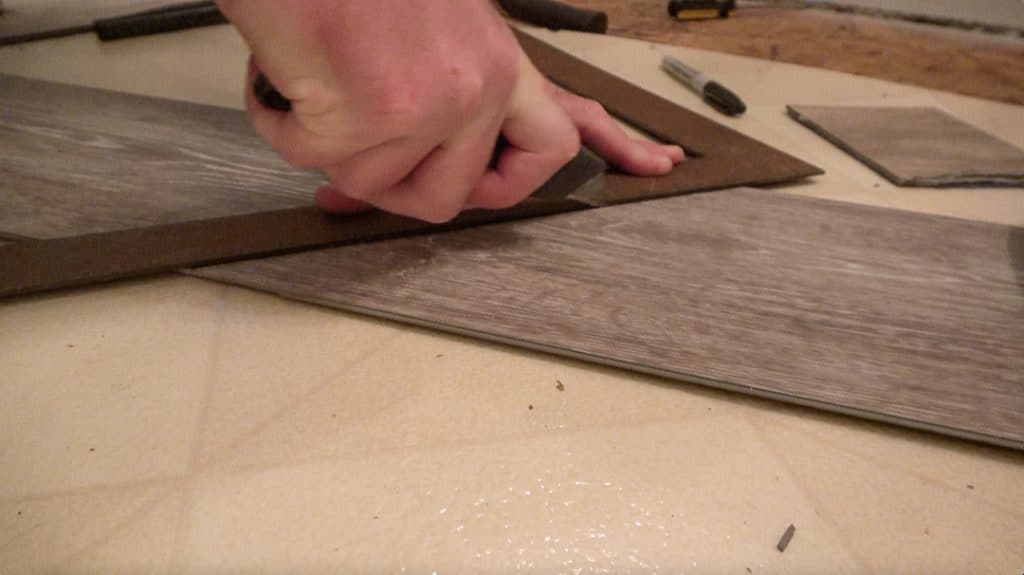
Rip Cuts
If you must create a vinyl plank that is narrower in width you will need to “rip” this plank. To do so is quite simple. Measure the distance of width you need. Mark this distance on both the top and bottom end of the plank you need to rip.
Then use your carpenter’s square to draw a straight line. Carefully score the line using your utility knife. Then place a scrap of wood beneath the vinyl plank and carefully press the plank until it snaps.
Move the block and press down and continue to do so until the whole plank is split lengthwise. At this point, you may need to use your knife to cut the film on the backside of the plank.
Note, if you must make a very narrow rip in order to fit the plank, follow the steps above. But rather than using your body weight to snap the blank, you can use Channel Locks to carefully pry the piece of plank apart.
Combined Cuts
Having made simple angled cuts and slightly more complicated rip cuts, you will likely also have to combine these two. As such, you will combine both techniques of measuring, marking and carefully cutting.
We feel it is easier to make the diagonal cut first and then rip that piece. This is because rips tend to be more difficult and if you make the diagonal cut first you will only have to rip the shorter piece, rather than the whole.
Add Trim
Adding trim to the new RV flooring will make it stand out from the rest of your interior design and also cover up any small flaws in any of the planks you may have mismeasured or cut incorrectly. The most common trim people use with vinyl plank or laminate flooring is quarter-round trim.
There is a whole process of correctly measuring and cutting trim that we won’t discuss in this post. However, once you add the trim you will see finished product will be vinyl plank flooring with a finished look.
NOT SURE WHERE TO BEGIN WITH YOUR RV REMODEL?
No worries! We can help you get started on your RV remodel! From offering counsel and assistance in picking out the best RV to remodel to walking you through some of the major and minor tasks you may want to complete, we offer RV remodeling consultation to suit your needs!
Rates start at $50/half hour and consultation packages can be tailored to your wants and needs!
Contact us via email to arrange an initial consultation and discuss consultation packages available!
NOTE: Due to the nature of our travel schedule, we do not offer remodeling services outside of a consultation.
Frequently Asked Questions
What is the difference between laminate flooring and vinyl plank flooring?
Vinyl flooring and laminate flooring are very similar in how they look and are installed. Both will use the click-lock technique to secure one piece to another. However, vinyl can be cut with a utility knife whereas laminate must be cut with a table saw. Vinyl is also softer and fully waterproof compared with laminate. And laminate flooring will also be loud when you walk on it without a foam underlayment.
Should I do vinyl plank flooring or vinyl tile?
Both vinyl plank flooring and vinyl tile will achieve the same results in your RV. However, choosing RV flooring is usually done with a certain look in mind. As vinyl plank floors simulate the look and feel of real wood floors, most RV owners prefer planks over squares when it comes to new RV floors. But if you prefer squares over planks, both result in the same installation process.
Do I have to make the subfloor perfectly smooth?
No. Sometimes the carpet is difficult to completely remove and you may have a stubborn nail or staple that breaks off and can’t be fully removed from the subfloor. Vinyl plank flooring has a bit of flexibility built into its thickness such that it can absorb some small imperfections in the subfloor. So you can even leave the old, think laminate flooring as we did in our bathroom, and the new vinyl flooring will go right over it in an easy install.