
Last Updated on November 26, 2023 by Chris and Lindsay
If you’re looking for a great and affordable process for resealing an RV roof, we’ll walk you through what you need to know and the best options and steps when it comes to RV roof maintenance.
RV roof maintenance is one of the most important aspects of RV ownership. Aside from tire safety, keeping water from leaking into your RV is a top priority. And whether you purchase your RV new or used, eventually all roofs will need attention.
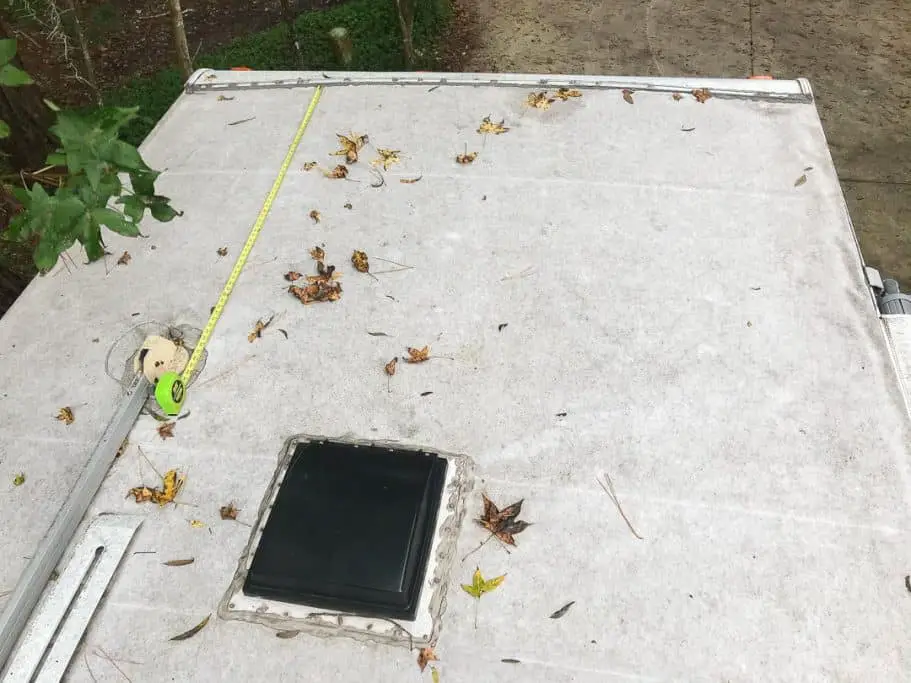
You should plan to closely inspect your RV roof at least once a year. However, if you have solar panels you’ll want to clean those every month or so. This gives you a great opportunity to take a look at your roof.
Water damage on the roof can also extend down the sides of the RV and dealing with water damage is not something you want to mess with. In fact, when purchasing a used RV, searching for water damage should be your first priority.
As part of our comprehensive Class C motorhome remodel, we prioritized sealing the existing roof because it was still functional but definitely in need to repair. But we couldn’t afford to pay for a new roof and knew there must be a relatively easy DIY way to save time and money with this aspect of roof maintenance.
This post is going to focus on the DIY side of roof maintenance. And we’ll share with you what we found to be the best, most budget-friendly way to reseal our roof and keep water out for many years down the road.
We spent a total of around $300 on new roof vent covers and fixtures and just under $500 to complete the entire roof sealing job.
SPECIAL NOTE: This process does NOT replace an old RV roof. Nor does it ADD a new roof. The process described below will prolong your existing roof as long as it is not damaged, torn or ripped in such a way that water damage exists or is likely to exist. Roof coatings like we describe below are meant to strengthen a worn roof as an alternative to unnecessarily replacing the entire roof material.
Affiliate Disclaimer: This post may contain links to products we think you’ll like. If you purchase any of the products through the links below we’ll receive a small commission. As full-time RVers, we know our RV products well and only recommend those that we either own or would consider owning ourselves.
Resealing an RV Roof on a Budget
Resealing your RV roof does not have to be difficult, time-consuming or expensive. Let’s get into what you need to know before you get busy on the roof!
| ROOF PREPARATION | QTY | PRICE | TOTAL |
| Eternabond Tape | 1 | $108.80 | $108.80 |
| Shower Skylight | 1 | $89.55 | $89.55 |
| Butyl Tape | 1 | $16.29 | $16.29 |
| Fridge Vent Cover | 1 | $28.63 | $28.63 |
| Fan Vent Cover | 1 | $19.47 | $19.47 |
| Dior Self-Leveling Lap Sealant | 4 | $9.01 | $36.04 |
| $298.78 | |||
| RESEALING THE ROOF | |||
| Henry Tropi-Cool (5 gals) | 1 | $445.00 | $445.00 |
| Henry Tropi-Cool (10.1 oz) | 1 | $21.98 | $21.98 |
| Paintbrush | 1 | $8.98 | $8.98 |
| Roller Pads | 1 | $7.98 | $7.98 |
| Roller Extension | 1 | $6.92 | $6.92 |
| $490.86 |
What type of RV roof do I have?
The first thing you need to know is what type of RV roof you have. And by the roof, it’s more what kind of roof coating is it?
There are 4 different kinds of RV roofs: EPDM, TPO, aluminum or fiberglass. EPDM and TPO are two different types of rubber roofs that require different maintenance. And both aluminum and fiberglass roofs require special maintenance that rubber roofs don’t need.
EPDM Rubber Roof
EPDM stands for Ethylene Propylene Diene Monomer, which is a rubber membrane that is stretched over the roof and typically fastened mechanically, as opposed to being glued. It is lightweight, inexpensive and relatively easy to repair and install.
While it doesn’t necessarily look as refined as other roofs, it is very easy to reseal. This is the kind of roof we have and what we’ll cover for how to maintain and reseal the roof.
TPO Rubber Roof
TPO, or thermoplastic polyolefin, is another chemically produces rubber roof coating. It is generally white in appearance, which helps reflect light. And it can either be glued or physically attached directly to the roof.
Unlike EPDM, TPO typically will not puncture easily. But it comes in narrower rolls which means more seams on the roof. Both EPDM and TPO are relatively inexpensive and quite common on all sorts of RVs.
How can I tell if I have an EPDM or TPO rubber roof? The easiest way is to find a place where you can see the roofing material itself. You can take a few screws out of your roof trim and peel the roof back a small amount.
Or you can take off the inside cover to a roof vent and you will usually see the roof membrane exposed. If the rubber roof has black underneath, it is EPDM.
Fiberglass Roof
A fiberglass roof is glass fiber sealed in an epoxy resin that creates one of the most durable and watertight roof options out there. It is heavier and costlier than rubber roofs and is not very heat resistant. However, it is less likely to crack and is rust and rot-resistant.
Aluminum Roof
An aluminum roof is the most durable but also the most expensive type of roof. It can handle a beating and won’t puncture from things like tree limbs and is overall less likely to form leaks.
However, aluminum roofs must be fastened with galvanized screws and properly sealed to prevent rust and hidden leaks.
Inspecting An EPDM Roof
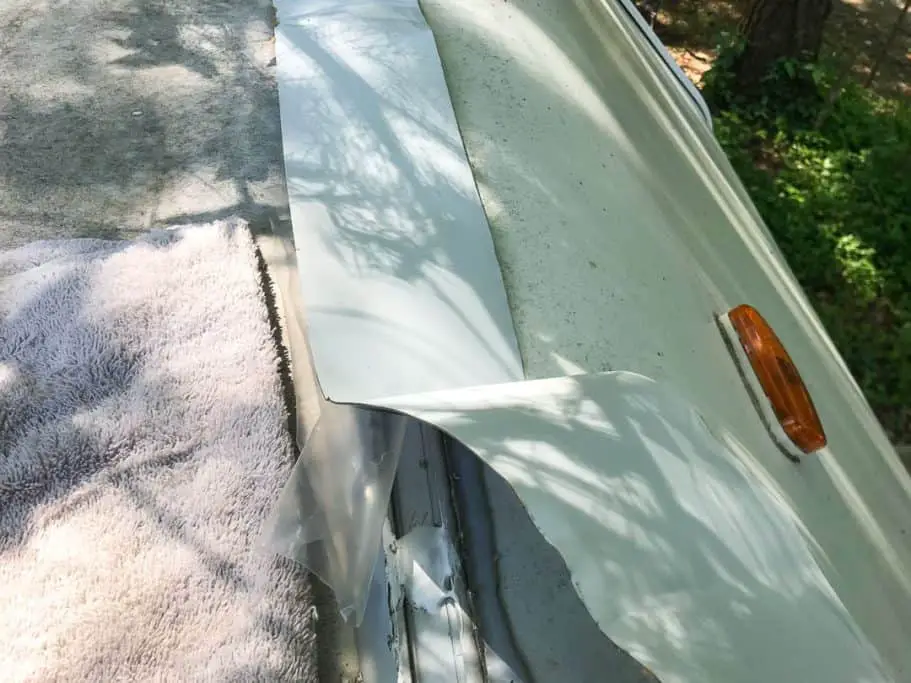
As we inspected our recently purchased used class C motorhome, we learned that it was made of EPDM. This allowed us to research this type of roof material to learn the best ways to take care of the roof.
Our roof had many small cracks and a small tear here or there. But there was no sign of an active leak anywhere on the exterior or interior of the RV. And we wanted to keep it this way!
So we decided that we needed to reseal the entire roof, to cover existing cracks in the rubber EPDM roofing and ensure that water would not find its way inside.
Resealing an EPDM or TPO Rubber Roof
After researching a variety of ways to reseal our RV roof, we ultimately decided to use a combination of new Dicor Self Leveling Lap Sealant, Eternabond tape and Henry Tropi-Cool silicone roof sealant.
We also made sure to pay attention to all of our roof covers and fixtures because once we finished the job with Henry Tropi-Cool we knew there would be no going back later.
We’ll break down what we did and how we did it in the following sections.
Inspect the membrane for cracked edges, tears leaks in the material
The first thing you need to do is carefully inspect the rubber roofing material for cracks, tears and other signs of roof damage. Both TPO and EPDM roofs are rubber and stretch and fatigue just like other rubber materials.
With EPDM roofs, oftentimes the edges will be stretched and actually look warped while the rest of the rubber roof takes on an almost scaly, alligator-like look. Neither of these means you must replace your entire roof.
If you’d like to take on that DIY challenge or have the extra cash to shell out on a professional roof install, then go for it. But we’d recommend this simple and budget-friendly way to save time and money.
Replace existing roof covers & Fixtures as necessary
Before you apply the new roof coating you will want to make any repairs or upgrades to your existing room covers, vents and other appliances.
In our case, we upgraded and replaced two vent fans, the shower skylight and virtually every cover as they were all dry-rotted from years in the sun. As far as we could tell, we had the original roof and appliances on our 22-year old motorhome.
So doing the work of upgrading fans and replacing other covers gave new life to our roof even before we added the new roof coating.
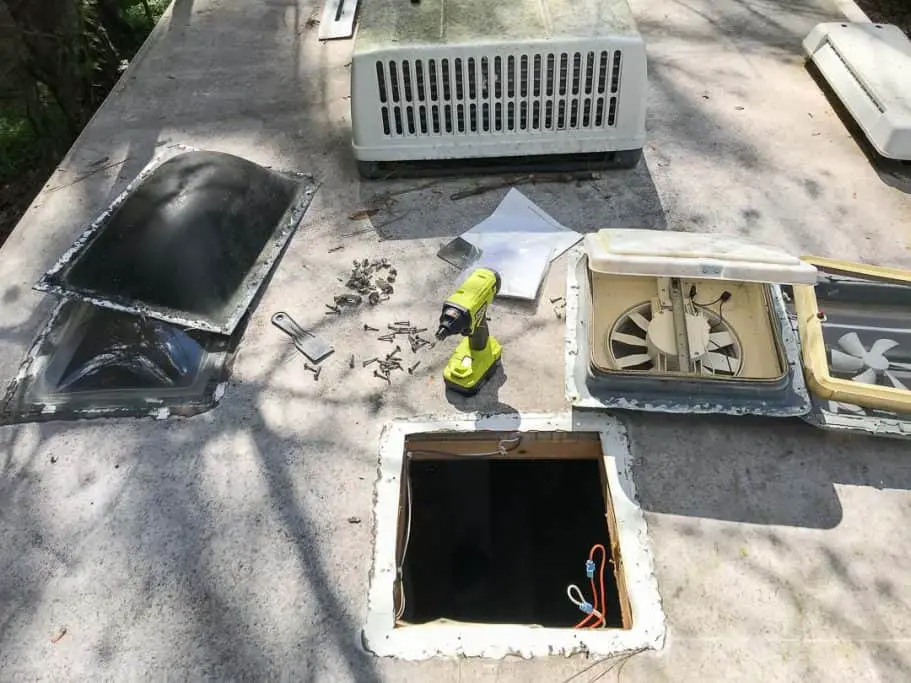
READ MORE: Read this post to learn how simple it is to install a new vent fan on your RV roof.
Clean the roof
After replacing or otherwise attending to your roof covers and appliances, now you can clean the existing roof. One of the best soaps you can use is Dawn dishwashing detergent. While not entirely biodegradable, it is safe to use outside and will not harm either TPO or EPDM rubber roofs.
You can also use a pressure washer to remove deep-down mildew, sap and other stains. Just be careful to do a light job in pressure washing and be careful not to tear the roof with the pressure washer.
You will want to let the roof dry before moving on. If you are on a time restraint, you can use a leaf blower to clear the water from the roof and then spot dry using a towel. But if you let the roof dry in the sun then you may need to return with a leaf blower later before the next step.
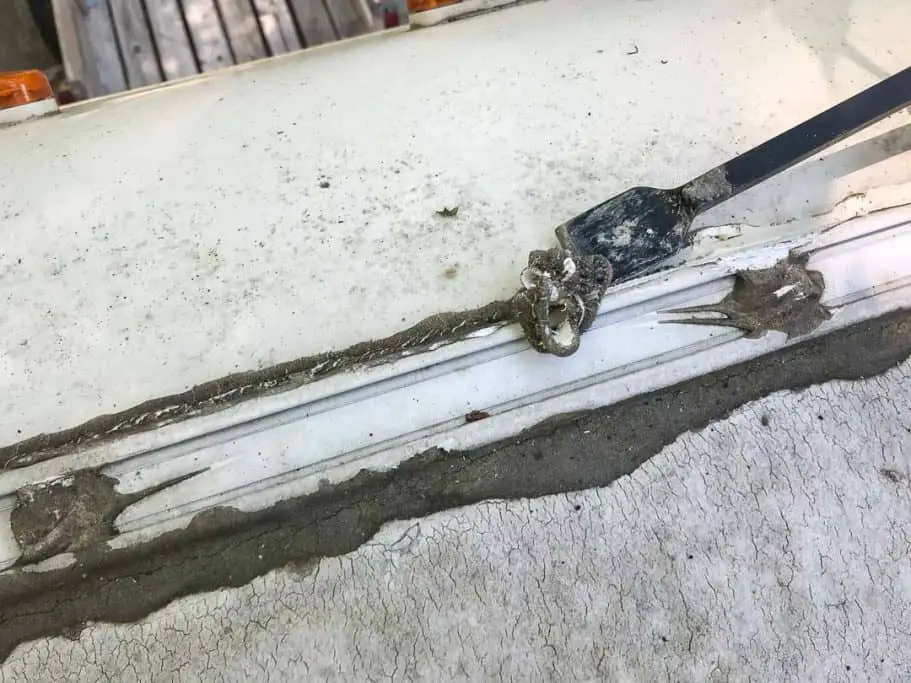
Remove old sealant
Removing old sealants can be done while the roof is wet. But to prevent any potential water damage at this step, it is best to let the roof dry. Use a combination of both metal and plastic putty knives or even a flathead screwdriver to carefully scrape all of the old sealants away.
You’ll want to do this both from the edges of the roof seams along the side of the roof and anywhere there is a cover or appliance. And the process will work better on a warm day, or with a hairdryer warming up the sealant into soft putty.
Be careful not to puncture the rubber roof. Even though you’re going to cover it with new sealant, tape and two coats of Henry Tropi-Cool, it’s still best to keep the roof as intact as possible.
You can also use denatured alcohol on a rag to further clean the surface. But do be mindful not to rest the rag on the roof as the chemicals can be harsh on the roof over time.
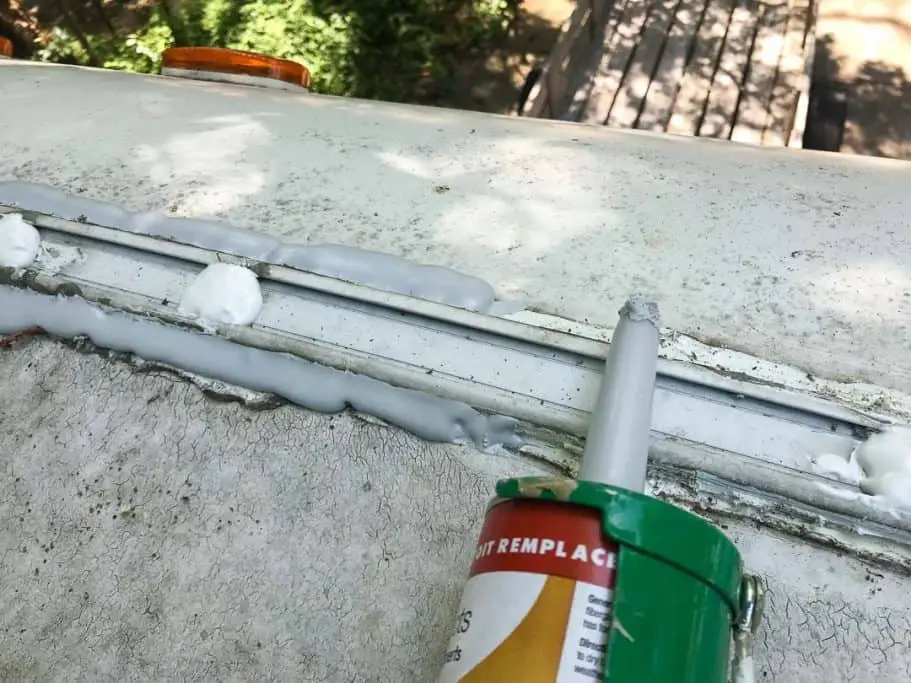
Caulk new Dicor self-leveling roof sealant
With the old sealant removed and the surface of the RV roof cleaned it is time to reapply the new lap sealant. Dicor makes the industry-leading self-leveling lap sealant and we trust the brand and the results we always have from it. The self-leveling aspect is important on the roof as gravity will actually help the sealant spread to cover the area.
Use a caulk gun and apply the sealant along all of the areas you just removed the old sealant. You can be generous with the application, ensuring that every surface is covered.
But note that if you follow our practice, you’ll cover these areas with Eternabond tape and with the silicone roof coating. Allow ample time (usually 1-2 days depending on the temperature and humidity) for the sealant to dry before moving to the next step.
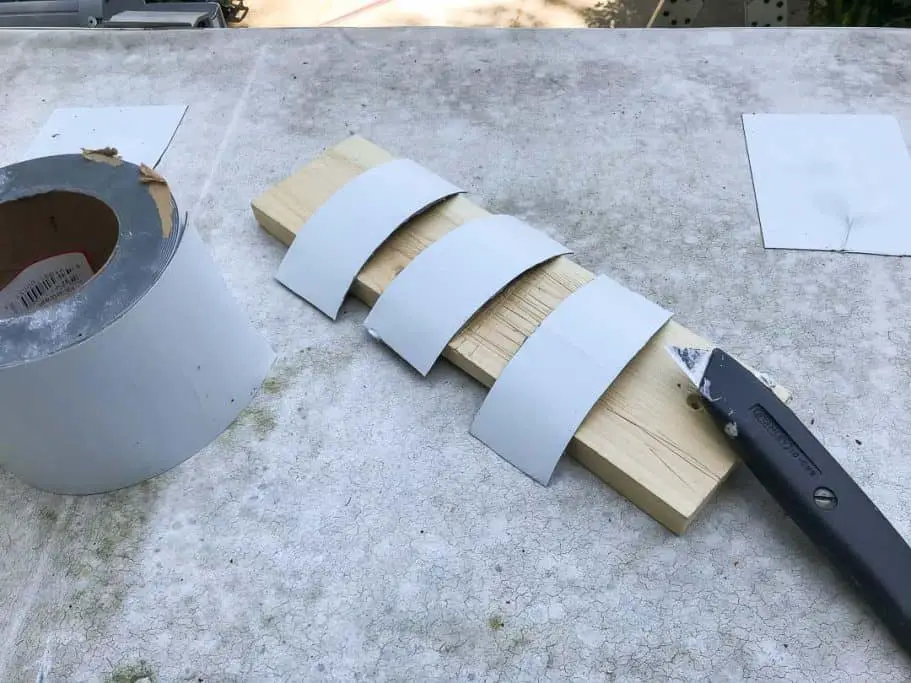
Tape all edges and seams with Eternabond tape (Optional, but advised)
Once the sealant has been allowed to dry, you can add an additional step to protecting your RV roof from future leaks by adding a strip of Eternabond tape in a few places. Eternabond has long been used and recommended both for DIY RV roof repairs like this, to avoid more expensive dealer maintenance, and for patching holes to prevent a leak in the event of an emergency on the road.
We recommend that you use generous strips of Eternabond to cover any weak areas of the roof that show wear, significant cracks or holes in the surface of the roof material. We started taping around the front cap of our motorhome using the 4” wide Eternabond. This covered the seals and all of the new sealant we just applied.
Then we ran the Eternabond lengthwise down both the driver and passenger side of the RV roof. We folded the tape over the edge to cover the screws on the side of the roof seams and wrapped it over the corner edge to cover loose areas of the EPDM that were starting to show cracks sure to lead to a leak.
Take it slow, and use an old credit card or plastic putty knife to flatten the Eternabond as you move down the length of the RV.
Use the same principles as you lay the Eternabond over the rear end of the roof as well.
Next, you’ll want to cover each of the vents, covers and other appliances such as air conditioning units that may be on your RV roof. Depending on how thick you applied the new sealant, you could consider cutting the Eternabond in half to use thinner strips to cover more ground.
Last, be sure to cover any clear tears on the surface of the roofing material or anywhere that looks weak and could lead to a future leak.
In our case, we removed our existing roof rack and covered the screw holes with lap sealant and strips of Eternabond before applying the Henry Tropi-Cool. We also removed our TV antennae and had a few small areas that showed excessive wear and small damage to the exterior of the roof, likely from tree limbs or other obstructions.
Seal your RV roof with Henry Tropi-cool
Now it is finally time to put new rubber roof sealing over your existing rubber roof. For this, you will want to use Henry Tropi-cool Silicone Roof Coating. Henry Tropi-Cool is ideal for older rubber roofs that do not need to be replaced entirely.
NOTE: When applying Henry Tropi-Cool you are not adding a NEW roof to your RV. Instead, you are adding a protective layer of quality silicone to cover up any worn and cracked surface on the roof. If you have substantial roof damage, including severe tears in the rubber roofing material or places where the roof has become unattached or very loose, you will want to consider replacing the entire RV roof with a new covering.
Why Use Henry Tropi-Cool
Henry Tropi-Cool is a silicone roof coating that is compatible with both EPDM and TPO rubber roofs. While you can use this product on aluminum RV roofs, it is not advised to use it on fiberglass roofs.
In addition to coating the surface of old rubber roofs, Henry Tropi-Cool is mold and mildew-resistant, UV-resistant, 100% waterproof and actually reflects sunlight to allow for cooler surfaces in sunny areas. It is also easy to apply and is rain-safe in 15 minutes.
And while other products on the market offer similar benefits, Henry Tropi-Cool is very reasonably priced and is the best time-tested budget alternative to other products like Crazy Seal and Lanco Ultra Siliconizer.
Do be aware that Henry Tropi-Cool is a silicone coating. This means that it will adhere to your existing coating and sealants but that no other seal or coat will adhere ot it. We call this “being married” to Henry Tropi-Cool as you will want to ensure you only use silicone sealants for any future repair.
Tools and Materials
You can purchase all of the tools and materials necessary to apply Henry Tropi-Cool for around $500. And while you can estimate the square footage of your RV roof and calculate “just enough” coating to seal one or two coats on your roof, we opted to purchase the 5-gallon container so we could very liberally apply the coating on the roof.
Aside from the Henry Tropi-Cool roof coating itself, you’ll need the following tools and materials:
- Henry Tropi-Cool 10.1 oz coating
- 4-6” Paintbrush (that can attach to roller extension if desired)
- Paint Roller
- Paint Roller pads
- Roller Extension
- Painter’s tape (optional)

How to Seal RV Roofs with Henry’s Roof Coatings
With the materials in hand, the process of properly sealing the roof is pretty simple. Now that you have properly cleaned the roof, removed old sealants and applied new sealants and Eternabond to the roof you just have to apply the Tropi-Cool. If you’d like to keep the sealant from dripping along the sides or front of the RV you can lay down a strip of painter’s tape before applying the Tropi-Cool.
Now that it’s time to start painting, ensure that the bucket is thoroughly mixed. Then start adding the first coat by trimming all vents, covers, seals and appliances. Use your paintbrush and be very generous to ensure that it seals around everything on the roof.
While it may take up to a day to be perfectly cured, you will find that the sealing will dry relatively quickly. The easy part of the job comes once you have trimmed the edges.
Now you’ll set up your roller on the roller extension and dip it directly into the bucket. You can pour it into a roller pan. But we found the easiest way to add the thickest coat was to dip directly in the bucket.
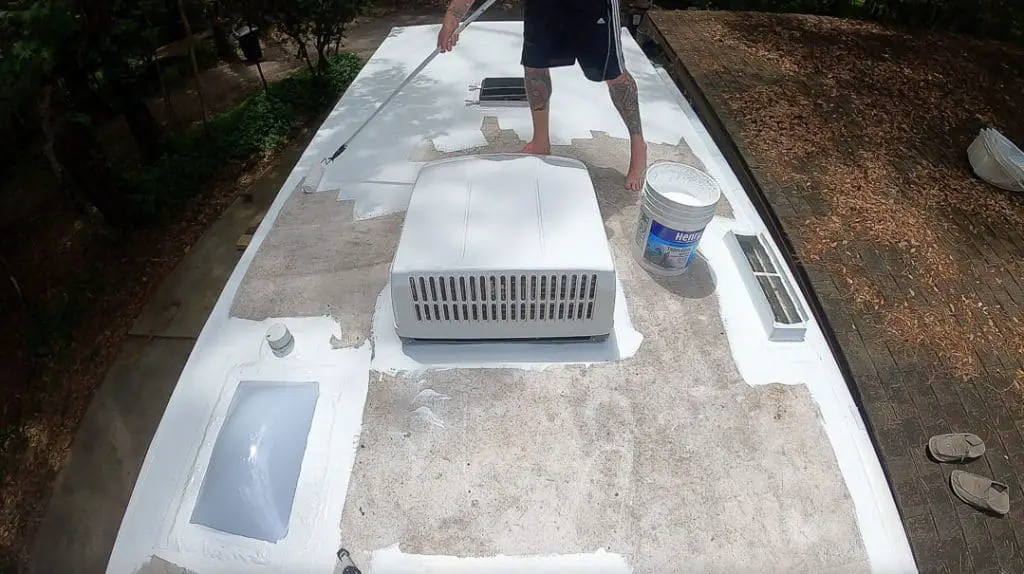
Start at one end of the RV roof and apply the first of two or three coats by painting toward an “exit point” on the RV. Be aware that if such an exit point is a ladder you use a proper ladder safely. The first coat should dry within a few hours, depending on the temperature and humidity of the air.
You can add a second coat a few hours later after the first coat has dried. Or wait until the next day if you have the time. When you apply the second coat you will follow the same procedure.
However, we did find that we spent a little less time trimming and instead rolled most of the second coat, only trimming the areas that were most difficult to reach with the roller. Henry says you can use a spray gun instead of a roller. But we found that the thick viscosity of the Tropi-Cool was the best fit for a roller application.
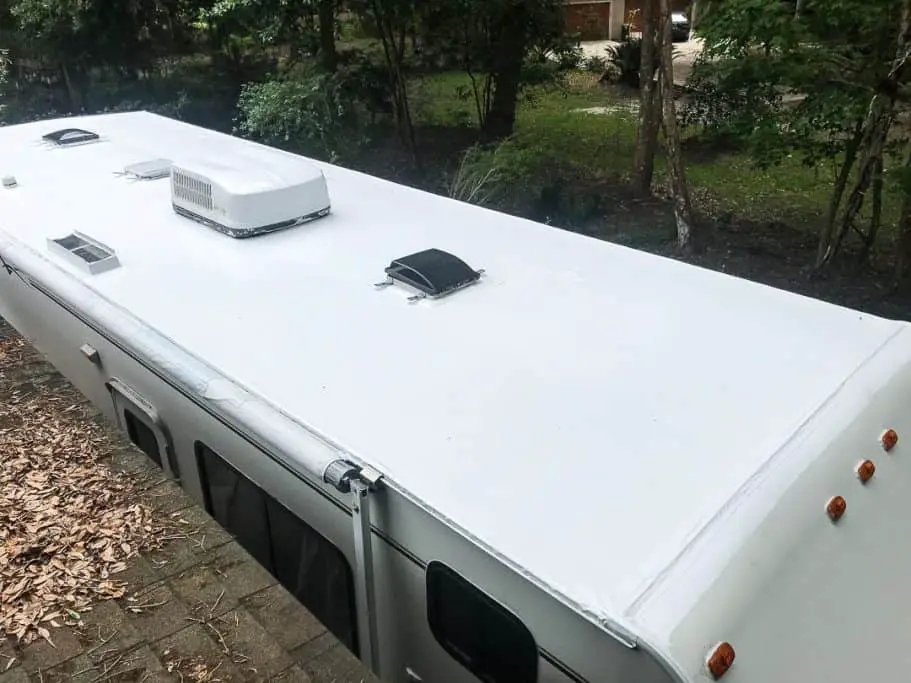
Continue to coat the roof until the second coat is thoroughly done. If you’d like, as still have leftover material, you can follow the same steps a third time. But two coats should be plenty. You’ll be amazed at how the white silicone makes your roof look brand new!
Wrapping Up
If you follow our guidance you’ll have 3 layers of added protection aside from the roof material itself. The new sealant will do its job of immediately covering up any areas that could be prone to leaking. And Eternabond will further add a layer of defense against leaks.
Finally, the silicone Henry Tropi-Cool will add a waterproof barrier sure to protect against both sun and water damage.
When it comes to maintenance down the road, you can simply clean the roof with a wet rag (no soap necessary). But do be careful walking on the roof when wet as it will be very, very slippery.
We bought an enormous package of roof sealants. In freezing Maryland weather, we learned we couldn’t keep the hoses within the van. We heated the putty bottles ahead of the radiators and took them out into the van to complete. some bottles froze hard. We placed an excellent hot container of the predicament in large ziplock bags to loosen the sealant. It worked. Then we found that a ziplock bag had a hole, a mastic tube was damaged because of a faulty ziplock bag. We decide to cut the pipes with the blades in warmer temperatures to finish the projects with the roof sealant.
Thanks so much for sharing! I really like your post as well as its content. It is useful for me and I will read more about your other post.
Thanks! Glad you found it useful!
All looks good and its good efforts of describing everything in one article. Like it! Only point I was thinking what it could be most cost effective if you go with One Coat Application products like RV Roof Magic.
This is a one-coat product we had lots of extra leftovers and put a second coat on. We’re absolutely pleased with the job almost 2 years later and have not worried about the roof at all.
Absolutely going to take advantage of this for helping my camp neighbor in Spring. Thanks for sharing!
Glad you found it helpful and can help out your neighbor!