Last Updated on September 2, 2022 by Chris and Lindsay
If you are interested in completing a DIY RV shower remodel to replace your existing shower, we’ll help you understand all the parts you need and how to go about creating a beautiful new look and feel in your RV bathroom!
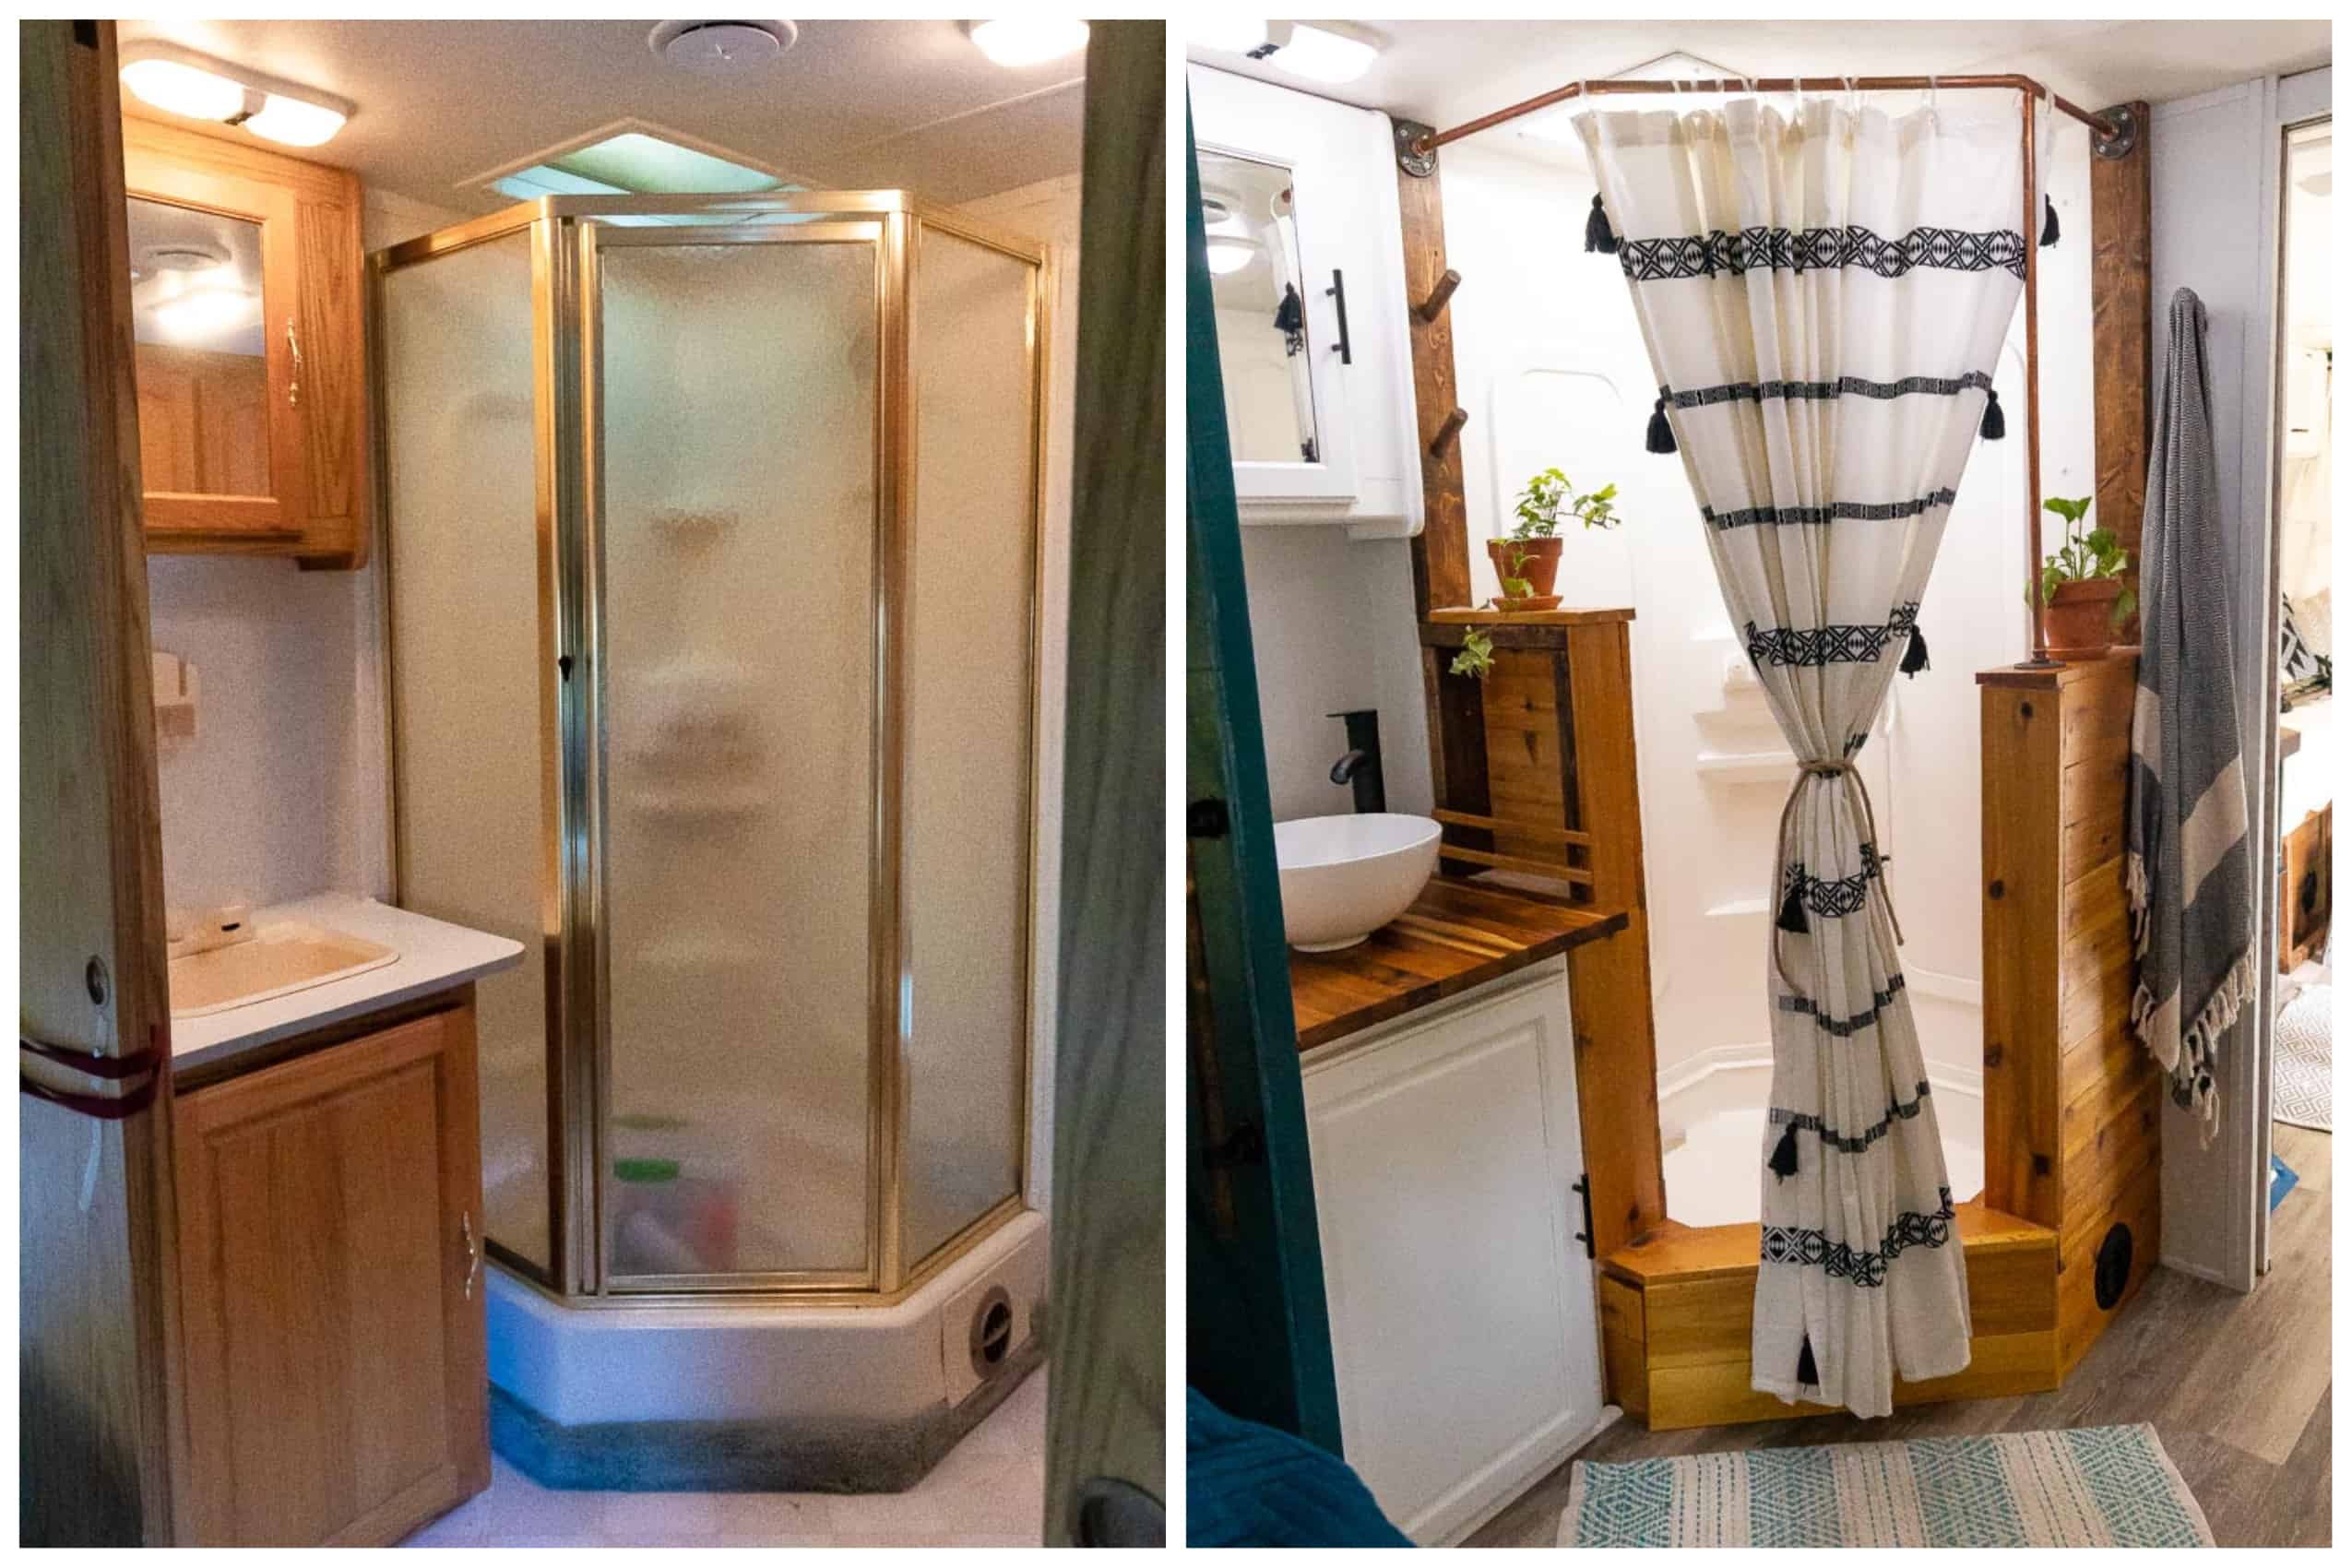
Just because you live in an RV or camper doesn’t mean you cannot have the comforts, looks and feels of a traditional home. As part of our major Class C motorhome remodel, we decided to overhaul our bathroom to make it more functional for our needs and to tie the farmhouse look and feel we were creating throughout the rest of the RV.
And while we painted all of the walls, installed vinyl plank flooring, replaced the counters and later built a new toilet in the bathroom, we also decided to completely renovate our existing shower.
RV manufacturers don’t seem to put much effort into camper bathrooms. And with time, the basic RV shower walls had become yellowed. The shower head was a cheap plastic one straight from the 1990s. And the glass shower door and walls were quite restricting and created a sense of claustrophobia.
And while we had our share of major renovations going on inside of the camper, we felt adding a new shower was a non-negotiable if we were going to truly treat our motorhome like our home on the road.
But being on a tight budget with limited knowledge in the DIY space meant that we needed to be creative in designing and building our new shower.
In this post, we’ll share with you everything you need to know about replacing RV shower systems in your motorhome or trailer. And we’ll do it all for under $300!
Affiliate Disclaimer: This post may contain links to products we think you’ll like. If you purchase any of the products through the links below we’ll receive a small commission. As full-time RVers, we know our RV products well and only recommend those that we either own or would consider owning ourselves.
NOT SURE WHERE TO BEGIN WITH YOUR RV REMODEL?
No worries! We can help you get started on your RV remodel! From offering counsel and assistance in picking out the best RV to remodel to walking you through some of the major and minor tasks you may want to complete, we offer RV remodeling consultation to suit your needs!
Rates start at $50/half hour and consultation packages can be tailored to your wants and needs!
Contact us via email to arrange an initial consultation and discuss consultation packages available!
NOTE: Due to the nature of our travel schedule, we do not offer remodeling services outside of a consultation.
How to Complete a DIY RV Shower Remodel for Under $300
When we started planning and budgeting the various projects in our RV remodel we did intend to replace our RV shower. But we were not exactly sure what kind or style we wanted to go with – or how competent we would even be at building our own shower.
We knew that installing a bathtub was out of the question for our RV (and not recommended for most campers). And we knew that most, if not all, of the shower would need to be built from wood since that is what we felt most comfortable working with.
In the end, we made the right decision and we’ve inspired lots of other RVers to follow our lead with the design we finally picked out to match our RV bathroom.
Here’s what we did and how we did it all in a matter of a few days for only $300!
| PROJECT | PART/MATERIALS | QTY | PRICE | COST |
| Shower stall | Rust-Oleum Tub & Tile Paint | 1 | $21.55 | $21.55 |
| Build/Frame | 2x4x8 Board | 4 | $4.18 | $16.72 |
| Build/Frame | 2x6x8 Board | 1 | $8.46 | $8.46 |
| Build/Exposed | 1x4x8 Cedar Board | 6 | $12.07 | $72.42 |
| Build/Exposed | 1x6x8 Cedar Board | 1 | $27.39 | $27.39 |
| Sealant | Silicone Sealant | 1 | $7.58 | $7.58 |
| Sealant | WaterLox Sealant | 1 | $33.72 | $33.72 |
| Showerhead | Oxygenics Showerhead | 1 | $47.00 | $47.00 |
| Shower Curtain Rod | ||||
| Copper Pipe (1/2″ x 10′) | 1 | $14.26 | $14.26 | |
| Copper Mounting Flange | 3 | $4.78 | $14.34 | |
| Copper Flange (screw) Adapter | 3 | $6.13 | $18.39 | |
| 45* Copper Elbows | 2 | $1.81 | $3.62 | |
| T Copper Elbow | 1 | $1.16 | $1.16 | |
| $286.61 |
Shower Demo

The first thing we did was to demo the existing shower. This should have been easy. But due to the age of the RV (over 20 years old!), many of the screws were either rusted or otherwise difficult to access.
We ended up taking the walls apart in pieces, leaving only the shower pan and interior stall intact. We didn’t want to touch the plumbing or have to shop for new shower pans, so we were careful with stripping the shower down to all but the corner shower stall, pan, drain and shower head.
If you were to modify the plumbing in any way, such as running a new line of hot or cold water, installing a new faucet or new toilet or altering the drain in any way you would want to consider shutting off the water supply and/or draining the tank entirely before demoing.
Repaint the Shower Stall
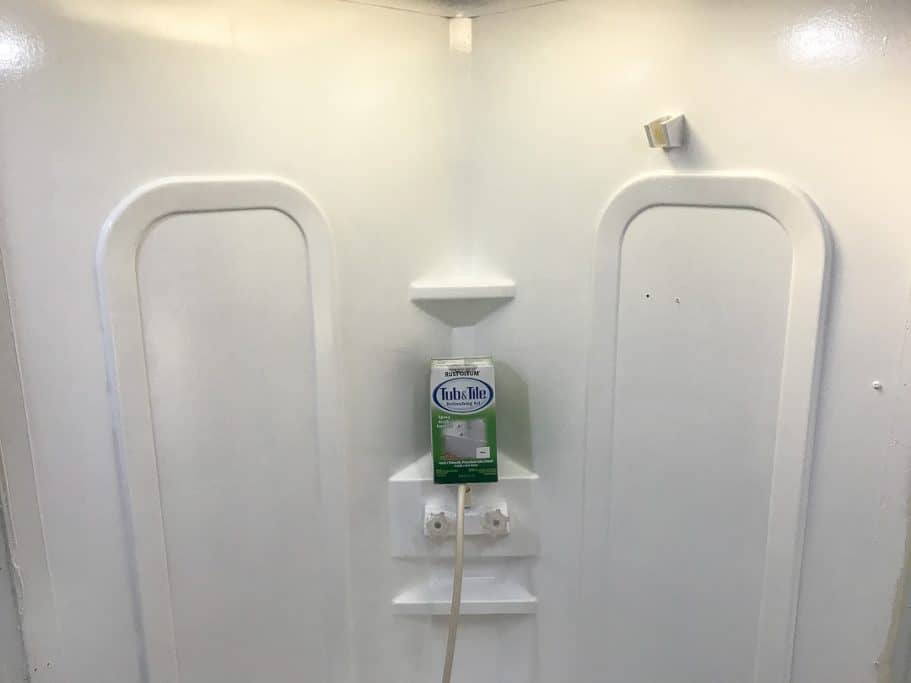
The 2 plastic shower surround had become yellowed with age. And there were some small cracks here and there that we feared would turn into substantial leaks with time.
So the first thing we did once the glass walls and shower door came down was to repaint the stall. We sanded the edges where the old walls had been removed and then lightly sanded the existing walls.
Then we got to painting the stall and pan. For this task, we used a Rust-Oleum brand tub and tile refinishing kit. The 2-part epoxy acrylic paint was relatively easy to use. As the instructions indicated, you simply stir each separate component before mixing them together.
When the epoxy was prepared, we simply painted it on the walls and shower pan with a paintbrush and standard paint roller.
However, it is caustic to inhale so we were sure to properly ventilate the camper while working with it by adding additional fans inside to move air through the workspace. And we wore gloves while mixing it. Ideally, you’d also want some form of ventilator if your camper does not offer much ventilation.
Just painting the old shower stall bright white gave us an immediate feeling of satisfaction and accomplishment! But we were far from finished with our new RV shower.
Framing the Base of the New Shower
Since we left the existing shower stall and pan in place, we knew the basic shape and space our new shower would have to occupy. We didn’t want to have to move plumbing around any more than necessary. And by keeping the shower stall and pan in place we could leave the plumbing alone.
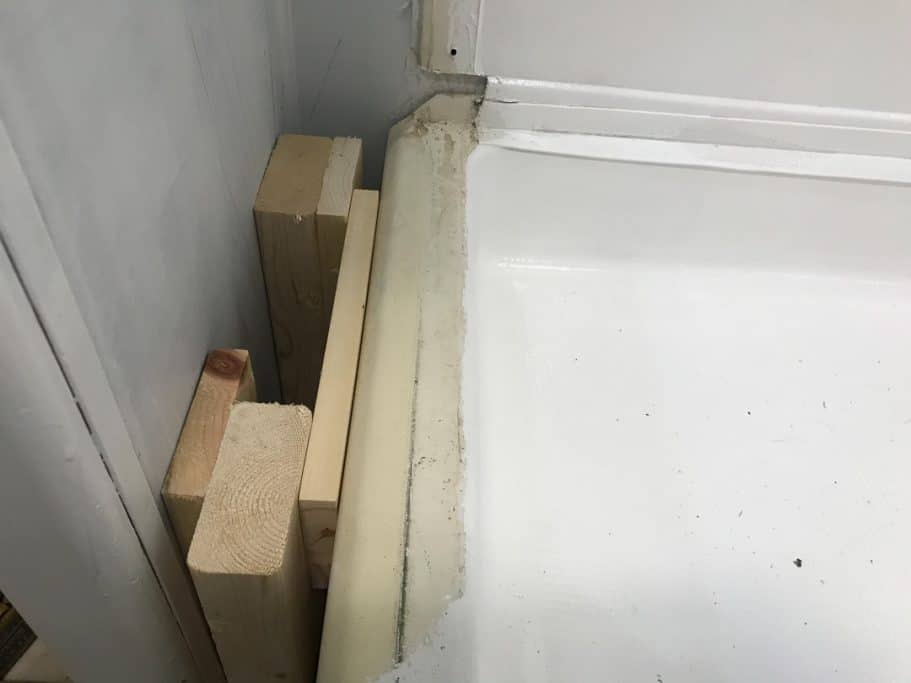
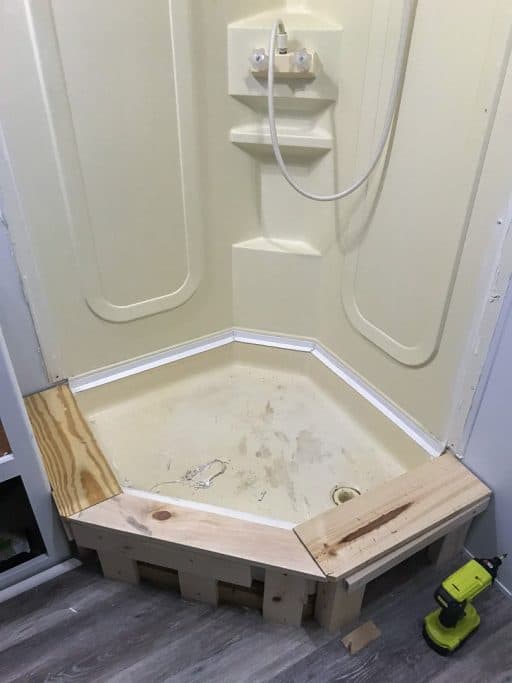
But this also meant that we were left with some awkward angles and spaces that the RV builders had left for some reason. So, as in the case of all building structures, we started by trying to frame in the base of the shower first.
The shower pan was elevated by boards that acted as a floor beneath it. This was good for us as it meant that we could attach whatever frame we built to the existing shower pan floor.
But there was no formula for exactly how much wood to use or in what size and shape. So we played a little guess and check with the base of the shower.
Ultimately we decided we wanted to extend a 2×4 board up the sidewalls of the shower stall where the glass siding had been in place. To do this meant that we would need to build a base that was primarily outside of the existing shower pan.
But if we weren’t careful with our design, water would be able to seep between the shower pan and the shower frame.
Finally, we found that a 1×6 inch cedar board (which is truly only 5.5” wide) would make the best base to lay on top of the side of the shower pan and bridge the space between the outer frame we were building and the shower shell itself.
This worked great on one side, which was open to our bathroom hallway. But on the other side where the shower merged with our vanity, we had another awkward space to work with. Eventually, we made the 1×6” cedar board fit there as well and we had all but finished framing the base of the shower.
Framing the New Walls
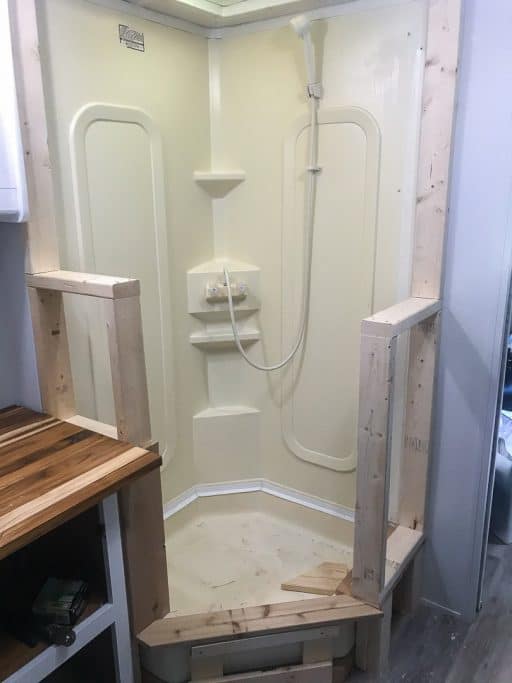
With the base built and securely attached to the existing wood beneath the shower pan we next set out to build the frame for the two sides of the new shower walls that we wanted.
In our design, we decided that we did not want to totally enclose the shower. We wanted to have walls that only came up about halfway up the height of the shower. This “open concept” would allow our shower to feel bigger than it actually was and allow light from the skylight above the shower to disperse throughout our RV bathroom.
We decided that we wanted the shower wall next to the hallway to be approximately 48” tall and the one next to the vanity to be 42” tall. And we determined that each wall would be approximately 16” wide, leaving a space of about 20 inches for the doorless entrance to the shower.
Taking into account that the base of the shower was approximately 8” tall, we built a frame for each side of the new walls of the shower using 2×4 wood. Rather than built them into the wall itself, we assembled them separately and then moved them into their proper place when it was time to secure them to the wall and base of the shower.

By creating these frames with rectangular dimensions approximately 16” wide by 40” and 34” tall we were able to standardize the length and number of cedar panels with which we intended to build the outside and inside walls.
We carefully screwed each side of the frame into the wall, noting that one wall led to a small space with a pocket door and the other wall led to the outside of the RV. We wanted the most secure attachment we could have without screws that protruded past the walls.
Assembling the Shower Walls

Next, we cut 1×4” cedar planks to nail to the frame of both sides of the shower. In our design we were going to have two sides of the wall closed in with cedar planks on one side of the shower and on the other side, which shared a wall with the vanity, we would just attach cedar on the inside of the shower.
We used a brad nailer to attach these cedar planks on both inside and outside of the shower surface, as well as on the top of the walls that would be exposed.
And then we measured and cut two 2×4 boards that would make up the top frame of the shower. These boards would be exposed, so we stained them to match the decor consistent with the rest of our RV remodel and then attached them to the wall.
We did leave the side adjacent to the vanity open to create a sort of pocket shelf that would be perfect to stick toiletries and other bathroom accessories.
At this point, our shower looked once again like a shower should look. But it was far from finished. We still needed to enclose the front step as well as to build the curtain rod.
Building the Shower Curtain Rod

In keeping with the farmhouse look and feel of our RV remodel, we added a little industrial touch by using copper pipes and fittings for the shower curtain rod.
For this, we started with a 10-foot piece of ½” diameter copper pipe. Because the shape of the shower was pretty much decided for us when we opted to keep the corner shower structure, we put a strip of tape on the ceiling to try and figure out exactly where the rod should be positioned to best match the shape of the shower.
We mounted 2 of the 3 flanges that we bought to hold the pipe in place such that they were as high on the walls as possible. Then we measured one piece of copper at a time and made careful cuts with a pipe cutter.
For the side that was adjacent to the hallway we measured and cut a vertical piece of pipe that would support the curtain from that side. We mounted a flange to the top of the wall on that side and used a copper T elbow to join the horizontal rod with the vertical support.
We also had to use two 45-degree elbows to make the curtain rod bend across the front where the shower door once stood. And, as we noticed that the one vertical support did a fantastic job of holding the entire rod in place, we didn’t add a second vertical support to the side adjacent to the vanity.
The curtain rod was now complete and it was on to the next step in finalizing the project!
Waterproofing the Shower
We chose to use cedar for the exposed part of the shower because cedar is naturally water-resistant. But we knew that we couldn’t count on that alone to not mildew and rot over time.
So we had a few tasks we needed to do in order to completely waterproof the shower.
Silicone Exposed Edges and Corners
The first thing we did for waterproofing our new RV shower was to add a thick bead of white silicone caulk along every crack and crevice inside the shower that may be exposed to water. This included the vertical areas where the cedar planks pressed into the plastic shower panels as well as along the base of the shower.
We were incredibly generous with our application of the silicone caulk as the one thing we knew we didn’t want to deal with in the future was water damage anywhere throughout the RV.
We also used clear silicone to seal the more visible front side of the shower that would be open to the rest of the bathroom. And we were generous with dabbing this clear silicone all along the base of the step leading into the shower as well.
Waterlox the Exposed Cedar
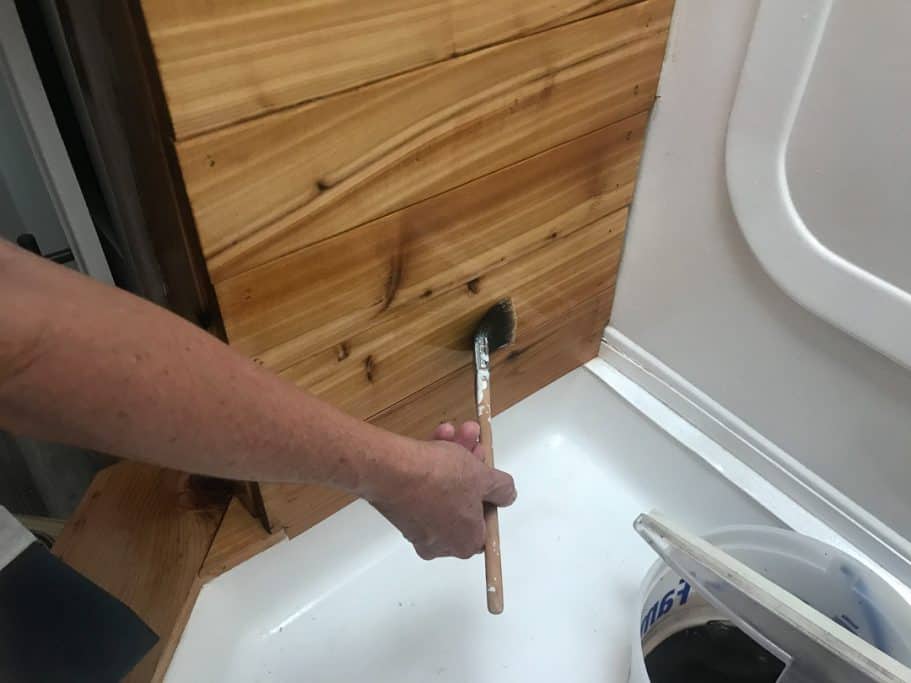
With the seams waterproofed with silicone, we began the task of sealing the cedar planks that would be exposed to water from the shower. For this, we used Waterlox, the same sealant we applied to our kitchen and bathroom counters.
Waterlox is a Tung oil that leaves a slight sheen look to the finished product. We didn’t care about the look, as the color and texture of the cedar was the perfect blend of rustic and industrial we were aiming for in the RV bathroom.
However, its ability to wick water off the surface of the wood it penetrates is invaluable when you build your own RV shower out of wood.
Replace the Shower Head
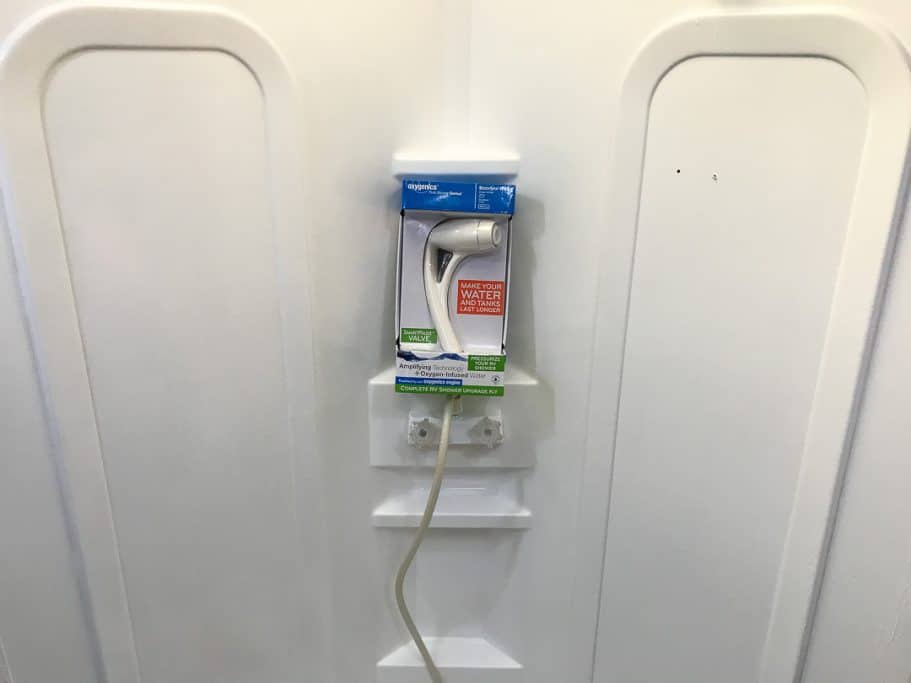
With the shower built and waterproofed all that was left to do was to replace the old showerhead with our favorite one from Oxygenics.
The old shower head was the original one from the manufacturer that not only looked yellowed and well worn but also hardly functioned at all.
Our new Oxygenics showerhead was efficient with water, having an easy-to-use button to change the rate of flow of water. It allows you to adjust the water pressure with the click of this button rather than having to mess with the faucet knobs.
We did leave the original faucet in place with one knob for hot water and the other for cold water. And although we had checked for any water leaks through the access panel in our kitchen (behind the shower), we did not have to alter the plumbing in any way.
And at this point, we picked out our favorite shower curtains and installed plastic rings to hold them in place. Now our new RV shower was finished and to this day it is our favorite DIY remodel project in our entire RV!
NOT SURE WHERE TO BEGIN WITH YOUR RV REMODEL?
No worries! We can help you get started on your RV remodel! From offering counsel and assistance in picking out the best RV to remodel to walking you through some of the major and minor tasks you may want to complete, we offer RV remodeling consultation to suit your needs!
Rates start at $50/half hour and consultation packages can be tailored to your wants and needs!
Contact us via email to arrange an initial consultation and discuss consultation packages available!
NOTE: Due to the nature of our travel schedule, we do not offer remodeling services outside of a consultation.
So amazing! Your rig looks great!
I’m going to give this a go in our motorhome!! What did you use for your bathroom counter and did you use the same in the kitchen?
We’re so happy we went this route with our shower! We used the same butcher block countertop in the kitchen and bathroom as the piece we purchased from Home Depot provided us just enough for both, plus a few accents around the motorhome. Let us know how it goes!