Last Updated on September 2, 2022 by Chris and Lindsay
If you are interested in doing an RV bathroom remodel or RV bathroom renovation we’ve got several simple DIY makeover ideas that are sure to turn your camper or trailer into your home on the road!
Although we had been RVing full-time for nearly 3 years when we decided to sell our truck camper and purchase a larger Class C motorhome, we didn’t really have any idea how to remodel an RV.
Through various trials on the road, we learned how to fix virtually every appliance inside our camper. Bumpy roads tend to shake things loose and many RVs are not built for full-time occupation.
So we knew the basics of how to fix older, broken things inside our RV. And because our first camper was over 15 years old, we also knew the kind of simple comforts and modern look and feel that we would like in our next RV.
But because we live on so little, our budget did not afford us the option of buying a new, bright and shiny RV. And when we finally found our perfect new home on the road, it was actually 5 years older than the one we had just sold!
So we knew we would have our hands full with the RV remodel of our 1999 Shasta Cheyenne. At 31 feet with the classic motorhome layout, we had nearly 3 times the living space than we were used to with our truck camper.
When it comes to completing an RV bathroom remodel, there are three primary appliances around which you’ll need to make the most important decisions: the RV shower, RV bathroom sink and faucet and RV toilet.
We’ll cover these first in this post and then get into all of the other projects you can undertake in your bathroom renovation.
And we’ll share the price breakdown for how we spent under $1,000 for all of these renovations!
Affiliate Disclaimer: This post may contain links to products we think you’ll like. If you purchase any of the products through the links below we’ll receive a small commission. As full-time RVers, we know our RV products well and only recommend those that we either own or would consider owning ourselves.
NOT SURE WHERE TO BEGIN WITH YOUR RV REMODEL?
No worries! We can help you get started on your RV remodel! From offering counsel and assistance in picking out the best RV to remodel to walking you through some of the major and minor tasks you may want to complete, we offer RV remodeling consultation to suit your needs!
Rates start at $50/half hour and consultation packages can be tailored to your wants and needs!
Contact us via email to arrange an initial consultation and discuss consultation packages available!
NOTE: Due to the nature of our travel schedule, we do not offer remodeling services outside of a consultation.
How to Complete a DIY RV Bathroom Remodel for Under $1,000
No camper bathroom renovation is complete without addressing the shower, sink and faucet and toilet. Whether you remodel all of these fixtures or choose to take on just one or two is up to you.
Here’s what we did in completely overhauling our entire RV bathroom.
A NOTE ON TOOLS AND MATERIALS: We purchased a power toolset prior to beginning our entire RV remodel so we are listing tools to use but not including them in the price as we assume you will have a toolset before you begin your RV bathroom remodel. Additionally, we balanced the sourcing of our materials between Amazon and our local home improvement store. So items we list with Amazon links may be easier to source locally, but we still want you to see and know what we are talking about.
RV Shower (~$200)
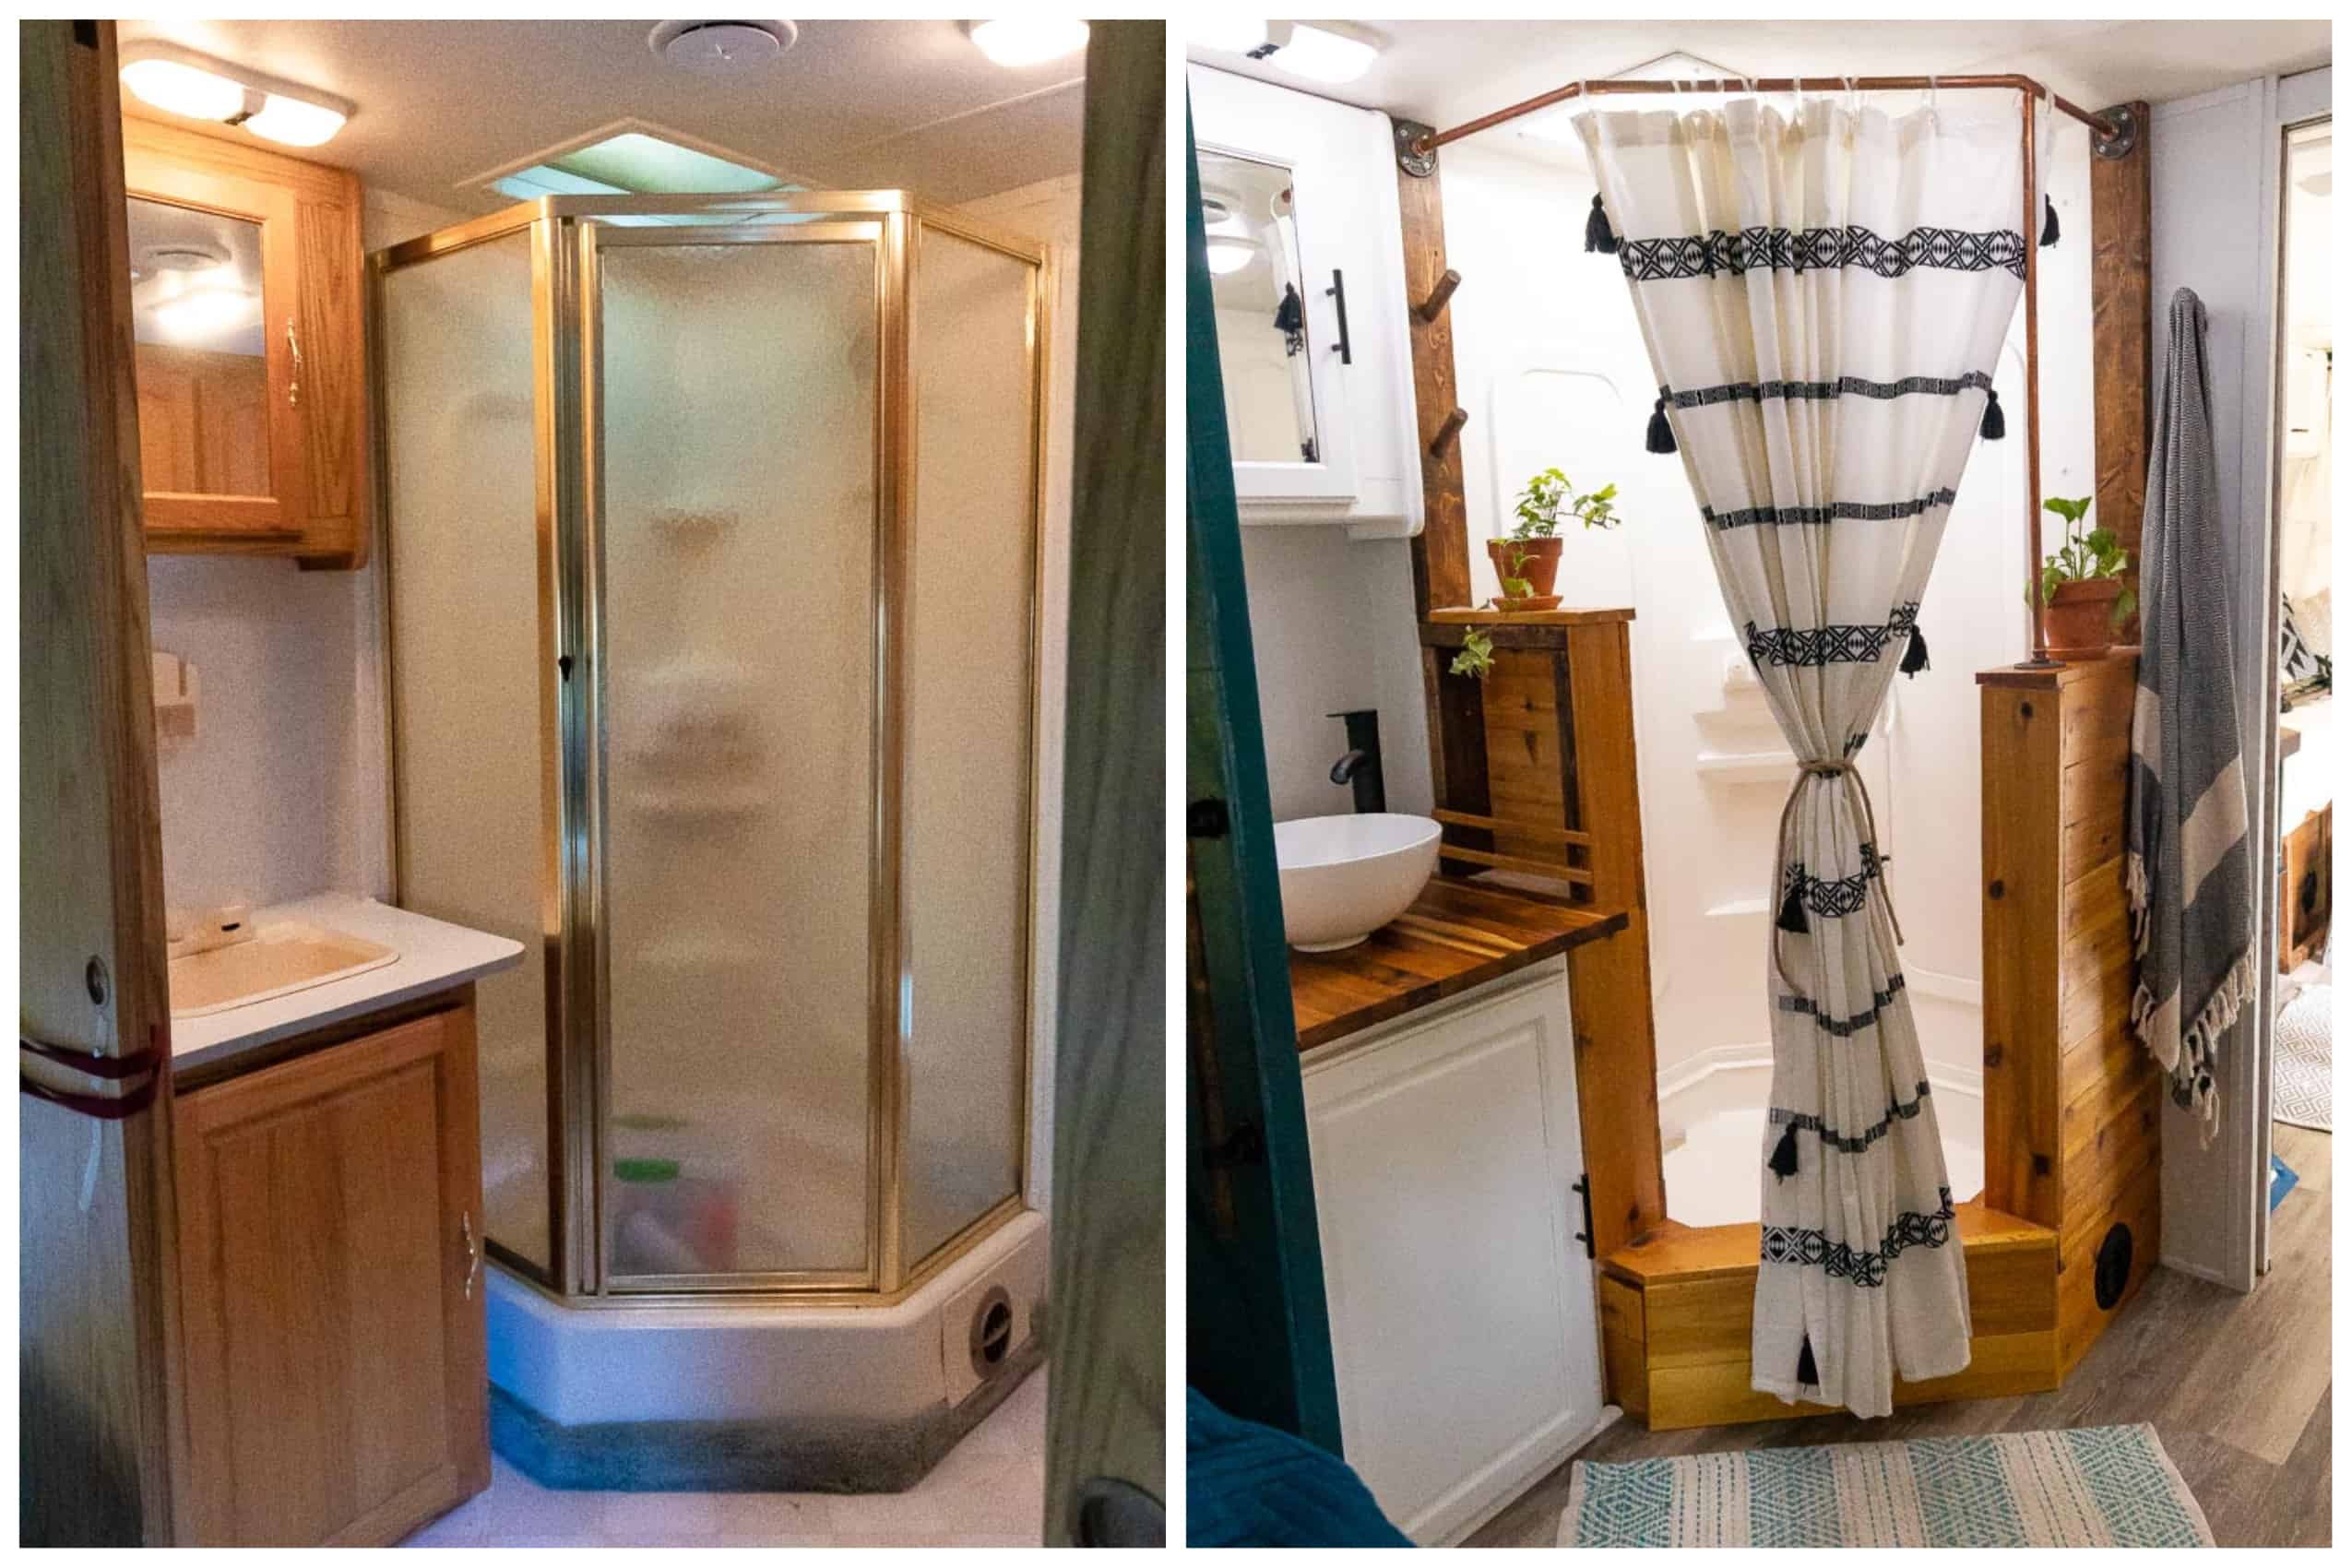
When we first started our remodel, our RV shower was much like most camper showers. The shower lining had become a dingy yellow. The standard RV faucet and the showerhead were cracked and leaking.
And the shower itself was framed in with a weary gold-painted metal enclosed with heavy frosted glass. The entire RV shower was dated – over 20 years at that!
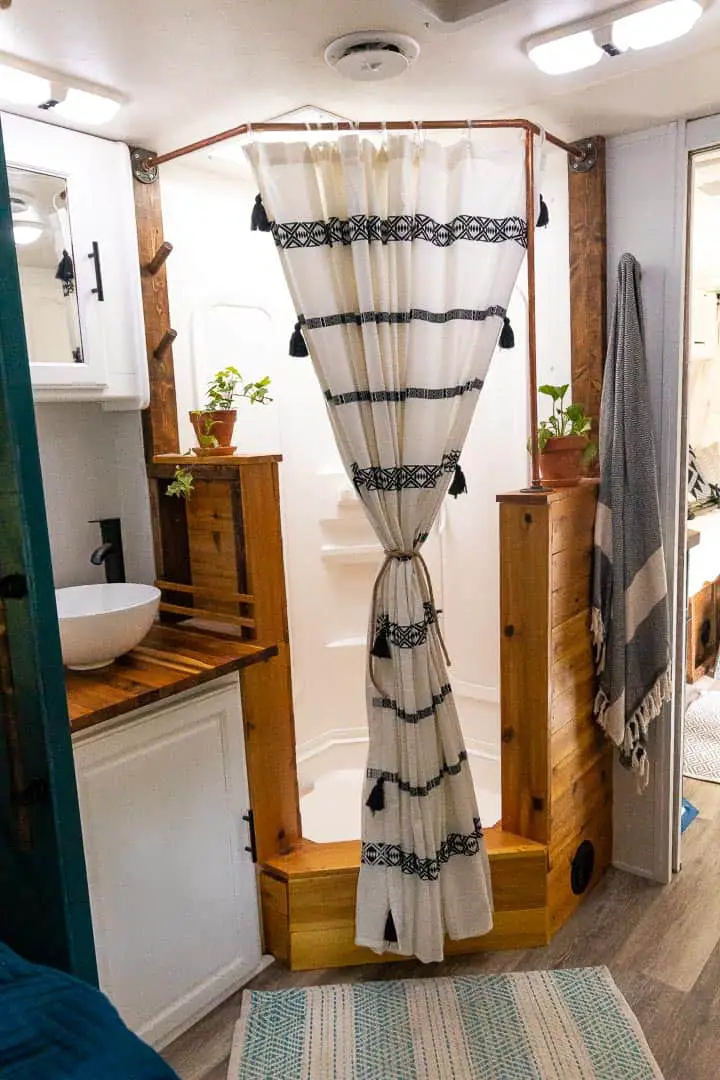
We wanted to build a new cedar shower in its place with a modern look and feel that would combine elements of rustic and industrial aesthetics.
So the first thing we did was to take it apart. Several screws held the frame to the wall and then it was a matter of just taking it apart frame by frame, minding the fact we did not want to shatter the glass in the process.
We stripped the shower down to just the shell, and cut loose the carpet and heater vent that was attached to its base.
Tools and Materials Needed:
- Screwgun
- Prybar
Then we painted the shell with Rust-Oleum Tub and Tile epoxy resin. Not only did this immediately give the shower lining a bright new life, but also it sealed any areas that were beginning to crack or wear with age.
First, we sanded the rough edges along the side of the shower where the frame left screw holes. Then we painted all of the walls and the base of the shower so that it was one seamless new shower shell.
Tools and Materials Needed:
- Orbital Sander
- Rust-Oleum Tub and Tile Epoxy Resin
- Roller
- Paintbrush
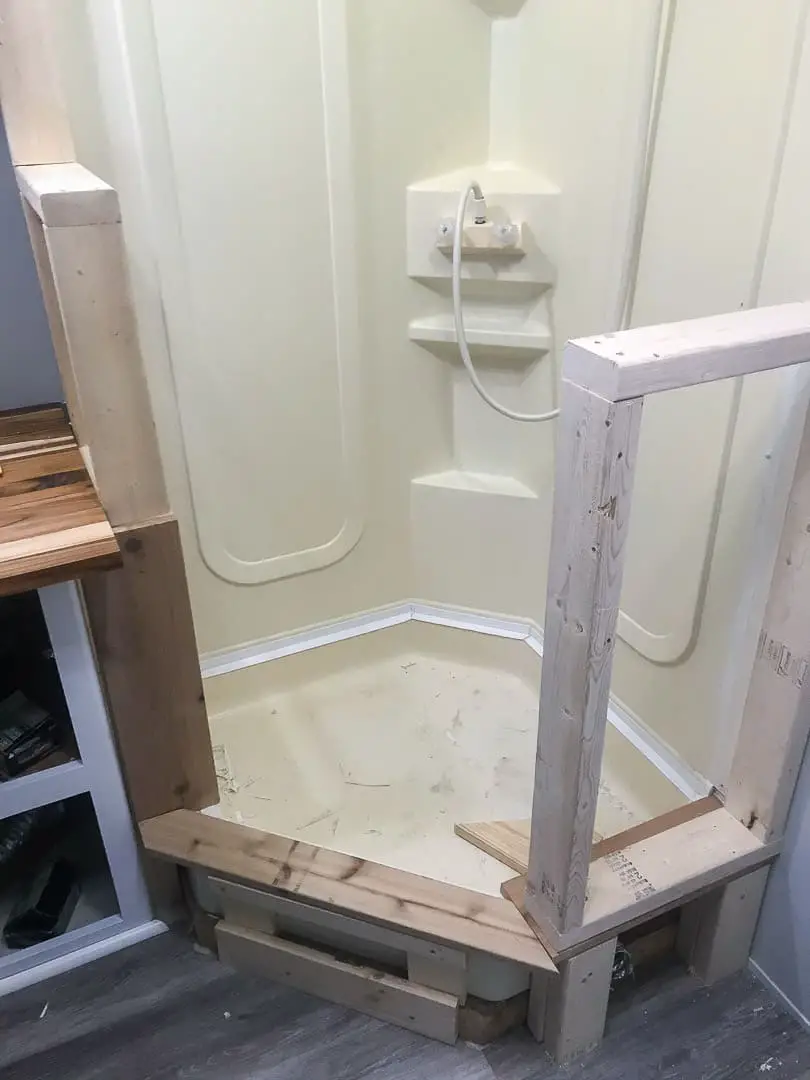
Then became the work of framing the new RV shower we wanted to build. We started at the base just outside of the base of the shower itself and had to create a unique shape using pieces of 2x4s that enabled us to make the framing easier.
Then we cut a short, rectangular piece of 2×6 cedar for each side of the shower that would lay flat over the base and cover the existing edge of the shower shell.
The idea was that we wanted any water that came in contact with this board to drip entirely into the shower pan rather than into a crack between the shower pan and our foundation.
Now that the base was built, we decided how tall we wanted to make the shower walls and built a rectangular frame for each side using 2x4s. We opted to leave one side taller than the other.
But the tallest side was no more than 40 inches so it left a nice open view both in and out of the shower.
With the framing done we went to work cutting a bunch of 2×4 cedar planks that would be stacked and nailed vertically up the sides of the shower. These were quick and easy to cut and install using a nail gun because we carefully framed the shower ahead of time.
One of our shower walls was enclosed on the outside by our sink vanity so we only had to add cedar planks to the inside of this side of the shower. We also added a vertical cedar plank on the outside of both sides of the shower as well as the top.
Next, we measured and cut two 2×4 boards that would serve as the side mounts from where the shower stall ended to the ceiling of the RV. We stained these a dark brown to match other wood throughout our camper. Then we secured them to the wall to be the base of our shower curtain rod.
Tools and Materials Needed:
- 2x4x8′ wood (4)
- 2x6x8′ wood (1)
- 1x4x8′ cedar wood (4)
- 1x6x8′ cedar wood (1)
- Various wood screws
- Nailgun and 1″ brad nails
The rod itself was made of one long ½” copper pipe that we cut to various lengths. We screwed a cast iron pipe flange to the top of each of the stained boards that would hold the shower curtain rod horizontally to the wall, and one to the top of one side of the shower for a vertical copper rod to hold the rest of the shower curtain rod in place.
From here, we simply measured appropriate lengths of copper pipe, cut them to size and then connected all of the pieces together using various copper elbows and t-joints.
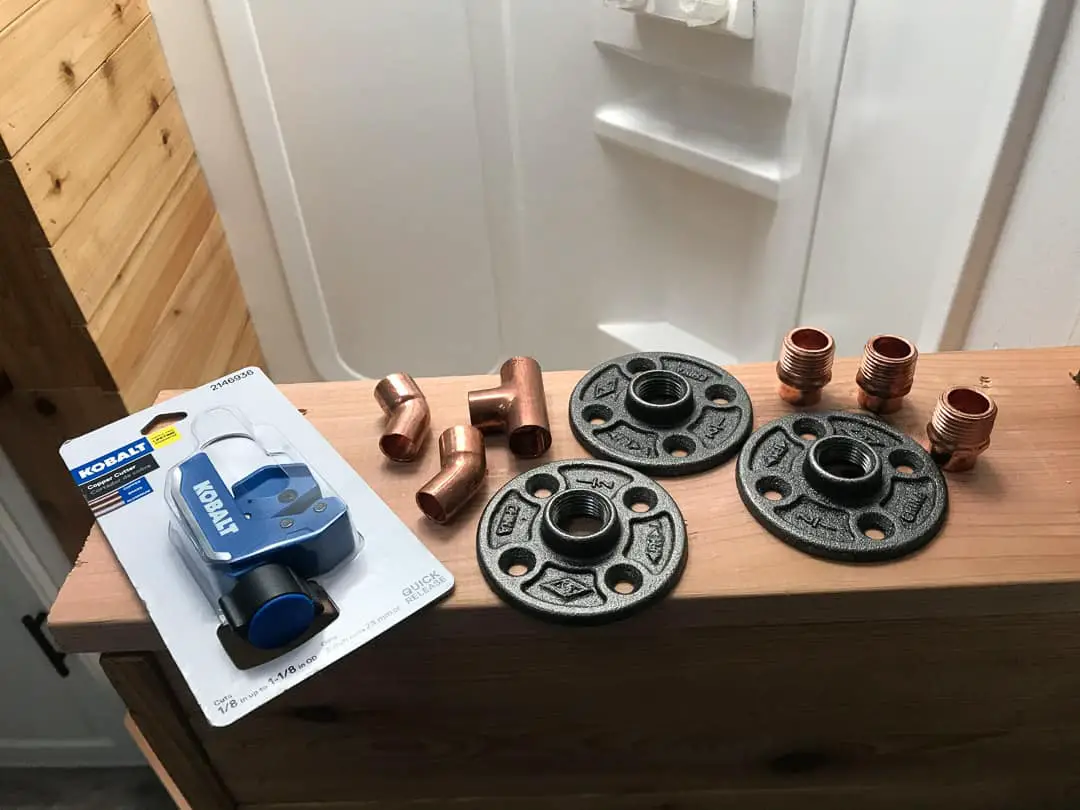
Tools and Materials Needed:
- 1/2″ diameter x 10 feet copper pipe
- Copper pipe cutter
- Cast Iron Pipe Flanges (3)
- Tee Fitting
- 45 degree elbow (2)
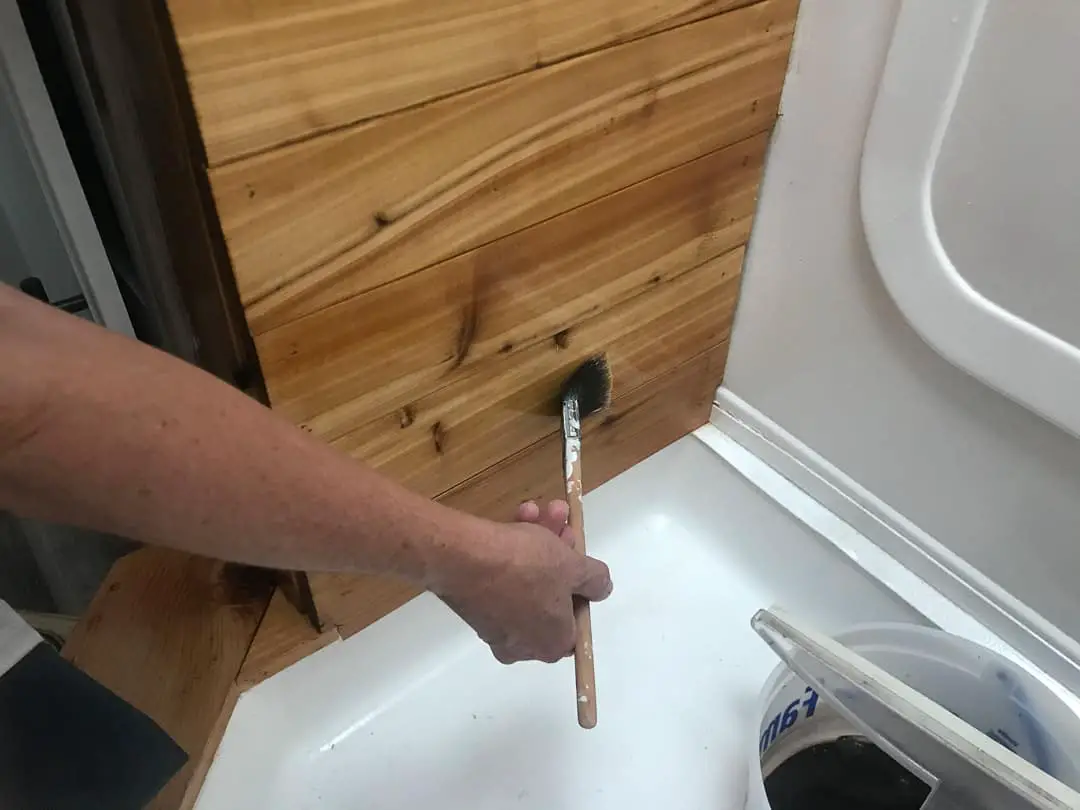
At this point, all that was left to do was to waterproof the shower. Although cedar is particularly water-resistant, it is not waterproof. So we used Waterlox to seal every cedar edge that would be exposed to water.
Then we used waterproof silicone caulk to line the edges of the inside of the shower where the cedar met the shower lining.
When this was done, all we needed to do was to choose the best shower curtain, shower curtain liner and rings to hang the shower curtain! We also replaced the old showerhead with our favorite Oxygenics showerhead both as an update and an improvement in water efficiency.
Tools and Materials Needed:
- Waterlox
- Silicone Sealant
- Oxygenics Showerhead
- Paintbrush
- Caulk Gun
RV Bathroom Sink & Faucet (~$200)
The next major project we completed in our RV bathroom remodel was to address the old RV bathroom sink and faucet.
When we purchased our RV we knew that the old faucet had a leak. But as it was dated already, we planned to replace it along with the sink and countertop to keep with our rustic-industrial theme.
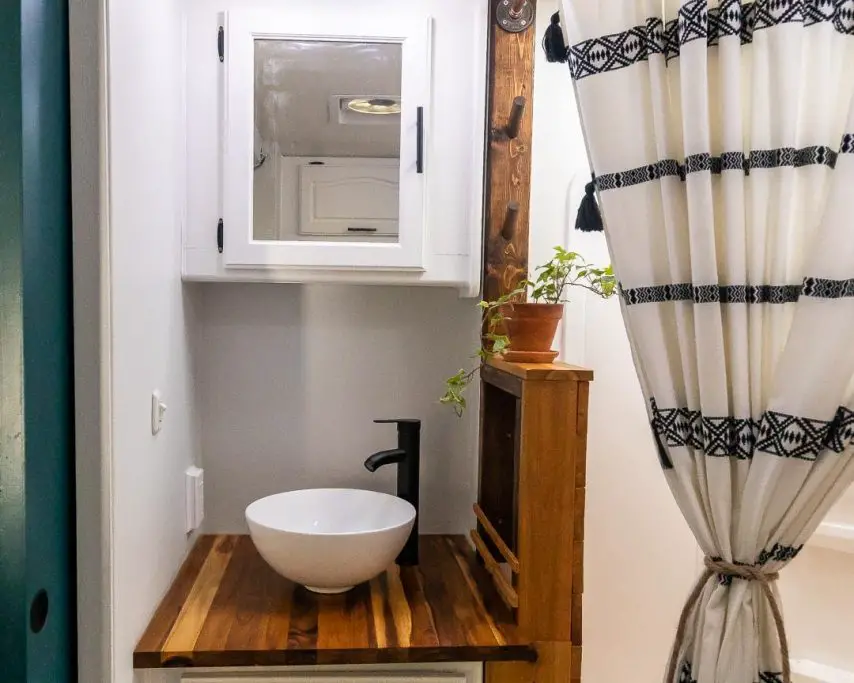
We planned to install a beautiful vessel sink with a modern residential faucet that sat on a new butcher block counter.
To do this we had to disconnect the existing plumbing to the faucet and drain. Then we unscrewed the clips that held the sink to the counter and the screws that held the countertop in place.
When everything was disconnected we broke the old parts away from the cabinet base below leaving an open space that looked straight down upon the p-trap and hot and cold water lines.
To rebuild the RV bathroom sink and faucet, we started by finding a piece of butcher block countertop that would fit the dimensions of our previous counter. We had a large block leftover from our kitchen remodel.
But as it worked out there was a singular piece we were able to purchase that was at the exact dimensions of what we needed.
We sealed the wood using Watco’s clear butcherblock oil, which both brought out the natural colors of the butcherblock and made it waterproof. Then we set it in place and screwed it to the wall from underneath to hold it in place.
Next, we drilled a hole into the center of the counter at the dimensions set forth in our sink’s manual, aligning both with where we wanted the sink to rest and with the existing plumbing beneath. Our hope was that we did not have to move the plumbing at all which, in our case, we didn’t.
Once the hole was cut we added silicone to the base of the sink to create a solid seal once we pressed it in place around the hole. We then assembled the sink according to its instructions and the drain fit perfectly into the existing P-trap so we did not have to alter it.
On the other hand, adding the faucet itself required a little more work. First, we cut a hole in the counter that allowed us to fit the faucet in place. This particular faucet had its hot and cold water inlet hoses dangle beneath a cylindrical shaft that sort of wedged itself in place inside the hole we cut.
However, these inlet hoses were too long to meet up with the existing pipes. As the plumbing was done with Pex, we measured (twice!) and cut the Pex piping back before adding a female Sharkbite adapter to each pipe.
We taped each male end of the faucet hoses with plumbers tape and quickly screwed them into place. When this was done we tightened the mount from the underside of the counter that held the faucet in place.
At this point, all that was left to do was to check for leaks. We turned the water pump on and opened the faucet and sure enough, everything worked as it should!
When we knew that everything was in its right place we used silicone caulk to waterproof the edges of the counter where it met with the wall on each of its 3 enclosed sides and this finished the job entirely!
Tools and Materials Needed:
- Screwgun
- Drill +
- Butcher Block Countertop
- BUTCHER BLOCK WOOD TREATMENT
- Vessel Sink
- Residential Faucet
- Sharkbite Adapters (2)
- Plumber’s Tape
- Plumber’s Putty
RV Toilet (~$150)
The final major project in our RV bathroom remodel was deciding what to do about our RV toilet. We had a standard plumbed RV toilet in the RV when we began the remodeling.
But as with the faucet, there was a leak in the plumbing to the toilet. Further, when we were adding vinyl plank flooring to the area around the base of the toilet we accidentally knocked the toilet over and cracked it.
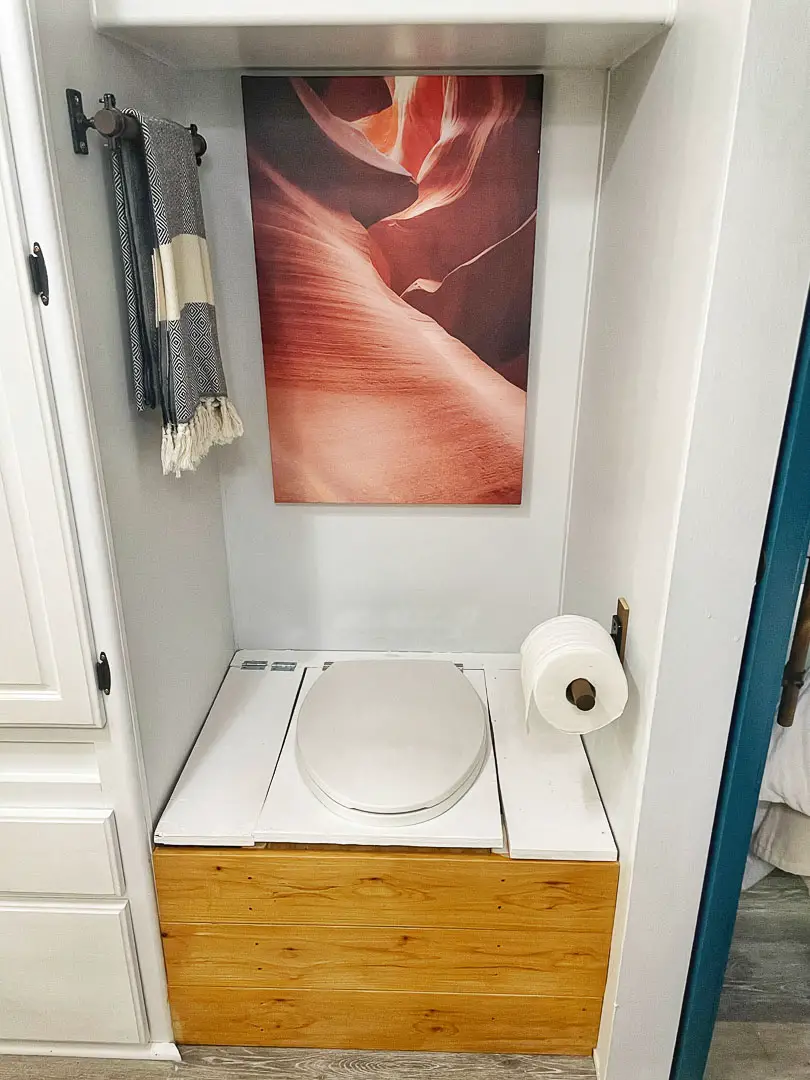
So we were faced with the option of purchasing a new RV plumbed toilet to put exactly in place of this one, or to invest in a composting toilet. Because we boondock frequently, we’ve wanted a composting toilet for years to cut down both on our water use and black water waste collection.
But the Nature’s Head composting toilet was out of our price range. So we studied how to build a composting toilet and decided we would build our own to occupy the empty space the broken toilet left behind.
First, we capped the water input with a Sharkbite cap and the black tank with a corresponding plastic cap. Then we set out to frame the toilet in the design and function we wanted.
The toilet itself would be standard height. But we wanted to have a hinged storage shelf next to the toilet for our composting shavings, spray bottles and bag storage.
So we framed out the space using 2x4s and ¾” plywood cut to appropriate dimensions. Because we were building our toilet custom to our space there were no exact models for us to follow. So we measured and cut precisely as we needed to build out the frame of the toilet.
Then we cut the 4 cover pieces of the toilet. We had one long strip along the back that would be permanently secured so that the hinges could be mounted for the movable lids.
And there were 2 matching pieces for each side of the toilet. One we would permanently mount as it would not be lifted due to the fact our toilet paper holder would be in the way of lifting.
The other would be on a hinge that would lift to provide access to the 3-cubby storage space beneath. Finally, the largest piece was the center, which we would have to cut and mount the toilet seat.
For the toilet seat, we purchased a standard toilet seat and laid it on the board where it would be. We traced the inside hole and cut the hole such that the toilet fit perfectly. Then we drilled holes in the plywood accordingly to screw the seat into place.
Initially, we attached our urine diverter to the underside of the toilet. But we realized that because we wanted to plumb the diverter to our black tank, anytime we lifted the cover to empty our compost the diverter hose would have to lift up and down as well.
Eventually, we figured, the hose would come out and we’d be faced with our urine entering our RV and not the tank!
So we cut another small piece of plywood on which to mount the diverter such that it rests permanently beneath the toilet seat. This way when we changed composting bags the diverter stayed in place.

We attached a hose of an appropriate length to run to the black tank and cut as small a hole as necessary in the black tank cap to accommodate running this hose into the black tank.
We also added a plastic container beneath the toilet to act as a second barrier in the event of a “spill.” We built a little trash bag holder that would sit in the plastic bin and meet up with the diverter such that no waste of any kind would go outside of either the diverter or the bag.
With the underneath part of the composting toilet complete, all that was left to do was to use a hinge to attach the movable lids to the permanent mounting strip of plywood at the back of the toilet.
Then, for good measure, we painted the plywood with the same epoxy resin from the shower in such a way as to make the cleaning process easier.
When the inside and top of the toilet were complete we framed the front using cedar boards to match the look and feel of the shower.
Rust-Oleum Paint – https://amzn.to/3AGyrTm
Tools and Materials Needed:
- Urine Diverter
- Toilet Seat
- Piano Hinge
- Standard Hinge
- 2x4x8′ Plywood (3)
- 1x6x8′ Cedar (1)
- Hose/Tubing (various length, as neceesary if connecting to black tank)
- Rust-Oleum Tub and Tile Paint
- Various Wood Screws
- Nailgun + 1″ brad nails
Other DIY RV Bathroom Makeover Ideas
Aside from these three major projects, we did a lot of other little DIY projects to spruce up the camper bathroom even more.
Painting Everything (Under $100)
Before we started building anything in the entire RV remodel we first painted the walls in every room a light grey. And all cabinets and doors were finished in a bright white. This lighter color opened up each and every room, particularly in the bathroom.
First, we took off everything that was mounted to the wall. We went back with wood filler and filled in all of the holes and then sanded these down when it dried.
Next, we sanded each surface using Liquid Sandpaper. This was a quick and relatively easy process of simply wetting a cloth with the Liquid Sandpaper and running it on the surface. Because it was so quick and painless we did two coats of sanding before we set out to prime the walls and cabinets.
For priming, we used a spray gun to paint two coats of Kilz primer on each wall, cabinet and door. Because the primer was significantly less expensive than the paint we were using we decided that it would be more cost-effective to put on two coats of primer rather than two coats of paint.
As it turned out, we needed that extra coat because both the white primer and the grey paint were so light that the old wood-stained walls would have shown through with only one coat of each.
READ MORE: Find out some good tips and tricks for painting the interior of your RV with this post!
Although the spray gun did a decent job with priming the walls, we made sure to trim the corners and edges by hand with a paintbrush.
We also primed each of the 5 bathroom cabinet doors. Prior to this, we removed all of the hinges and other hardware. While they were off, we painted these black using Rustoleum spray paint.
After the priming was done throughout the RV bathroom, we began painting. Because we had issues at the very end with our paint gun we decided to paint everything by hand using paintbrushes and rollers.
This took more time. But in the end, it was a much higher quality finish and we only had to apply one coat of paint to each surface.
After the paint dried, we also added new black pulls to each cabinet door to give it a nice contrast to the lighter colors on the walls and cabinets.
We reinstalled the freshly painted black hardware and mounted the cabinet doors back in place in every place except the sink cabinet, which we were going to need to access for plumbing the new sink and faucet.
Tools and Materials Needed:
- Liquid Sandpaper
- Kilz Odorless Interior Primer
- Wall Paint (preferred color)
- Paint Gun
- Paint Roller (2)
- Paintbrushes (2)
- Painter’s Tape
- Plastic Drop Cloth Cover
Vinyl Plank Flooring (Under $100)
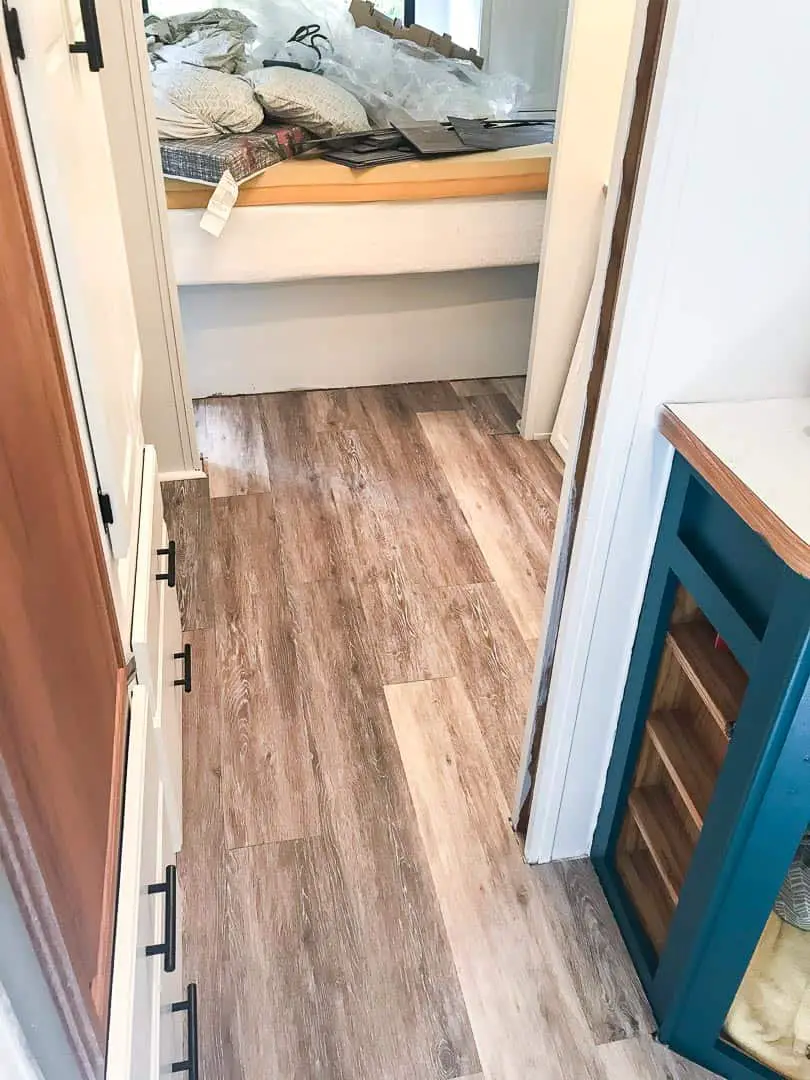
After painting the interior of the RV we also added vinyl plank flooring throughout the entire living space. The previous flooring was a disjointed mixture of carpet in the living room, vinyl tile flooring in the bathroom and then back to the carpet in the bedroom.
So after ripping up the carpet and vinyl tiles we laid down a water-resistant vinyl plank flooring we purchased from our favorite home improvement store. It was hard to determine how much of the flooring actually went into the RV bathroom renovation. But it was no more than 1.5 boxes.
The hardest part of the flooring was cutting the many angles that curved around the base of the shower and toilet. For the toilet, we actually removed the previous RV-style plumbed toilet and covered the black tank hole in order to properly cut vinyl plank flooring to go around the toilet.
In this way, when we reinstalled the toilet the flooring was seamless. Although, as you know by now, we ended up building our own composting toilet over all of the vinyl plank flooring that is now covered up by the toilet.
Vinyl plank flooring clips together and can be lightly tapped with a hammer (best to use a piece of cloth or a scrap of wood between the hammer and the plank). For any cuts, you will need to make you can use either a standard box cutter to score the plank and then snap it along the score, or you can invest in a vinyl floor cutting tool.
Tools and Materials Needed:
- Vinyl Plank Flooring (as much as needed)
- Box Cutter (or vinyl flooring cutter)
- Hammer
Skylight & Vent Fan Replacement (~$150)
The existing bathroom skylight had either been painted black or had turned black with time, thus defeating the purpose of the skylight itself. While we were on the roof switching out Fan-Tastic Fans in the bedroom we went ahead and replaced the skylight as well.
This was more expensive than we thought it would be. But it was a great replacement to invite full light back into the bathroom.
We didn’t purchase a new vent fan for the bathroom, however. Instead, we purchased a nice, new, 3-speed, multi-directional Fan-Tastic vent fan for the bedroom and moved the existing fan from the bedroom to the bathroom.
The existing bathroom fan was the cheapest you could find in 1999. The one we moved from the bedroom wasn’t much better. But it saved us a few hundred more dollars we could have spent in replacing it entirely.
READ MORE: Learn how to replace your old vent fans by checking out THIS POST.
Replacing the skylight cover was quick and easy as all the work was done on the roof. Simply remove the screws holding the existing cover in place. This will allow you to pull the top skylight cover off of the skylight itself.
We left the plastic skylight in place and simply slid the new cover on top of the skylight and matched up the screw holes. Before we screwed it in place we put a layer of 1” wide butyl tape all around the skylight to form a barrier between the skylight and the roof.
Then we screwed new screws into the roof to secure the existing skylight and the new cover in place. With the cover secure, we dabbed some Dicor self-leveling lap sealant over the tops of the screws to prevent water from sneaking in.
For an extra layer of protection, we put a layer of Eternabond tape around the edges and covered the screws. And to finish things off, we added a few dabs of Dicor self-leveling sealant around the edges of the tape to ensure water had no path inside the RV.
Swapping out vent fans was relatively similar. You can read about that in THIS POST.
Tools and Materials Needed:
- Skylight Cover
- Fan-Tastic Vent Fan
- Screw Gun
- Wire Cutters
- Wire Crimpers
- 12-14 AWG Wire Connectors
- 1″ Butyl Tape
- 2″ Eternabond Tape
- Dicor self-leveling lap sealant
Paint Ceiling Covers (Under $10)
While we were moving fans and skylights around we decided to brighten up the dreary yellowed ceiling covers in the RV bathroom and throughout the rest of the RV.
This included both the ducted air conditioning vent covers as well as the fan and skylight covers.
To do this we simply sprayed a bright white spray paint over the plastic and let it dry. The covers were easy to take off and reinstall. And the bright color they added back into the room brought new life to the old bathroom.
Swap Out LED lights In Every Fixture (Under $10)
Swapping out old incandescent light bulbs for these LED bulbs is a simple task in an RV bathroom remodel. It not only adds more light to the room but also saves you power in your battery bank.
We used these bulbs because the light fixtures we had still looked and worked fine. Although at one point, we did consider removing the fixtures to add recessed lighting.
DIY Towel Holders (Under $30)
RVs are notorious for the cheap, clear plastic towel holders that not only take up space but look horrific in any recent RV bathroom remodel. So rather than simply reinstall the old ones we took down before painting, we decided to build our own.
In the end, we build two different kinds that provided us plenty of room to hang our towels and other wet clothing. One type we composed our of a wooden dowel and metal clamps and the other type was done with the same wooden dowel and some dowel screws.
Both were quite simple to build and added a unique, rustic look to the bathroom.
Metal / Dowel Towel Holder (Under $20)
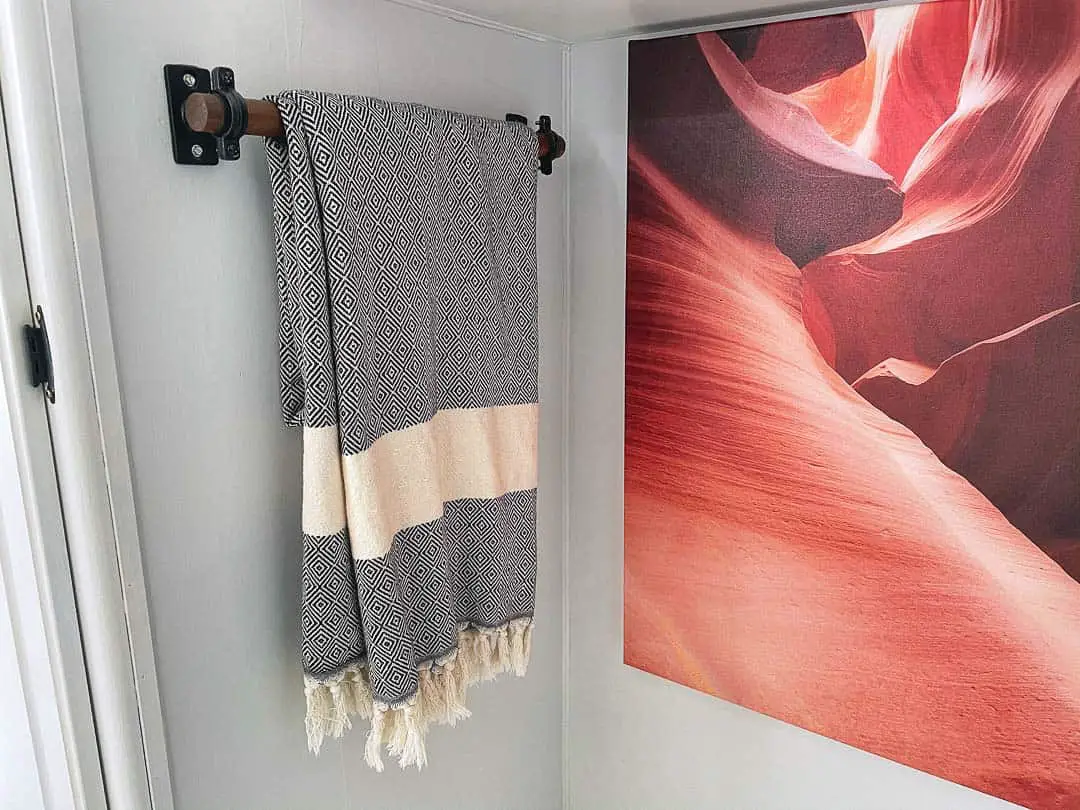
Although you can buy these wall brackets already assembled and save yourself a little time, we wanted the full DIY experience.
So we took a piece of threaded steel rod and cut 2 pieces to the length we wanted (approximately 1”) for the distance it would hold the dowel from the wall. Then we painted it black alongside the wall bracket.
Next, we cut a ½” diameter wood dowel to 18” to fit the wall of our bathroom. We stained it dark brown to match the look and feel throughout the RV bathroom and the rest of the camper. Then we simply assembled all of the pieces together and mounted them to the wall.
Tools and Materials Needed:
- Wall brackets (2)
- Threaded Steel Rod (1+ feet)
- Wood dowel (18+ inches)
- Wood Stain (as desired)
- Rust-Oleum Spray Paint
- Clamps (2)
Wood Dowel Towel Holder (Under $10)

An even simpler DIY project, these towel holders require only a short piece of wood dowel cut to your desired length and a 2-sided dowel screw.
To make these, we recommend using a thicker dowel of at least 1” in diameter. Stain the dowel to the color you prefer. Then you will cut it into the shorter pieces that will be mounted to the wall and act like a “hook” on which to hang towels, clothes or other items.
We measured our towel holders to be approximately 3 inches in length. But before you cut, note that you will want to cut the dowel at an angle (at approximately 30 degrees) in order for the dowel to face upwards when mounted to the wall. If you cut it flat then it will just stick straight off the wall and not too much good!
Once the dowels are cut, use a drill and bit just smaller than the thickness of the dowel screws you plan to use. We used 5/16” diameter by 1 ½ “ dowel screws. Screw into the cut end of the dowel screw at a right angle to the cut, but make sure not to push the bit through the side of the dowel.
Then use pliers to hold the dowel screw and thread the wood dowel onto the screw (it’s easier this way than the other way around!). Next, drill a lead hole into the wall or surface where you want to mount the towel holder.
Finally, twist the exposed end of the dowel screw into the wall until the dowel is facing up and is snug to the wall.
Make as many of these as you would like as they are cheap, simple to make and do a great job of holding all sorts of things throughout your RV – from towels, keys, hats to virtually anything else you’d normally hang on a wall!
Tools and Materials Needed:
- Wood dowel (18+ inches)
- Wood Stain (as desired)
- Dowel Screws (1 per holder)
- Miter Saw
- Pliers
- Drill + Appropriately sized bit
DIY Toilet Paper Holder (Under $15)

One final DIY project we did in our RV bathroom remodel was to build our own toilet paper holder in the same style as the rest of our bathroom. To do this we used the same exact tools and materials as the metal/dowel towel holder.
However, instead of having two wall brackets to secure both ends of the dowel to the wall we just used one. This way we could easily add the next roll of toilet paper to the holder.
Follow the same steps to cut the steel rod, paint all the metal and stain the wooden dowel. Then cut the dowel to size using a standard toilet paper roll as reference. From there you just put all the pieces together and screw it to the wall.
Note, in our case, the wall we were screwing the paper towel holder into was so thin that we actually used another thin board to spread the weight of the towel holder and allow us to mount it easier. If you are mounting into solid wood you will not have to do this.
Tools and Materials Needed:
- Wall brackets (1)
- Threaded Steel Rod (1+ feet)
- Wood dowel (18+ inches)
- Wood Stain (as desired)
- Clamps (1)
- Miter Saw
- Pliers
- Screws + Screwgun
Final Touches & Decor
Since we had the major projects for our RV bathroom remodel completed it was time for some final touches and personal decor. Lindsay is a plant fanatic, so we keep a few plants around the shower. Not only do they look nice, but also they get ample sunlight through our new skylight.
We also took up empty wall space by hanging one of Lindsay’s favorite photographs that she’s ever taken on the wall. It is an image of Antelope Canyon and the colors contrast with the wall and composting toilet giving it the perfect home in our RV bathroom.
We prefer to use our own artwork in our camper. But of course, this option is up to you for how you want to add the final touches and decor to your RV bathroom renovation.
But whatever you do, and however you do it, we’re certain that you will be pleased when you get to the finish line and see the great work you have done to transform your camper bathroom into one that looks like anything you’d see on a home improvement show!
NOT SURE WHERE TO BEGIN WITH YOUR RV REMODEL?
No worries! We can help you get started on your RV remodel! From offering counsel and assistance in picking out the best RV to remodel to walking you through some of the major and minor tasks you may want to complete, we offer RV remodeling consultation to suit your needs!
Rates start at $50/half hour and consultation packages can be tailored to your wants and needs!
Contact us via email to arrange an initial consultation and discuss consultation packages available!
NOTE: Due to the nature of our travel schedule, we do not offer remodeling services outside of a consultation.