Last Updated on September 2, 2022 by Chris and Lindsay
If you are thinking about replacing your RV countertops and upgrading to a new look and feel, we’ll take you through everything you need to know to install your own DIY wood countertops!
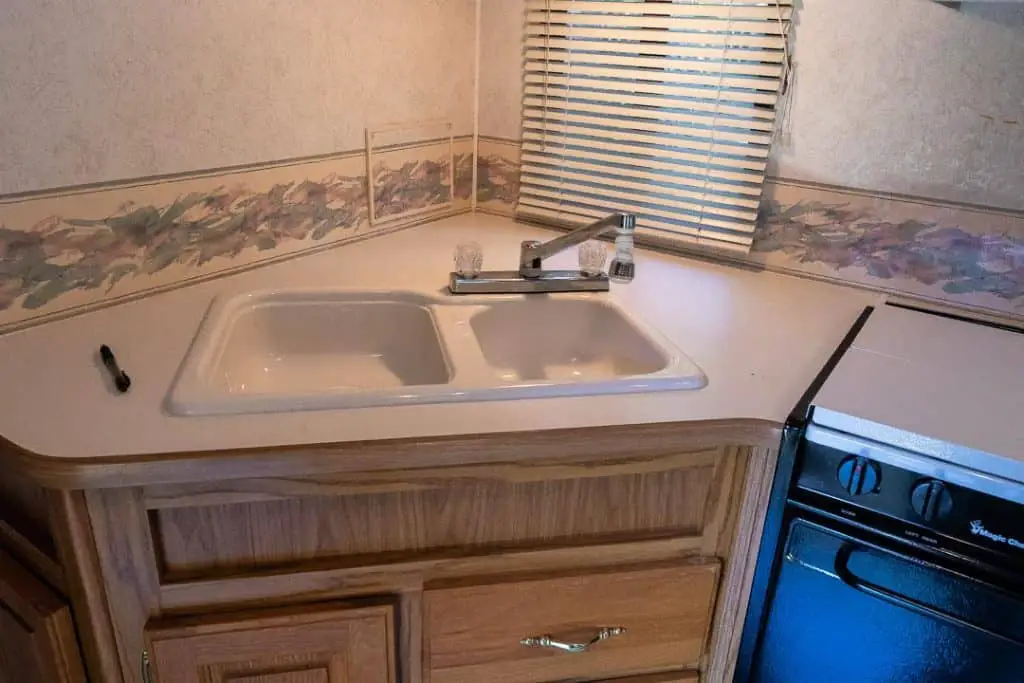
Depending on how much time you spend in the kitchen, RV countertops can easily be the first or last items on your RV remodel checklist. But one thing is almost certain – unless you purchased your RV used from someone who already upgraded the kitchen, you’re likely to have a drab, flimsy RV countertop that will be a sore thumb to the rest of your RV remodel.
Of course, you don’t HAVE to replace your existing countertop. And in the section below we’ll give you an overview of a few ideas if you just want to transform the existing countertops into something else.
But if the one you have works fine and looks fine, then you’re probably best clicking away from this post now. Chances are, you stumbled on this post because you’re interested in the look and feel that a butcher block countertop adds to your home on the road.
In our world, the expression “happy wife, happy life” applies directly to the RV set up in the kitchen. And there is a direct relationship between how happy the wife is and the quality and quantity of food that comes out of it.
So when Lindsay requested a butcher block RV countertop in our fixer-upper Class C motorhome, we had to figure out how to make it happen.
In this post, we’ll help you learn how to remove existing RV countertops and replace them with a wood countertop of your choosing. As butcher block can be expensive, the information in this post applies to all DIY wood countertops.
Affiliate Disclaimer: This post may contain links to products we think you’ll like. If you purchase any of the products through the links below we’ll receive a small commission. As full-time RVers, we know our RV products well and only recommend those that we either own or would consider owning ourselves.
NOT SURE WHERE TO BEGIN WITH YOUR RV REMODEL?
No worries! We can help you get started on your RV remodel! From offering counsel and assistance in picking out the best RV to remodel to walking you through some of the major and minor tasks you may want to complete, we offer RV remodeling consultation to suit your needs!
Rates start at $50/half hour and consultation packages can be tailored to your wants and needs!
Contact us via email to arrange an initial consultation and discuss consultation packages available!
NOTE: Due to the nature of our travel schedule, we do not offer remodeling services outside of a consultation.
RV Kitchen Countertop Replacement
While vinyl plank floor installation is among the easier DIY projects, replacing your RV kitchen countertop can be a little more challenging. You’ll be working with a thick piece of wood that will need to be cut with proper saws and sharpened blades.
And you’ll need to measure and recreate sometimes awkward angles to match existing appliance placement. Further, you’re going to have to put a few holes in the counter to accommodate your sink, faucet and potentially other items such as soap dispensers.
But the reward for the transformation is priceless, even if there is a bit of stress involved in the process. Let’s get into the process now!
| PROJECT | PART OR MATERIAL | QTY | PRICE PER | TOTAL COST |
| Kitchen Faucet | Faucet | 1 | $70.61 | $70.61 |
| Kitchen Sink | Kitchen Sink | 1 | $159.56 | $159.56 |
| Kitchen Counter | Butcher Block Countertop | 1 | $259.00 | $259.00 |
| Counter/Sink Sealant | Silicone Sealant | 1 | $7.58 | $7.58 |
| Sink/Drain | Plumber’s Putty | 1 | $3.31 | $3.31 |
| Sink Plumbing | Plumber’s Tape | 1 | $2.14 | $2.14 |
| Sink/Drain | Sink Drain | 1 | $9.98 | $9.98 |
| Faucet Connection | Sharkbite Adapters (x2) | 2 | $8.98 | $17.96 |
| TOTAL | $530.14 |
Removing the existing countertops
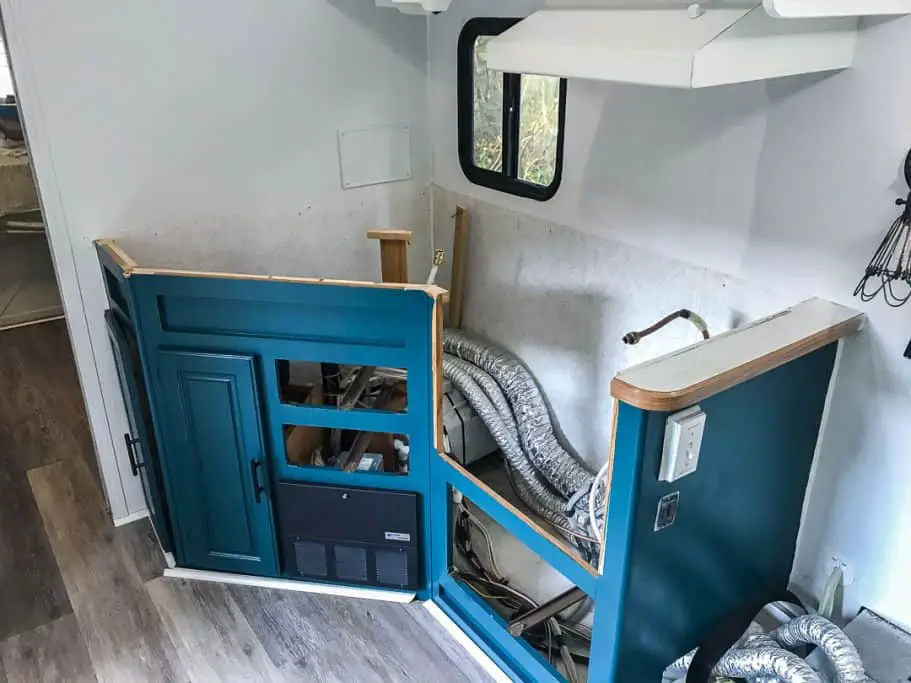
The task to remove the old RV countertops may be a challenge as it is usually such a small space beneath the counter, which is usually crammed with sink components, plumbing, wires, cabinets and various other odds and ends. But the principle is the same.
First, you’ll want to disconnect the plumbing. If you haven’t already done so, drain the water from your tank so that there is no water in the lines coming into your sink. Then close any valves you may have to feed the kitchen faucet as a redundancy. Of course, don’t turn the water pump on by accident.
Now you can disconnect the old faucet, which may be as simple as twisting loose a single connection depending on your RV or trailer. You are now ready to detach and remove the sink.
Sinks are usually attached to the counter with clips that typically screw into place. You may need to move some shelving to get a clear view of the clips. But most will loosen quite easily, typically with a Phillips head screwdriver or screw gun.
Loosen these clips and then press upward slightly and the sink should have some give. Use a utility knife to cut any silicone that may be attached between the sink and countertops.
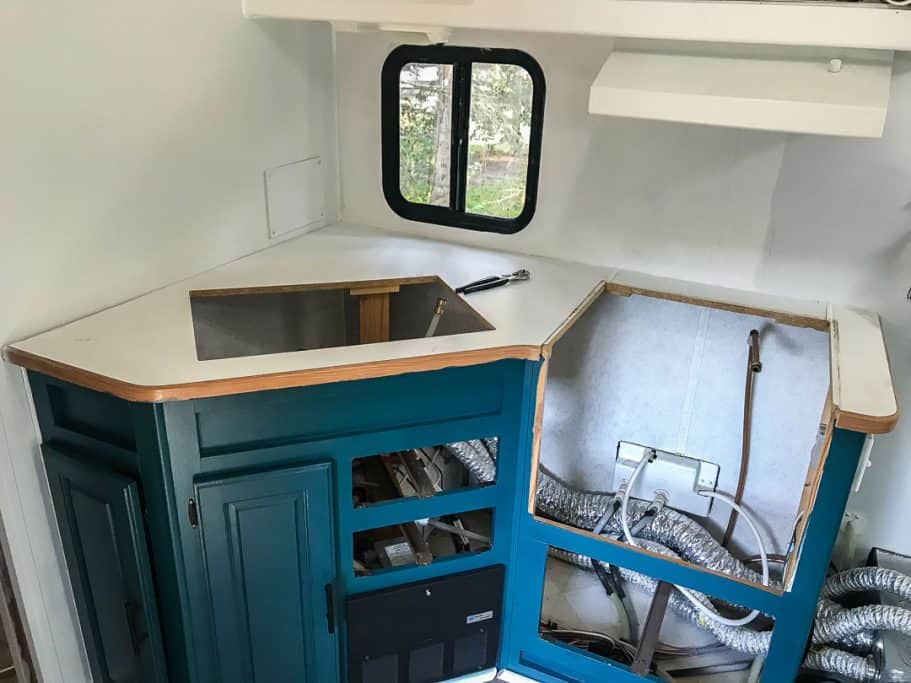
With the plumbing disconnected, the sink should just push up through the sink hole and out of the countertop. Now it’s time to loosen up the countertops for removal.
First, check to see if the counter is installed in one piece or multiple pieces. In our case, the counter was in 2 pieces. The first was a large section containing the sink and most of the countertop space. The second was a small “L-shaped” piece that wrapped around the back of our oven and side of the counter.
Next, grab a flashlight and take a peek at the underside of the countertops along the wall. You will likely see a small board screwed into the wall with the countertop resting on it. Check for screws between that board and the counter as many RV manufacturers secure it to the wall via these small support boards.
Once you have unscrewed all of the screws holding the RV countertops in place, carefully lift up (or push up if you are still underneath it) the countertop. You may find one last screw or two if you notice one area of the counter doesn’t want to move.
Now you can carefully remove the existing countertops completely and set them to the side. Note that you do NOT want to discard these yet. They will make a particularly perfect template for the new countertops.
Building the New DIY Wood Countertops
With the existing countertops removed, it’s time to start planning out your new one. This is where you’ve likely already thought about the countertop materials and whether you want to go with butcher block or otherwise.
Find Your New Countertop
Take careful measurements of the existing countertops and select a piece of wood that will be large enough to build the new ones. You may also want to consider other places you may add this matching countertop throughout your RV including in your bathroom, other tables and counter space or even a cutting board.
Once you have all of your measurements, go find the best board or boards that will match your needs. You can find various countertop materials at your local hardware store.

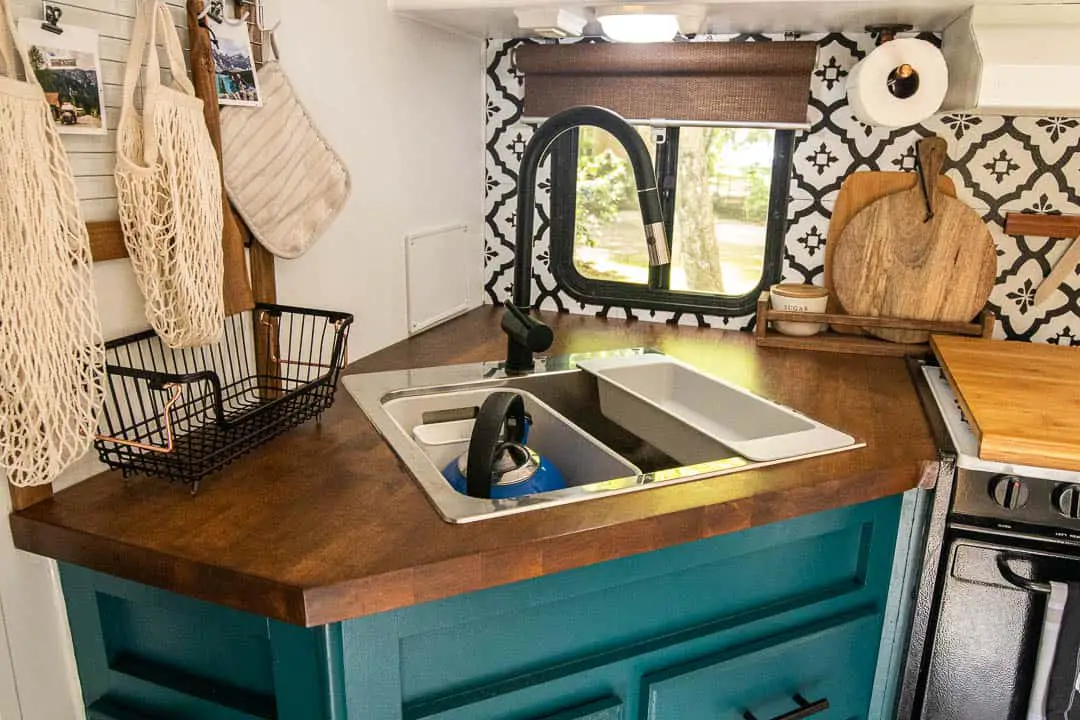
We opted for an 8-foot long section of unfinished birch that was 1.5” thick and 30 inches wide. These dimensions gave us the ability to have plenty of wood for our kitchen as well as our bathroom countertop. Plus as it was unfinished we were going to be able to stain and seal it as we pleased.
Getting the birch butcher block home was a challenge in the car we were borrowing. But once we got it home we began the next step, which is to start designing your new countertops.
Stencil The Outline
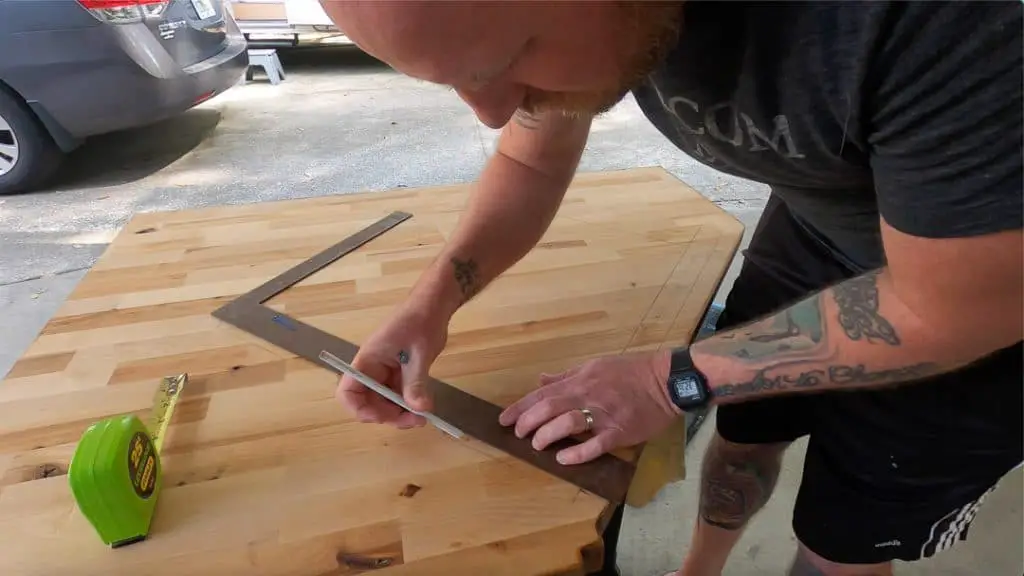
Unless you have incredible confidence in your woodworking abilities and/or you must replace your cabinets as well as your existing RV countertops due to water damage or other reasons, the simplest and easiest way for updating RV countertops is to use the existing ones as stencils for the new one.
Lay the existing countertops on top of the new wood and trace an outline with a pencil. If you are putting in the same sink as you removed, trace the sink hole as well and any other accessories you may need holes for.
If you are installing a different sink, refer to the sink installation manual to reference specific dimensions for the new sink.
Make the cuts
Now comes the work of making the various cuts. You don’t need any special tools. But you will need a combination of a circular saw, a jigsaw and an oscillating saw.
For the sides, you can likely use a circular saw to follow straight lines of the pattern. But any internal holes may require specialized sawing that combines all three.
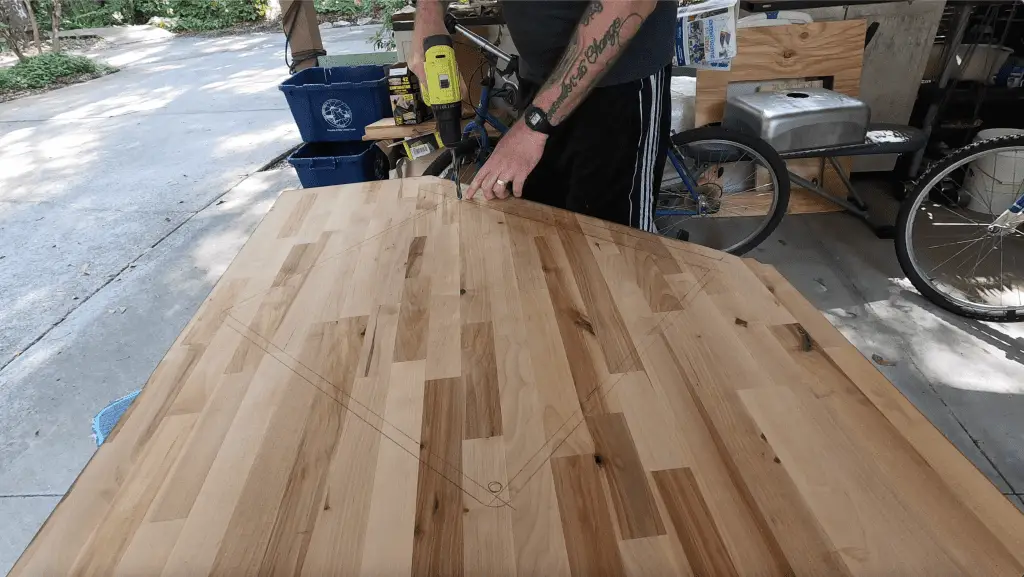
With a 1.5” butcher block, we used a large drill bit to drill 4 holes in the corner of the sink hole. Then we inserted the jigsaw to start the cut. We then used our more powerful circular saw to make the major cuts in the wood. When we were done we used our oscillating saw to clean up the sides and edges.
For faucet holes we used an appropriately sized hole saw kit and a whole lot of patience to drill through the thick countertop.
Stain the New Countertop
With the holes drilled, you can now get to the work of preparing the look and feel of the new kitchen countertops. This is a multistep process that will drag this project into day 2 or perhaps day 3.
First, sand the RV countertop. This process is about knocking out any rough spots in the wood as much as preparing it for the next steps.
Second, you will need to condition the wood. Conditioning, in DIY countertops, prepares the wood to be stained by allowing the wood to take the stain more evenly. Use a cloth towel to gently massage the conditioning into the wood.
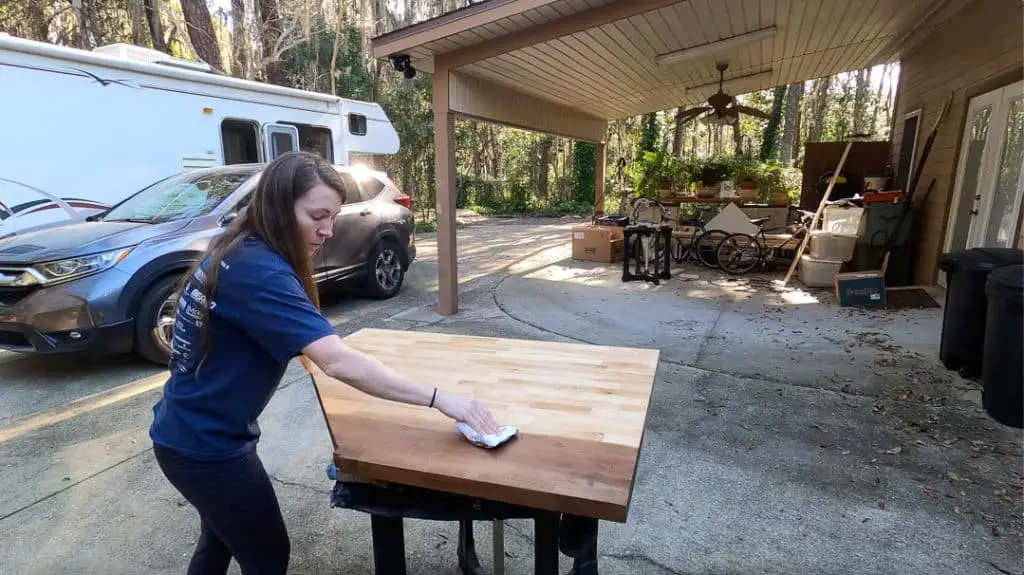
Third, add your first coat of wood stain. If you like the color that results from the first layer then you can stop. However, it is likely you’ll want several coats of stain before you are done. You’ll be at it a while if you want a dark walnut stain. Remember to lightly sand between each coat of stain.
Finally, you will seal the camper’s countertops with Waterlox. This waterproof sealant will provide a permanent finish to the wood and help prevent much of the wear and tear in the kitchen area from showing.
As with the stain, you’ll want to put multiple coats on the countertops. Lightly sand between coats and consider stopping after the 3rd coat.
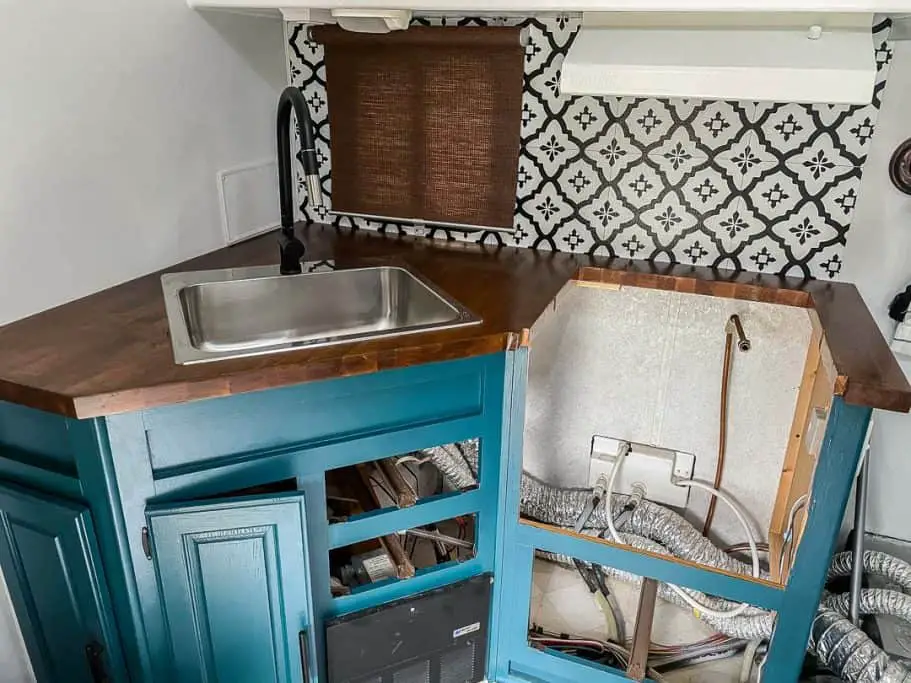
Fasten the Sink to the Counter
At this point, the countertops should look amazing – but out of place without being fixed to the kitchen walls and with no sink or faucet. So you’ll want to consider how to add the sink to the countertop before your final installation in the RV.
The best option is to install the sink outside and then to carry the entire sink and countertop into the RV kitchen to secure and set up accordingly. We opted for this route – and thankfully so.
It turns out that the 1.5” thick butcher block we purchased was too thick for the screws that hold the sink in place. This was a relatively simple fix, as we just needed to purchase longer screws to use. But it was much easier to set up than the second option.
Installing the sink outside also allowed us to put a nice layer of silicone between the sink and the new countertop ensuring a watertight connection between the two. Our sink was a single deep basin, stainless steel residential one that we knew required a new hole and adaptations to the existing plumbing.
The second option is to try and install the sink from inside the RV itself. There is likely much too little space to make this a worthwhile effort.
Fasten the Countertop In the Kitchen
With the sink installed outside, bring the sink and countertop combination inside and set it on the small wooden pieced mounted to the wall. Then push the countertops into the right position, flush against the wall. Take a drill and a small drill bit and pre-drill holes into the bottom of the countertop.
Next, simply reattach the RV countertops to the wooden mounts by tightening screws through the mounts and into the countertop. If you have two or more pieces of the countertop, as we did, you will want to fasten them together in place to create a more stable countertop.
For this, you use a small piece of scrap wood or metal like this to connect both pieces together. Tighten it down with screws. And if, when looking at the counter from above, it appears the gap between the two pieces may be too large, you can put a bead of clear silicone to help tie the look together.
Connect the Plumbing
With the sink installed and the countertop secured in place, the last thing to do is to connect the plumbing for your faucets. This will vary depending on your faucet preference.
We opted for a beautiful, sleek residential kitchen faucet that required only one additional hole in the countertop through the top section of the sink. Once it was pushed through the hole and tightened down the hot and cold water inlet holes just needed to connect to the existing hot and cold water pipes.
To do this, we had to use Sharkbite adapters both to connect to the existing Pex tubing and also to step down the plumbing from ½” to ¼” for our particular faucet. Be sure to check your faucet for instructions accordingly and don’t forget to wrap the male connectors with plumber’s tape.
With the countertop installed and the kitchen sink and faucet connected, you just need to fill the water tank once again, open any closed valves, and test whether you have any leaks. Hopefully, you are leak-free and you can take on one last task.
Add the finishing touches
It is likely your old RV countertop in your kitchen had a vinyl strip that ran along between the counter and the wall to create a seamless look. You can find this vinyl online and in RV dealerships.
However, you may find it easier and affordable to simply run a bead of silicone along the edges. This will not only make the new countertop look amazing, but also it will keep crumbs and water from seeping down the sides of the countertops, causing problems elsewhere.
Once this is complete, stand back and take a look at your new RV countertops! Your RV countertops worth may now be way more than the work you put into transforming this part of your RV!
Other places to include butcher block
Whether you opt to use butcher block for your DIY wood countertops or go with a different type of wood, you will find that the RV feel and look will be inspiring, especially since you completed the project yourself!
Now is a great opportunity to look at other places where you may want to use leftover wood for other counters in your RV. Here are a few ideas.
Bathroom
You can follow the exact same steps from above and use leftover countertop material to update your RV countertops in your bathroom as well. We did this as part of our RV bathroom remodel and we could not be happier with how the bathroom looks today.
We added a vessel sink and matching residential faucet and completely transformed the look and feel to match that of the rest of our remodel.
Cutting Boards
Another popular way to maximize the leftover wood is to create a cutting board from scrap wood. You can be simple and keep a square shape. Or get fancy and cut out any design you want.
The key will be to use a food-safe, nontoxic conditioner and sealant so that the resulting board can actually function as it should and not sit there just for looks!
Accents
By the time we were done cutting the RV countertops in the kitchen, we had several thin strips of beautiful butcher block wood that we did not want to waste.
Since we knew that items on shelves in our RV would want to slide whenever we were driving, we used several of these strips as accents on the shelves both to look incredibly sharp and tie the room together, and to hold our items in place.
We also used another small piece to create a little picture frame for our kitchen. The sky is the limit with what you can do with leftover wood from your counters.
Other tables and counter space
If you have other counters or tables in your RV you could also keep the same look going throughout the RV by adding leftover wood to other places.
We have 4 storage cubes in our living room that we tied together – physically and aesthetically – with a big piece of a leftover kitchen counter. And because even after all of these other projects we still had some wood leftover, we started making custom boards for friends and family members!
Other Ways to Upgrade Your RV Countertops
Committing to entirely replacing your RV countertops may not be altogether appealing when you consider the time, attention to detail and money it may cost you to do so.
Instead, if you are looking for a way to upgrade, update or otherwise improve your existing RV countertops you can check out any of these popular methods. Each one will take a standard particleboard counter from the RV manufacturer and turn it into a unique RV countertop that makes a big difference in turning your RV kitchen into your home kitchen.
Paint
The simplest solution. If your existing counter has normal wear and tear and you do not want to install a new one, you’d be surprised how a simple layer of paint can transform the counter.
You will want to sand the existing countertop before applying any conditioner, stain or paint to it. And, of course, be sure to use food-grade and nontoxic sealant to lock in the color.
Peel And Stick Wall Paper
Another simple, affordable way to make more of your existing counters is to use peel and stick wallpaper, contact paper or shelf liner. This will not be a very durable solution. But it is quick and easy and can be completed for less than $30 in most cases.
Resurface
You can either pay a professional or purchase a DIY resurfacing kit to change the color or surface of the counter. Clearly paying a professional will be more costly.
But DIY kits will let you do the job for under $200. This will take some time and attention to detail. But it is a lightweight and cost-effective option for transforming your counters.
Giani offers one of the best DIY resurfacing kits on the market. You can also get a good deal on a kit from Ekopel 2K.
Restoration
If you have particularly beautiful and rare wood counters in your RV that have seen better days you may want to attempt to restore them rather than to replace them.
While this restoration can take many shapes, essentially you’ll sand the wood and remove any scars or damage caused with time. Then you can choose to refinish the wood by resurfacing it with a different material or conditioning, staining and sealing it accordingly.
Here is a great kit by Rust-Oleum to get you well on your way to restoring your countertops over a long weekend.
Wood Plank Flooring
This is a possible option for many RVers who may have leftover vinyl flooring or tile from redoing their RV floor. Vinyl plank flooring or tile will snap into place, can be cut as necessary and can be glued or otherwise attached to the existing counter.
Doing so would possibly cause the counters and floor to run together. But you could use a different color for your counters than your flooring. Then add a few pieces of molding at the edge and you’ll have entirely new counters that are a relatively lightweight option, durable and easy to install.
READ MORE: Check out our post on adding vinyl plank flooring to your RV remodel or renovation.
Faux Marble
Faux marble can be achieved with a little paint and a little clear epoxy. It is not entirely difficult to work with and is a relatively lightweight countertop material.
But it will take some time, patience and practice to get it just right. Once again, Giani offers the best product to get the job done!
Faux Concrete Countertop
Solid concrete countertops would be entirely too heavy and not at all practical for an RV. But if you’re after the modern look and feel of concrete finishing in your RV you can add a subtle layer of concrete rubbed into your existing counters to recreate an actual concrete counter.
NOT SURE WHERE TO BEGIN WITH YOUR RV REMODEL?
No worries! We can help you get started on your RV remodel! From offering counsel and assistance in picking out the best RV to remodel to walking you through some of the major and minor tasks you may want to complete, we offer RV remodeling consultation to suit your needs!
Rates start at $50/half hour and consultation packages can be tailored to your wants and needs!
Contact us via email to arrange an initial consultation and discuss consultation packages available!
NOTE: Due to the nature of our travel schedule, we do not offer remodeling services outside of a consultation.