Last Updated on January 28, 2023 by Chris and Lindsay
If you can’t afford a new RV or want the wonderful memories and challenge of a renovated camper, in this blog post we’ll break down how to do a camper remodel on a budget of less than $8,000!
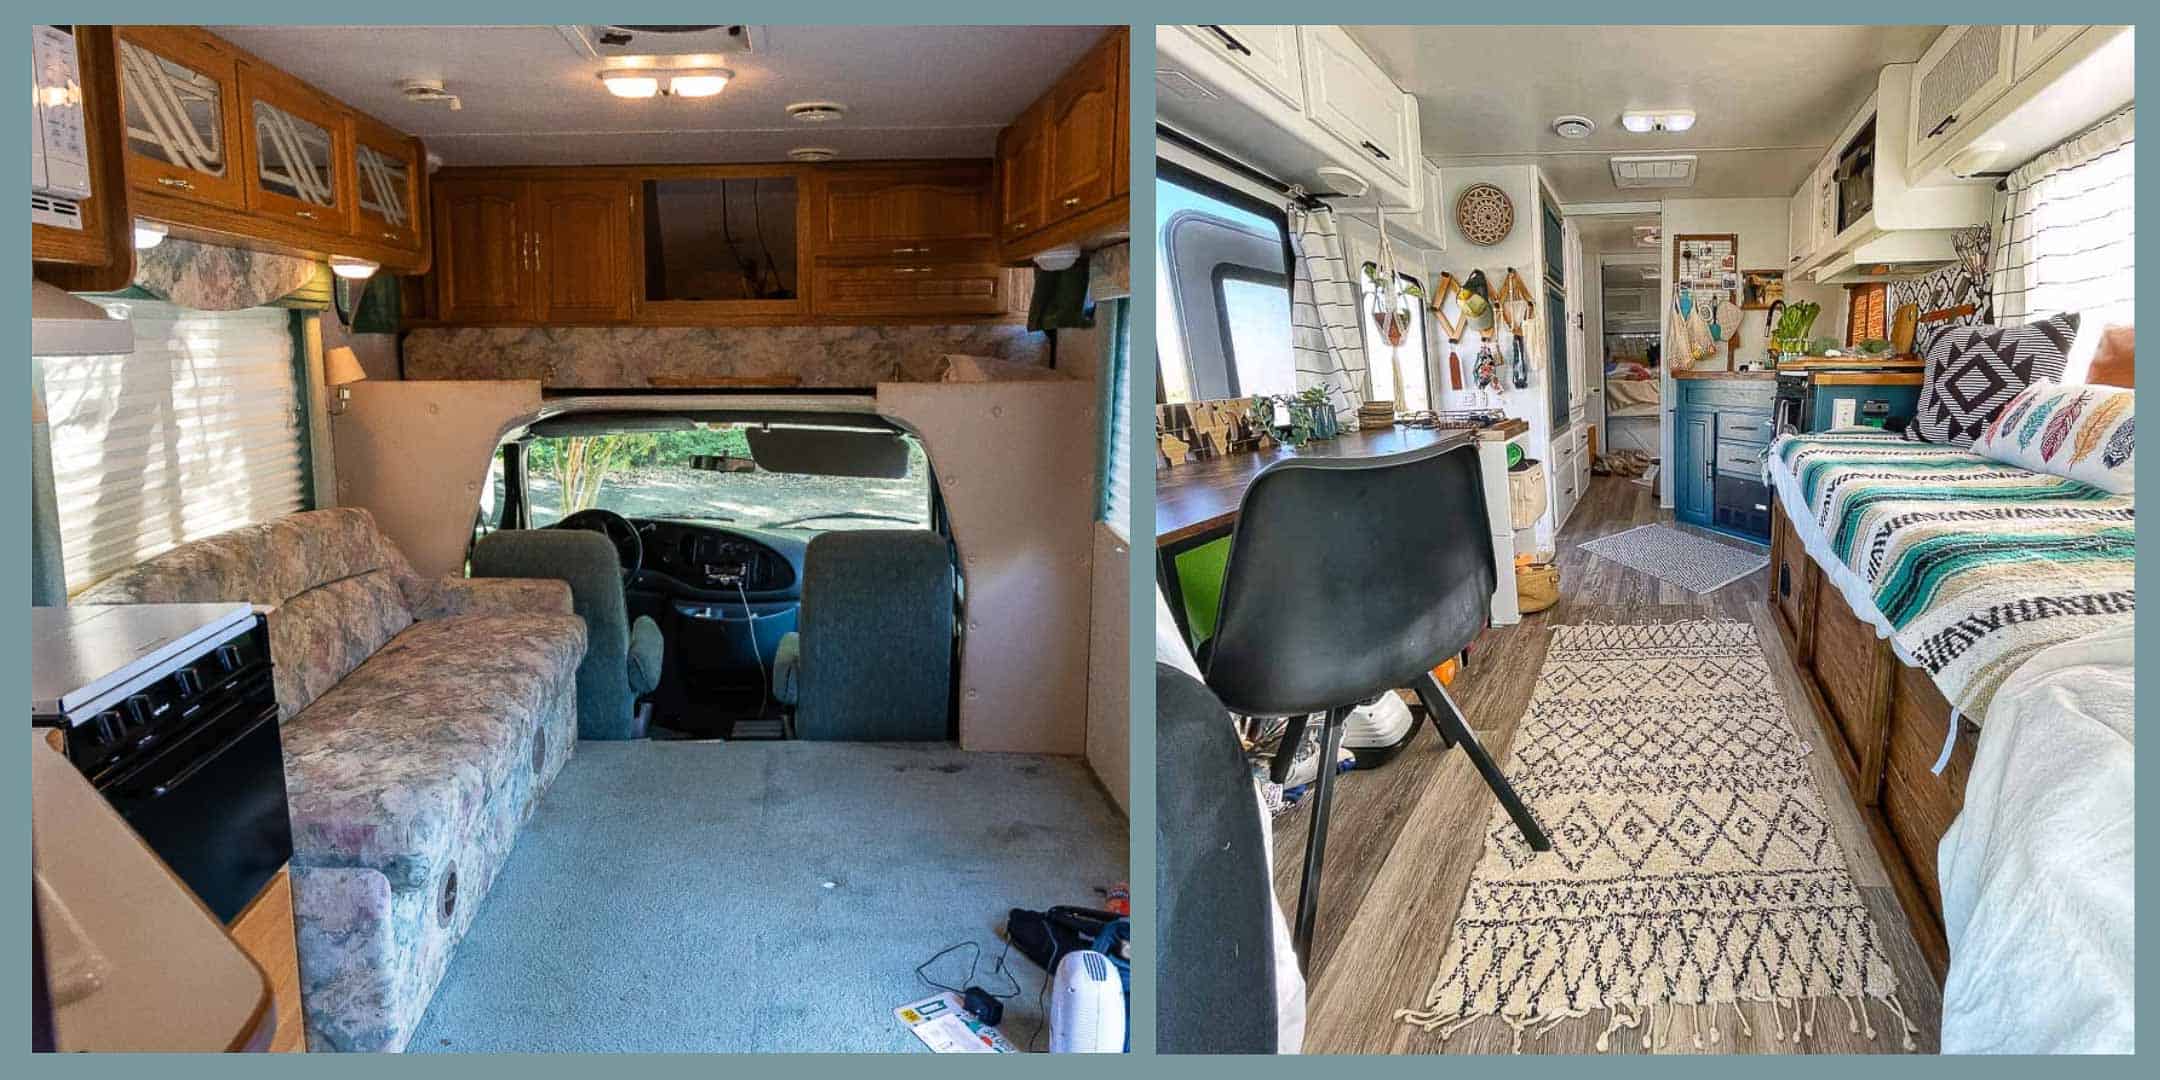
We recently completed a full RV remodel in our camper on a very tight budget. In fact, we only budgeted $20,000 between the RV renovation and the cost of the RV itself. So when we found and settled on our 1999 Shasta Cheyenne Class C and paid $12,000 for it, that left us $8,000 to make all the camper renovation and upgrade decisions that we wanted.
Because we spent a fair amount of time researching the exact type and floor plan of RV that we wanted when it came to planning the remodel we had a pretty good idea in mind of what we wanted to do. Then we set to break apart each of the projects we wanted to do in terms of costs and budgets.
In general, we wanted to build a budget that allowed for some unexpected overages and conservative budgeting. We were going to have to work to earn every dollar of the remodel so we wanted to set a hard spending goal in the hopes of coming in under budget.
For some projects, such as our power and solar setup, we spent a lot of time and went very deep into budgeting. But others, such as the office desk and couch in the living room or the painting of the interior, we didn’t put too much thought into and left a much larger budget than what we hoped.
And then, of course, are the surprises – like the toilet that breaks during the RV remodel and needs to be replaced, and the plumbing that turned out a lot more broken than you suspected.
But in all, after we listed all of the camper renovation projects we thought we wanted – such as luxury vinyl flooring, new window treatments with blackout blinds, a few new light fixtures and a fresh coat of paint – and tallied up the total cost of each, we did in fact get our RV makeover budget under $8,000.
The question became, could we stick to the budget and turn an old camper into a beautiful and comfortable home on the road?
In this post, we’ll take you through the camper renovation projects we took on in each room of our RV, as well as on the outside AND including the power and solar setup.
Whether you have a vintage camper you want to restore, a travel trailer or fifth wheel that needs a little TLC or a motorhome you plan to redesign from the inside out, we hope to guide you on the path to the most budget-friendly RV renovation you could possibly put together.
AFFILIATE DISCLAIMER: This post is full of affiliate links to the products that we used to remodel our RV. We have been intentional in linking to the actual products that we used so that you can have confidence when you plan and carry out your own RV renovation!
NOT SURE WHERE TO BEGIN WITH YOUR RV REMODEL?
No worries! We can help you get started on your RV remodel! From offering counsel and assistance in picking out the best RV to remodel to walking you through some of the major and minor tasks you may want to complete, we offer RV remodeling consultation to suit your needs!
Rates start at $50/half hour and consultation packages can be tailored to your wants and needs!
Contact us via email to arrange an initial consultation and discuss consultation packages available!
NOTE: Due to the nature of our travel schedule, we do not offer remodeling services outside of a consultation.
Camper Remodel On A Budget of $8,000 (or less!)
When we added up the total of our repairs that we had to make just to bring the older RV into a livable condition and upgrades we wanted to turn it into a beautiful home, we spent a total of $7,281.34.
Note, we completed our RV renovation in the middle of the pandemic so costs fluctuated substantially both during and now after our build. These costs may not be entirely reasonable based on current market pricing and availability. However, these are the true total RV renovation costs of every aspect of our old camper.
Let’s get into a room-by-room look at each project we completed and the approximate costs of each one.
| REMODEL EXPENSES OVERVIEW | |
| Living Room | $1,136.64 |
| Kitchen | $585.26 |
| Bathroom | $934.41 |
| Bedroom | $998.70 |
| Exterior | $173.97 |
| Power | $1,020.65 |
| Solar | $817.89 |
| Roof | $789.64 |
| Repairs/Upgrades | $824.18 |
| TOTAL | $7,281.34 |
Entire Camper – $896.37
There were several parts of the RV renovation that applied to the entire camper remodel and thus we placed them in a single budgetary “bucket.” These projects included installing new floors, switching our for all LED lights and light fixtures, painting all interior walls and cabinet doors, and the curtain fabric.
When it came to budgeting for, and expensing, each of these projects we added up a total amount for the project and then assigned an approximate portion of the whole to each room.
For example, the entire vinyl plank flooring cost $320.16. But this was divided up to $160.08 for the living room (approximately 50% of the new flooring was in the living area) and other portions for the bathroom and bedroom areas.
| ENTIRE CAMPER | $896.37 |
| * Flooring | $320.16 |
| * Lighting | $29.70 |
| * Painting | $446.60 |
| * Curtains | $99.91 |
Looking at the details of each project we have the following breakdowns:
Flooring – $320.16
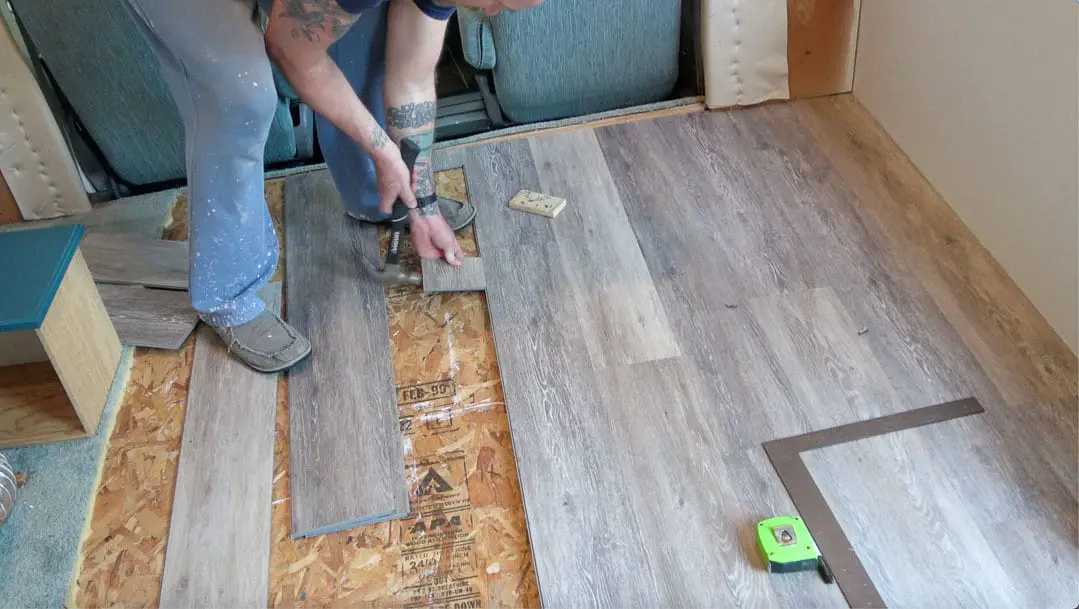
We installed waterproof vinyl plank flooring throughout the RV. In the front of the camper, we put a metal edging threshold to transition from the flooring to the carpeted driver and passenger seat area. We also put quarter-round floor trim throughout the RV.
A note on new flooring: We shopped vinyl plank flooring from our local big box hardware store. You can almost always find a deal on one kind of vinyl plank flooring or another if you shop around. And sometimes where there are deep discounts on a small amount of remaining inventory you can get by with the few remaining boxes because most RV renovations won’t require too much flooring material.
| Wood Flooring | 5 | $53.20 | $266.00 |
| Edging Trim Threshold | 2 | $8.38 | $16.76 |
| Quarter Round Floor Trim | 5 | $7.48 | $37.40 |
| TOTAL | $320.16 |
Lighting – $29.70
We switched out all the bulbs in our light fixtures to include only LED light bulbs. These were very affordable in bulk, reduce our overall daily power usage and brighten the room more than traditional incandescent light bulbs.
Our particular RV had two types of light bulbs and we replaced them all.
| ITEM | QTY | PRICE | TOTAL |
| LED Lightbulbs #1 | 1 | $14.71 | $14.71 |
| LED Lightbulbs #2 | 1 | $14.99 | $14.99 |
| $29.70 |
Painting – $446.60
When it came to painting all the walls and cabinet doors in the old camper we clumped all of the costs together and once again divided up the total cost by how much paint each room required. We did not, for example, purchase a new paintbrush for every room we painted. So we divided the cost of the paintbrush, rollers and pans equally among the rooms.
The materials included the painters tape and painters drop cloth, spray paint for cabinet hardware and covers, Liquid Sandpaper, primer, paint gun and wall paint. In addition to the traditional painting of the walls and cabinets, we also spray painted all cabinet hardware and AC and heating ducts and vent covers.
| PRODUCT | QTY | PRICE | TOTAL |
| White Spray Paint – Vent Covers | 1 | $5.98 | $5.98 |
| Black Spray Paint – Cabinet Hardware | 1 | $5.98 | $5.98 |
| Liquid Sandpaper | 1 | $17.44 | $17.44 |
| Painters Tape | 1 | $13.65 | $13.65 |
| Kilz Primer – 1 gal | 2 | $32.70 | $65.40 |
| Clear Drop Cloth | 1 | $4.82 | $4.82 |
| Wall Paint | 1 | $37.54 | $37.54 |
| Paint Gun | 1 | $45.99 | $45.99 |
| Wood Hole Filler | 1 | $8.98 | $8.98 |
| Purdy 3″ Paintbrush | 1 | $14.48 | $14.48 |
| Purdy Angled Trim Brush | 1 | $11.48 | $11.48 |
| Paint Roller | 1 | $5.98 | $5.98 |
| Paint Roller Cover | 2 | $7.98 | $15.96 |
| Paint Roller Pan Insert | 1 | $2.58 | $2.58 |
| Paint Roller Inserts | 1 | $5.96 | $5.96 |
| Foam Applicator Paintbrush | 4 | $0.98 | $3.92 |
| Heirloom Traditions Cabinet Paint | 1 | $157.65 | $157.65 |
| Cabinet Handles | 1 | $22.81 | $22.81 |
| $446.60 |
Window Coverings – $99.91
Although both the bedroom and living room required their own curtain rods and mounting hardware (included in each room separately), the curtain material itself came in one big batch that we purchased from Target.
We bought curtain panels in the largest size possible for the pattern we wanted in our RV renovation and used portions of it in each room.
| PRODUCT | QTY | PRICE | TOTAL |
| Curtain Panels | 1 | $99.91 | $99.91 |
| $99.91 |
Living Room & Desk – $1,136.64

Our living room and desk took up most of the space in our camper remodel and thus had the largest RV renovation cost. It was divided into 4 main projects plus the 4 portions of the entire RV renovation.
Although we liked the general RV interior design of the cabinets and floor plan, we were not fans of the RV furniture that occupied the space. So we removed the dining table (a dinette table that took up a lot of space) and replaced it with desk and cube storage boxes by the front door. Having a big, open workspace is more important to us than having a bulky and awkwardly-shaped dining table that extended into the center of the living space.
We also removed the old RV couch and built our own that functioned both to pull out and lift up so we could have storage beneath it and extra sleeping space if necessary.
Then in our cabover storage area, we also converted that space into a standing desk. We installed a DIY privacy curtain between the cab and the camper living space to be able to provide quick privacy when we were not staying long enough in a place to use the windshield RV cover.
| LIVING ROOM | $1,136.64 |
| * Painting | $259.21 |
| * Privacy Curtain | $86.88 |
| * Desk | $110.27 |
| * Front Door | $308.64 |
| * Lighting | $42.90 |
| * Sofa | $110.84 |
| * Curtains | $57.82 |
| * Flooring | $160.08 |
For a more specific project breakdown, see the following budgetary line items.
| SPECIFIC PROJECT | PRODUCT | QTY | PRICE | TOTAL |
| Cabinets | Peel & Stick Wallpaper | 1 | $35.91 | $35.91 |
| $35.91 | ||||
| PAINTING PORTION | $223.30 | |||
| $259.21 | ||||
| Privacy Curtain | Curtain RIngs | 1 | $7.99 | $7.99 |
| Privacy Curtain | Shower Curtain Rod Mount Holder | 1 | $9.99 | $9.99 |
| Privacy Curtain | Drop Cloth Tarp | 3 | $14.97 | $44.91 |
| Privacy Curtain | Tension Rod | 1 | $23.99 | $23.99 |
| $86.88 | ||||
| Desk | 1.5″ Zinc Plated Steel Corner Brace | 1 | $2.78 | $2.78 |
| Desk | Desk | 1 | $107.49 | $107.49 |
| $110.27 | ||||
| RV lock | Touchpad Lock | 1 | $156.98 | $156.98 |
| Door slider | Screen Slider | 1 | $12.97 | $12.97 |
| Light Switch | Single Light Switch | 1 | $9.99 | $9.99 |
| Light Switch | Double Light Switch | 1 | $11.99 | $11.99 |
| Shoe Bin Storage | IKEA EKET – Cubes | 4 | $18.99 | $75.96 |
| Entry Steps | Silver Floor Flush Stairnose | 1 | $15.98 | $15.98 |
| Door Mat | Door Mat | 1 | $15.98 | $15.98 |
| Screen Door Handle | Screen Door Handle | 1 | $8.79 | $8.79 |
| $308.64 | ||||
| Lighting | Sconce Lights | 1 | $28.05 | $28.05 |
| $28.05 | ||||
| LIGHTING PORTION | $14.85 | |||
| $42.90 | ||||
| Sofa Frame | 2x4x8 Wood Board | 3 | $4.18 | $12.54 |
| Sofa Frame | 2x2x8 Wood Board | 8 | $4.68 | $37.44 |
| Sofa Seat | 1x2x8 Wood Board (for slats) | 8 | $1.88 | $15.04 |
| Sofa Build | Wood Screws (3/4″ #6) | 1 | $5.48 | $5.48 |
| Sofa Build | Wood Screws (1 1/2″ #6) | 1 | $5.48 | $5.48 |
| Sofa Build | Hinges (2 pack) | 3 | $3.18 | $9.54 |
| Sofa Frame | 1x4x8 Wood Board | 4 | $6.33 | $25.32 |
| $110.84 | ||||
| Curtains | Curtain Rod Set | 2 | $16.99 | $33.98 |
| Curtains | Metal Curtail Rings | 1 | $8.99 | $8.99 |
| $42.97 | ||||
| CURTAIN PORTION | $14.85 | |||
| $57.82 | ||||
| FLOORING PORTION | $160.08 |
Kitchen – $585.26
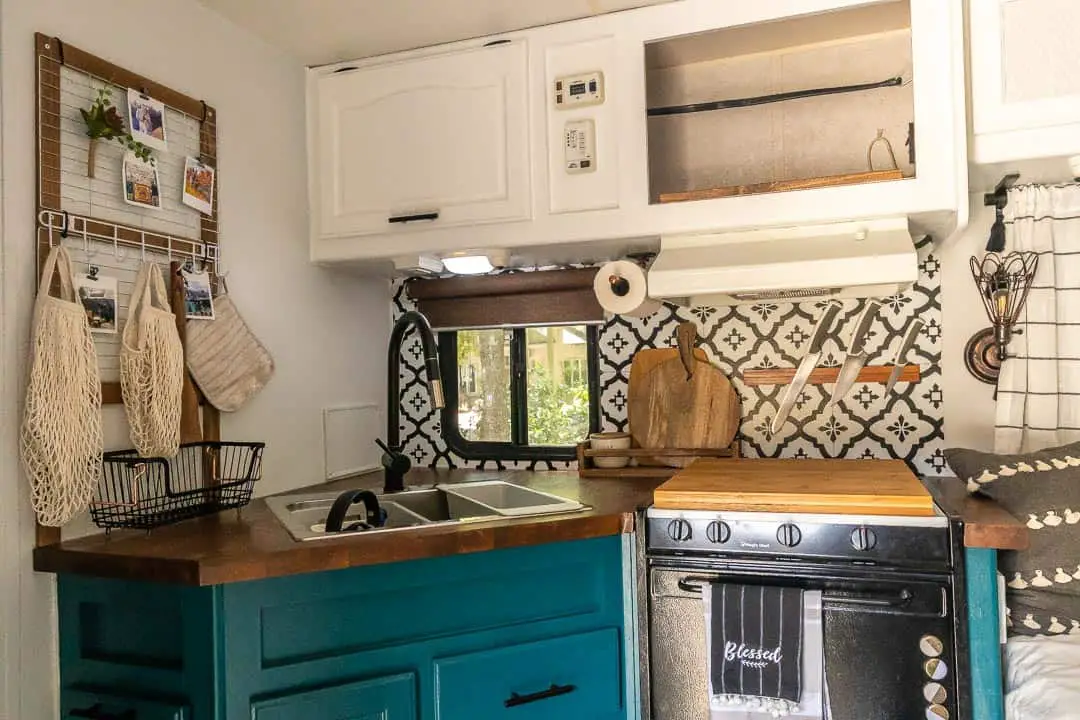
We have a split kitchen that begins at the edge of the living area and straddles a small hallway into the bathroom. With such space, we took on several significant camper renovation projects in the kitchen. And even though there is a subtle transition with the floor, paints and lighting we did not portion any percentage of these total expenses to the kitchen.
Instead, we focused on adding vinyl floor tiles, instead of peel and stick backsplash tiles, to the back wall. We purchased a simple bamboo curtain for the window coverings and added an original photograph in a handmade frame to the wall.
And our most significant project was removing the old counter and adding a butcher block counter complete with a new deep single basin sink and residential faucet.
We also took on the task of building several small DIY projects that included a copper paper towel holder and a wood and metal utensil holder for the wall that we sourced from the dollar store. And we added a sliding shelf in the pantry that gave us more access to the food we wanted to store.
Although we withheld the painting in this room, in combining it with the living room square footage, we did paint the kitchen cabinets with an accent color to cover up the fake wood look of the old camper and we used black spray paint and/or replaced the existing hardware for the cabinet doors.
Note that many people prefer cheaper vinyl peel and stick subway tile for an accent wall in the kitchen. But we found in the past that you get what you pay for with this particular material. For this reason, we skipped the peel and stick tile and paid a little more for vinyl floor tiles that had the same look as the subway tile but are far more durable.
| KITCHEN | $585.26 |
| * Back Wall | $77.29 |
| * Counter | $464.56 |
| * Pantry | $29.99 |
| * Paper Towel Holder | $6.46 |
| * Wall Utensil Holder | $6.96 |
For a more specific project breakdown, see the following budgetary line items.
| SPECIFIC PROJECT | PRODUCT | QTY | PRICE | TOTAL |
| Backsplash | Vinyl Floor Tiles (20 ct) | 1 | $28.83 | $28.83 |
| Backsplash Adhesive | Loctite Construction Adhesive | 1 | $10.48 | $10.48 |
| Kitchen Wall | 16″ Bamboo Roller Blind | 1 | $19.99 | $19.99 |
| Kitchen Wall | Magnetic Knife Rack | 1 | $17.99 | $17.99 |
| $77.29 | ||||
| Kitchen Faucet | Faucet | 1 | $70.61 | $70.61 |
| Kitchen Sink | Kitchen Sink | 1 | $79.99 | $79.99 |
| Stove Ignition | Char-Broil Spark Ignition | 1 | $13.99 | $13.99 |
| Kitchen Counter | Butcher Block Countertop | 1 | $259.00 | $259.00 |
| Counter/Sink Sealant | Silicone Sealant | 1 | $7.58 | $7.58 |
| Sink/Drain | Plumber’s Putty | 1 | $3.31 | $3.31 |
| Sink Plumbing | Plumber’s Tape | 1 | $2.14 | $2.14 |
| Sink Drain | Sink Drain | 1 | $9.98 | $9.98 |
| Faucet Connection | Sharkbite Adapters (1/2″ to 3/8″ Male Adapter) | 2 | $8.98 | $17.96 |
| $464.56 | ||||
| Pantry Shelves | IKEA JONAXEL Storage Combination | 1 | $29.99 | $29.99 |
| $29.99 | ||||
| Wall Utensil Hanger | Wall Utensil Hanger Wood | 3 | $1.25 | $3.75 |
| Wall Utensil Hanger | Wall Utensil Hanger Baking Grates | 2 | $1.07 | $2.14 |
| Wall Utensil Hanger | Wall Utensil Hanger Hooks | 1 | $1.07 | $1.07 |
| $6.96 | ||||
| Paper Towel Holder | Mounting Flange | 1 | $4.78 | $4.78 |
| Paper Towel Holder | 90* Copper Elbow | 1 | $0.86 | $0.86 |
| Paper Towel Holder | Copper End Caps | 1 | $0.82 | $0.82 |
| $6.46 |
Bathroom – $934.41
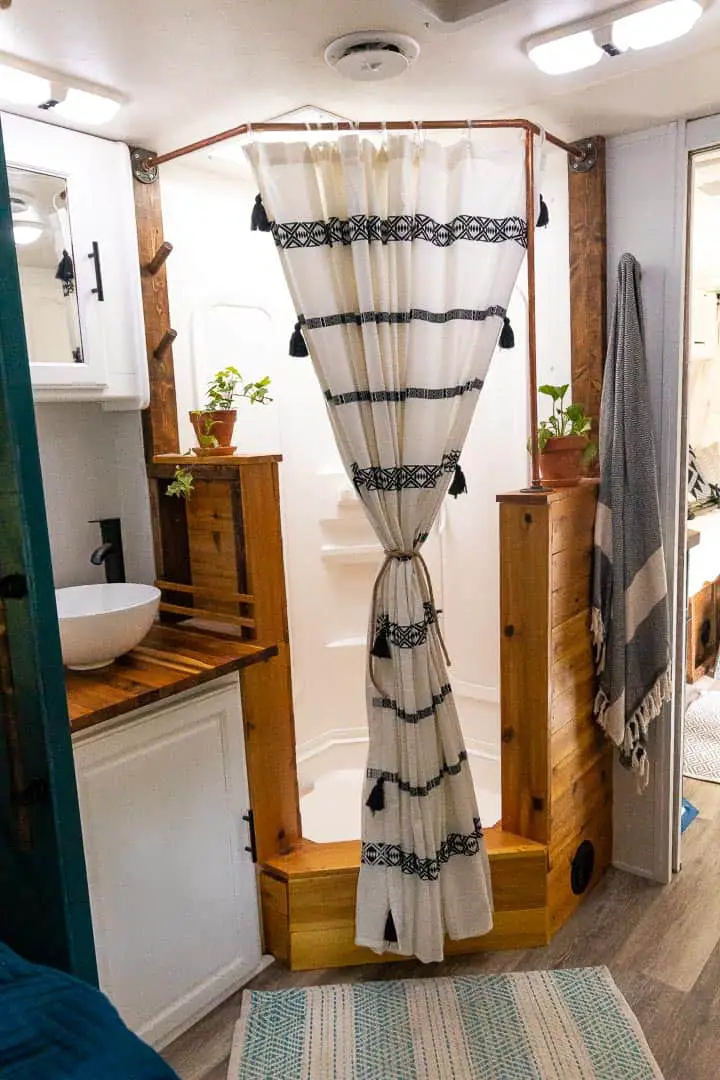
The next room in our camper renovation was our bathroom. While this is a relatively small space, we did a lot to completely remodel the bathroom. And this space was large enough to include the lighting, painting and flooring portions of the entire camper costs.
As with the kitchen, we removed the old counter and added a butcher block counter, vessel sink and a residential faucet with adapted plumbing. This set the tone for the construction of the shower, which we built from scratch using 2×4 boards and cedar planks.
This was the largest project, literally, in our entire camper renovation. We finished the shower with a copper curtain rod that tied the rustic look together.
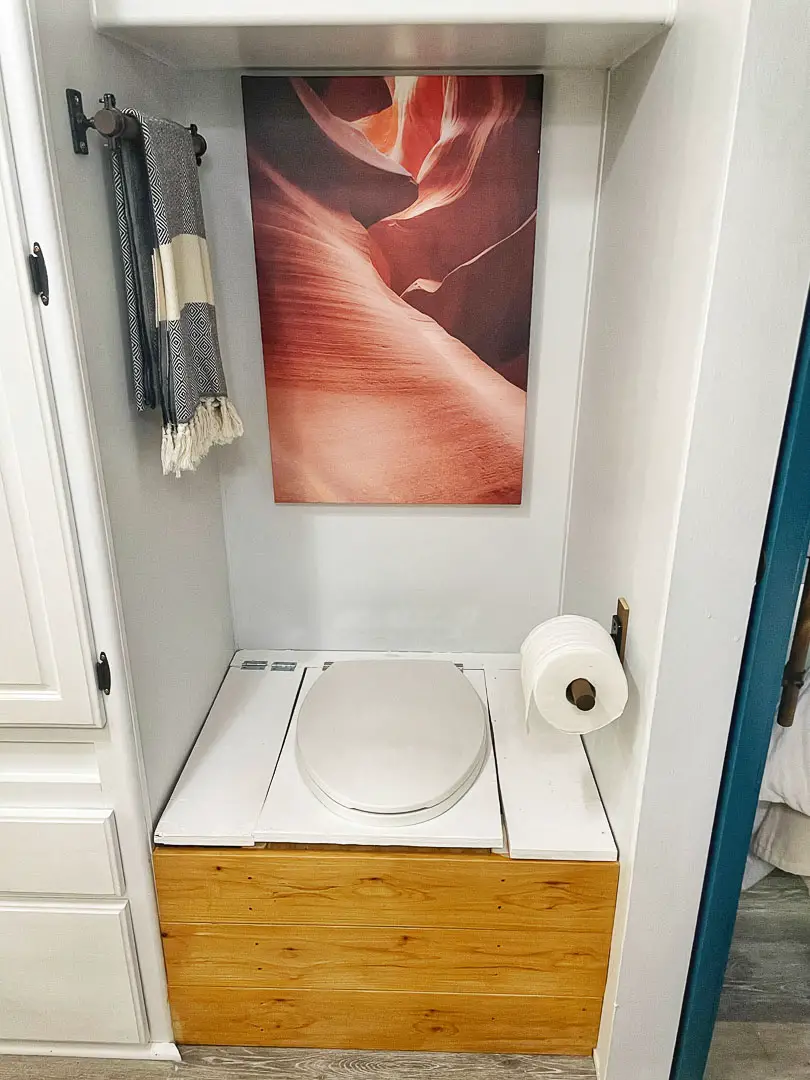
We also built a custom composting toilet from scratch after the existing toilet broke during demo day. This was a challenging task, but worthwhile as it would allow us to dry camp for longer periods of time.
And we added a few DIY projects to the bathroom wall. We built two types of simple towel holders as well as a paper towel holder that functions as well as it looks.
READ MORE: Read this post to learn how to build your own DIY cedar shower!
| BATHROOM | $934.41 |
| * Counter | $166.17 |
| * Shower | $286.61 |
| * Toilet | $241.72 |
| * Towel/Toilet Paper Holders | $22.41 |
| * Flooring | $128.06 |
| * Painting | $74.43 |
| * Lighting | $7.43 |
For a more specific project breakdown, see the following budgetary line items.
| PROJECT | SPECIFIC PROJECT | PRODUCT | QTY | PRICE | TOTAL |
| Counter | Faucet | Bathroom Sink Faucet | 1 | $25.33 | $25.33 |
| Counter | Bathroom Switch | Bathroom Light Switch | 1 | $9.99 | $9.99 |
| Counter | Sink | Bathroom Sink | 1 | $55.89 | $55.89 |
| Counter | Bathroom Counter | Butcher Block Counter | 1 | $37.50 | $37.50 |
| Counter | Bathroom Counter | Oil + Sealer | 1 | $9.78 | $9.78 |
| Counter | Bathroom Counter + Sink | Silicone Sealant | 1 | $7.58 | $7.58 |
| Counter | Faucet Plumbing | Plumber’s Tape | 1 | $2.14 | $2.14 |
| Counter | Faucet Plumbing | Sharkbite Adapters (1/2″ to 3/8″ Male Adapter) | 2 | $8.98 | $17.96 |
| $166.17 | |||||
| Shower | Shower shell paint | Rust-Oleum Shower Paint | 1 | $21.55 | $21.55 |
| Shower | Showerhead | Oxygenics Showerhead | 1 | $47.00 | $47.00 |
| Shower | Shower Sealant | WaterLox Wood Sealant | 1 | $33.72 | $33.72 |
| Shower | Shower Frame | 2x4x8 Wood Board | 4 | $4.18 | $16.72 |
| Shower | Shower Frame | 2x6x8 Wood Board | 1 | $8.46 | $8.46 |
| Shower | Shower Outside | 1x4x8 Cedar Board | 6 | $12.07 | $72.42 |
| Shower | Shower Outside | 1x6x8 Cedar Board | 1 | $27.39 | $27.39 |
| Shower | Shower Sealant | Silicone Sealant (clear) | 1 | $7.58 | $7.58 |
| Shower | Shower Sealant | Silicone Sealant (white) | 1 | $7.58 | $7.58 |
| Shower | Curtain Rod | Copper Pipe (1/2″ x 10′) | 1 | $14.26 | $14.26 |
| Shower | Curtain Rod | Copper Mounting Flange | 3 | $4.78 | $14.34 |
| Shower | Curtain Rod | Copper Flange Adapter | 3 | $6.13 | $18.39 |
| Shower | Curtain Rod | 45* Copper Elbows | 2 | $1.81 | $3.62 |
| Shower | Curtain Rod | T Copper Elbow | 1 | $1.16 | $1.16 |
| $294.19 | |||||
| Toilet | Toilet Seat Area | Rust-Oleum Tub & Tile Spray | 1 | $16.96 | $16.96 |
| Toilet | Toilet | Urine Diverter | 1 | $59.95 | $59.95 |
| Toilet | Toilet | Toilet Seat | 1 | $24.98 | $24.98 |
| Toilet | Toilet Hinge | Piano Hinge | 1 | $6.78 | $6.78 |
| Toilet | Toilet Compartment | Hinge (2 pack) | 1 | $2.78 | $2.78 |
| Toilet | Diverter/Black Tank | Hose/Tubing | 1 | $5.68 | $5.68 |
| Toilet | Toilet Frame | 4x8x3/4″ Pine Plywood sheet | 1 | $62.14 | $62.14 |
| Toilet | Toilet Frame | 2x4x8 Wood Board | 4 | $4.22 | $16.88 |
| Toilet | Toilet Outside | 1x6x8 Cedar Board | 1 | $27.39 | $27.39 |
| Toilet | Towel Holder | Wood Dowel | 2 | $3.82 | $7.64 |
| Toilet | Towel Holder | Dowel Screws | 2 | $1.28 | $2.56 |
| Tools | Shower nails | Brad Nails (1″) | 1 | $7.98 | $7.98 |
| $241.72 | |||||
| Accessory | Toilet Paper/Towel Holder | Wall Mount Flange | 3 | $1.89 | $5.67 |
| Accessory | Toilet Paper/Towel Holder | Split Ring Hanger | 3 | $1.86 | $5.58 |
| Accessory | Toilet Paper/Towel Holder | Wood Dowel (48″) | 1 | $3.82 | $3.82 |
| Accessory | Toilet Paper/Towel Holder | Steel Threaded Pipe | 1 | $7.34 | $7.34 |
| $22.41 | |||||
| FLOORING PORTION | $128.06 | ||||
| PAINTING PORTION | $74.43 | ||||
| LIGHTING PORTION | $7.43 | ||||
| $209.92 |
Bedroom – $998.70

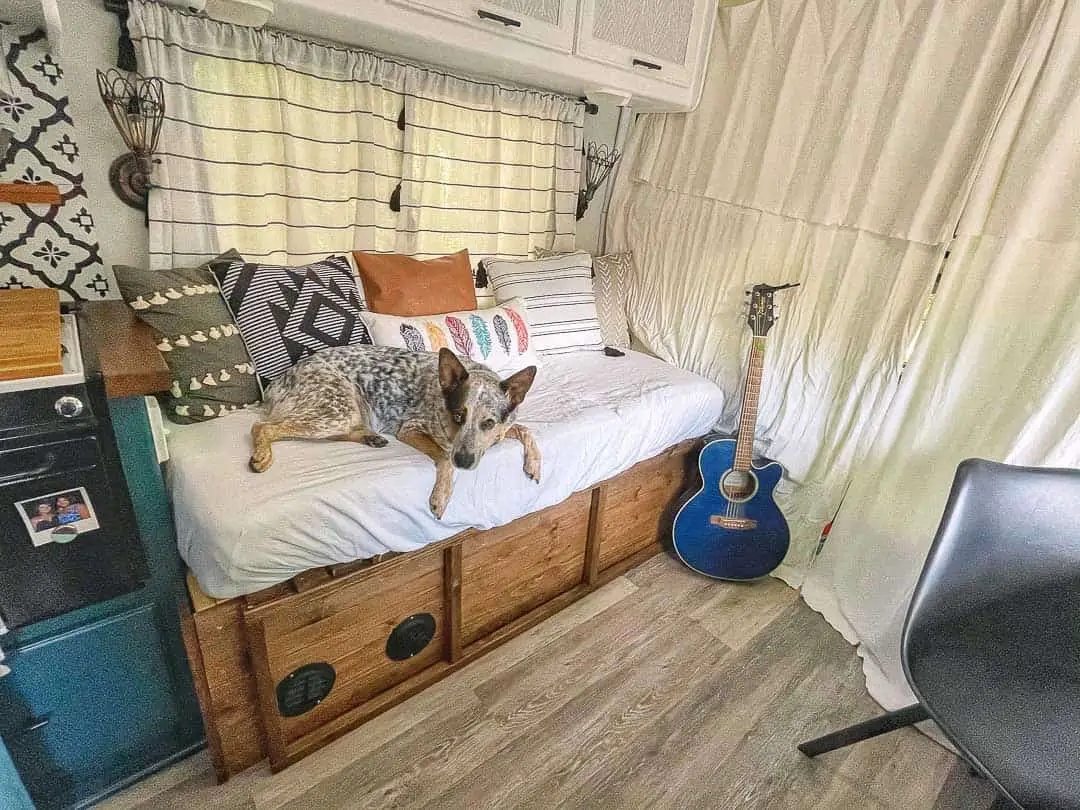
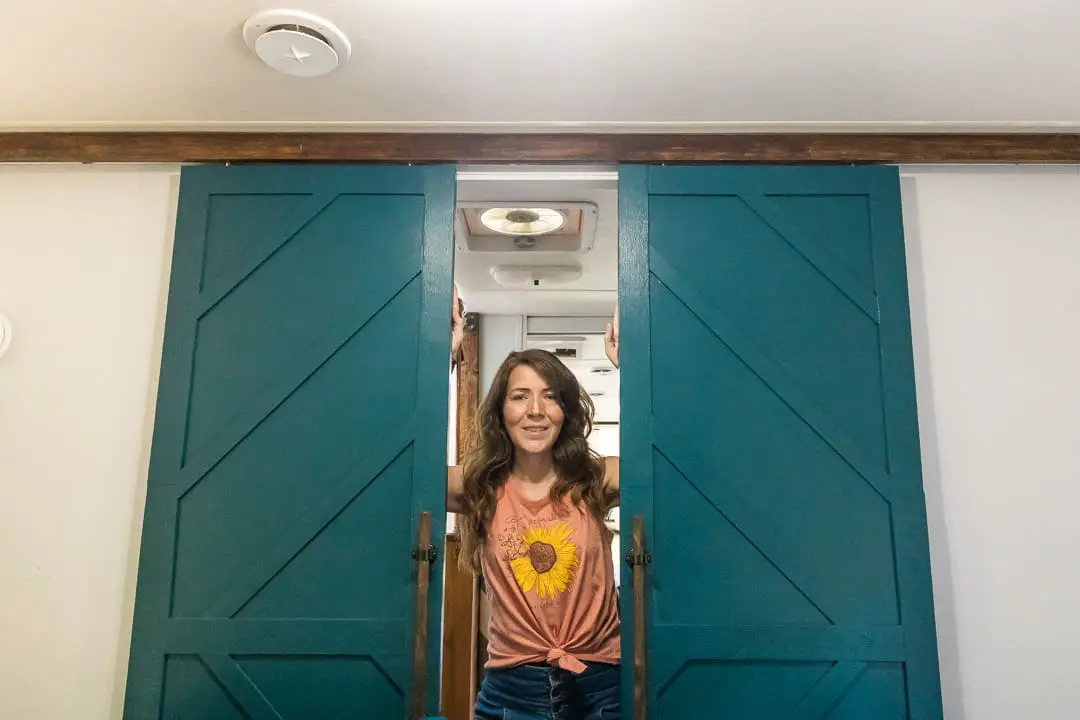
The last room on the inside of the renovated camper, our master bedroom, didn’t require a lot of big projects but did take some special attention for a lot of smaller, more creative projects. These included customizing a design and painting the barn doors that separate the bedroom from the bathroom.
We extended this design on the bed frame itself to tie into the flooring that extended into the room. Then we built two rather unique features in the room: a dog step/bed and a hidden laundry chute. These took more time than money to complete.
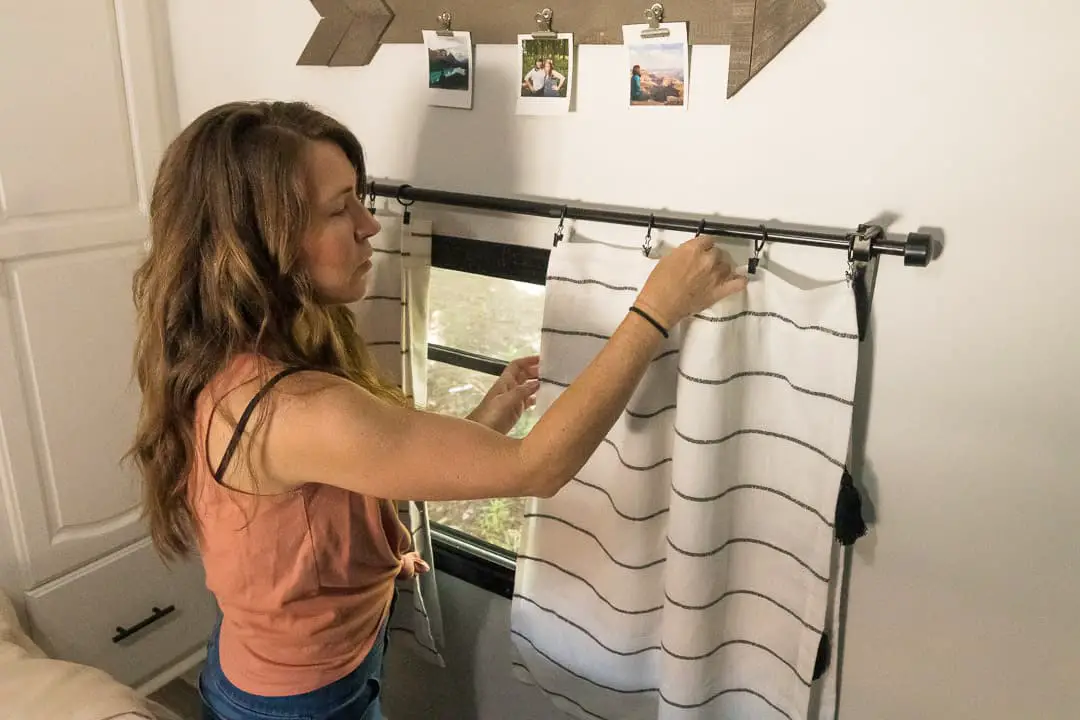
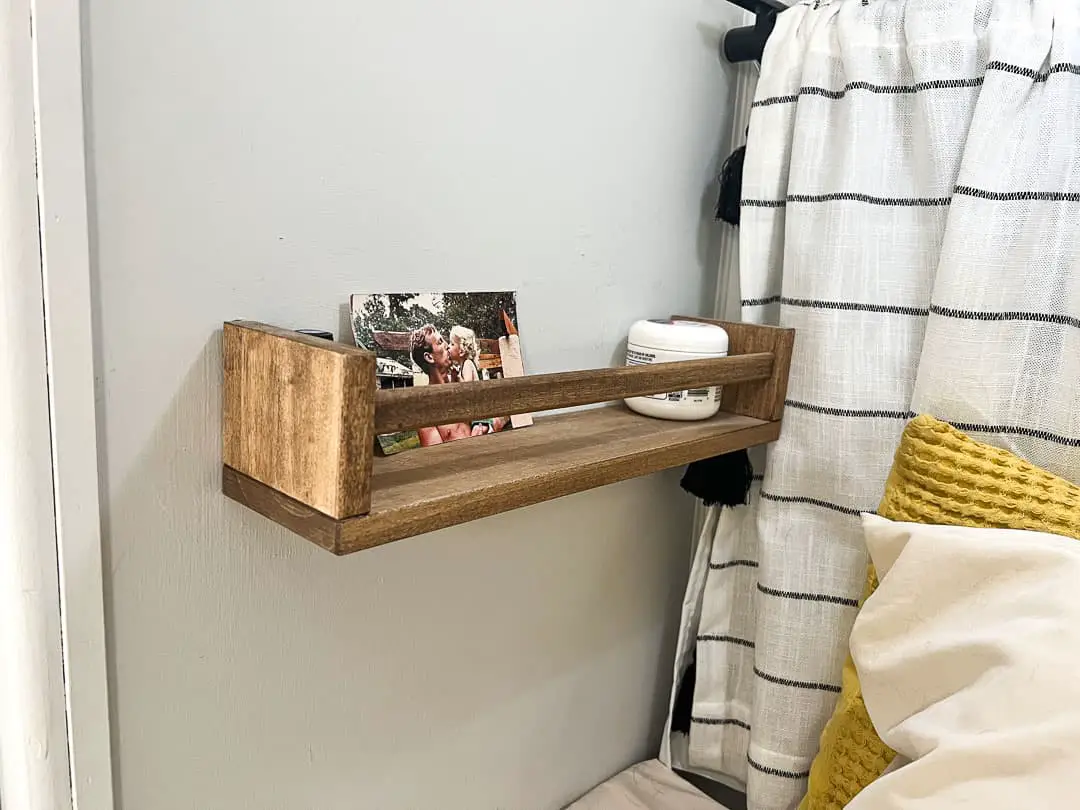
Additionally, our closets were wide open so we built shelves inside of them and added two wall shelves next to our bed for little knick-knacks we use before falling asleep. The bedroom has 3 separate window treatments that also required blackout blinds since we did not want the light to enter the room as we slept nor did we want to risk someone being able to view the inside of our bedroom from outside.
A note on optional expenses:
The biggest expenses in our bedroom budget are actually optional. RV mattresses in used RVs are not something we like to deal with. So we purchased a new 8” memory foam RV mattress for the short queen bed.
We also value fresh, cool air circulation in the bedroom. So we took the old vent fan out of the ceiling and replaced it with a new Fan-Tastic vent fan that either pushed or pulled air into the room and had multiple speed settings. This was a definite upgrade and may not be necessary for your particular setup.
| BEDROOM | $998.70 |
| * Barn Door | $112.05 |
| * Bed | $6.40 |
| * Closet | $42.58 |
| * Dog Step/Bed | $43.32 |
| * Laundry Chute | $10.92 |
| * Wall Shelves | $11.98 |
| * Flooring | $32.02 |
| * Painting | $148.87 |
| * Lighting | $7.43 |
| * Curtains | $142.81 |
| OPTIONAL Mattress | $271.34 |
| OPTIONAL Vent Fan | $168.99 |
READ MORE: Check out this post to learn how to transform your camper bedroom for under $1,000.
For a more specific project breakdown, see the following budgetary line items.
| SPECIFIC | PRODUCT | QTY | PRICE | TOTAL |
| Barn Doors Design | Liquid Nails | 1 | $4.96 | $4.96 |
| Barn Door | Slider Door Hanger | 1 | $10.58 | $10.58 |
| Barn Door | Jute Cabinet Pulls for Door Stops | 2 | $4.99 | $9.98 |
| Barn Door Slides | Barn Door Floor Slides | 1 | $9.99 | $9.99 |
| Barn Door Decor Slats | Reliabilt 1/4″ x 2 x 4 Square unfinished poplar | 20 | $3.20 | $64.00 |
| Barn Door Handle | Wood Dowel (48″) | 1 | $3.82 | $3.82 |
| Barn Door Handle | Bell Clamp (1/2″) | 4 | $2.18 | $4.36 |
| Barn Door Handle | Cup Hooks (3 pack) | 2 | $2.18 | $4.36 |
| $112.05 | ||||
| Bed decor | Reliabilt 1/4″ x 2 x 4 Square unfinished poplar | 2 | $3.20 | $6.40 |
| $6.40 | ||||
| Closet Shelves | 24″ x 36″ 1″ Thick Wood Board | 1 | $16.58 | $16.58 |
| Closet Shelves | Style Selections .77-in Shelf Pins | 2 | $4.64 | $9.28 |
| Closet Shelves | Style Selections 72-In L White Pilaster Strip | 4 | $4.18 | $16.72 |
| $42.58 | ||||
| Hinges for Shoe Door | Hinge | 2 | $1.29 | $2.58 |
| Pull for Shoe Door | Cabinet pull | 1 | $0.97 | $0.97 |
| Wire Coverings | 2x4x8 Wood Board | 1 | $4.18 | $4.18 |
| Dog Bed/Step | 2x4x8 Wood Board | 2 | $4.18 | $8.36 |
| Wire Coverings | 1x4x8 Wood Board | 2 | $3.68 | $7.36 |
| Dog Bed/Step | 24″ x 36″ x 1″ Wood Board | 1 | $16.58 | $16.58 |
| Dog Bed/Step | 2x2x8 Wood Board | 1 | $3.29 | $3.29 |
| $43.32 | ||||
| Curtain Rods | Curtain Rod Set | 3 | $16.99 | $50.97 |
| Curtain Rings | Curtain Rings | 1 | $11.99 | $11.99 |
| Curtains | Curtains | 1 | $59.95 | $59.95 |
| Blackout material | Blackout drapery curtain | 2 | $9.95 | $19.90 |
| $142.81 | ||||
| Ikea Wall Shelves | IKEA BEKVÄM – Spice Rack | 2 | $5.99 | $11.98 |
| $11.98 | ||||
| Hinge for Laundry Chute | Hinges | 2 | $1.29 | $2.58 |
| Decor for Chute | Reliabilt 1/4″ x 2 x 4 Square unfinished poplar | 2 | $3.20 | $6.40 |
| Pull for Laundry Chute | New Cabinet Pull | 2 | $0.97 | $1.94 |
| $10.92 | ||||
| FLOORING PORTION | $32.02 | |||
| PAINTING PORTION | $148.87 | |||
| LIGHTING PORTION | $7.43 | |||
| $188.31 |
We included two separate expenses in the total cost to give you an idea of what you may be looking at with a standard used RV. Most people will want to replace the mattress in their RV, especially if it is incredibly old or uncomfortable.
And you may end up replacing at least one of your vent fans (we’d recommend it, unless your RV already comes with the best ones on the market!). Clearly, you can withhold these expenses if your used RV and personal preferences do not require either.
| Mattress | $271.34 | https://amzn.to/3pNpGCQ |
| Fantastic Fan | $168.99 | https://amzn.to/3tG0LlF |
| $440.33 |
READ MORE: Check out this post for how to install a roof vent in your RV.
Exterior – $173.97
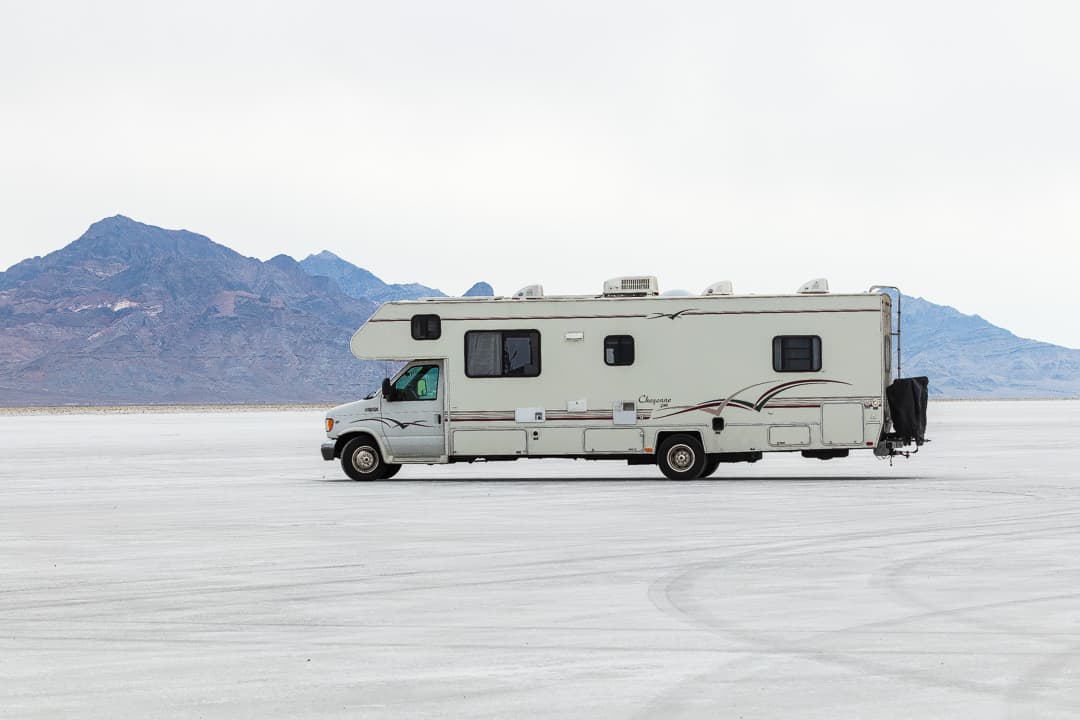
Our used RV was in decent shape, considering it was over 22 years old when we purchased it. This great condition applied not only to the inside but also to the RV exterior. So while most travel trailers, fifth wheels or motorhome remodels include only the interior projects and costs, we wanted to include everything we did to keep our old camper in the best condition it could be.
As such, we did some outside maintenance to the RV, which included replacing all of the old storage bay door latches and the vinyl strips that covered up screws along the outer seams.
We also waxed the camper exterior in a very comprehensive 7-step process that brought out the original colors, gave the fiberglass siding a new shine and kept bugs and other dirt and debris from sticking to it so easily.
| EXTERIOR | $173.97 |
| * Outside Maintenance | $124.25 |
| * Waxing Surface | $49.72 |
For a more specific project breakdown, see the following budgetary line items.
| SPECIFIC PROJECT | PRODUCT | QTY | PRICE | TOTAL |
| Window sealant | Proflex Seal | 6 | $9.09 | $54.55 |
| Door catch | Door Catch | 1 | $8.30 | $8.30 |
| Clips for bay doors | Baggage Clips | 1 | $14.67 | $14.67 |
| Outside Trim | RV Insert Trim – 25 ft | 1 | $8.99 | $8.99 |
| Outside Trim | Vinyl Screw Cover | 2 | $18.87 | $37.74 |
| $124.25 | ||||
| Waxing | Zep – Wet Floor Look Cleaner | 1 | $26.98 | $26.98 |
| Waxing | TSP | 1 | $5.48 | $5.48 |
| Waxing | Bar Keepers Friend | 1 | $2.28 | $2.28 |
| Waxing | Rubbermaid Microfiber Wet Mop | 1 | $14.98 | $14.98 |
| $49.72 |
Power – $1020.65
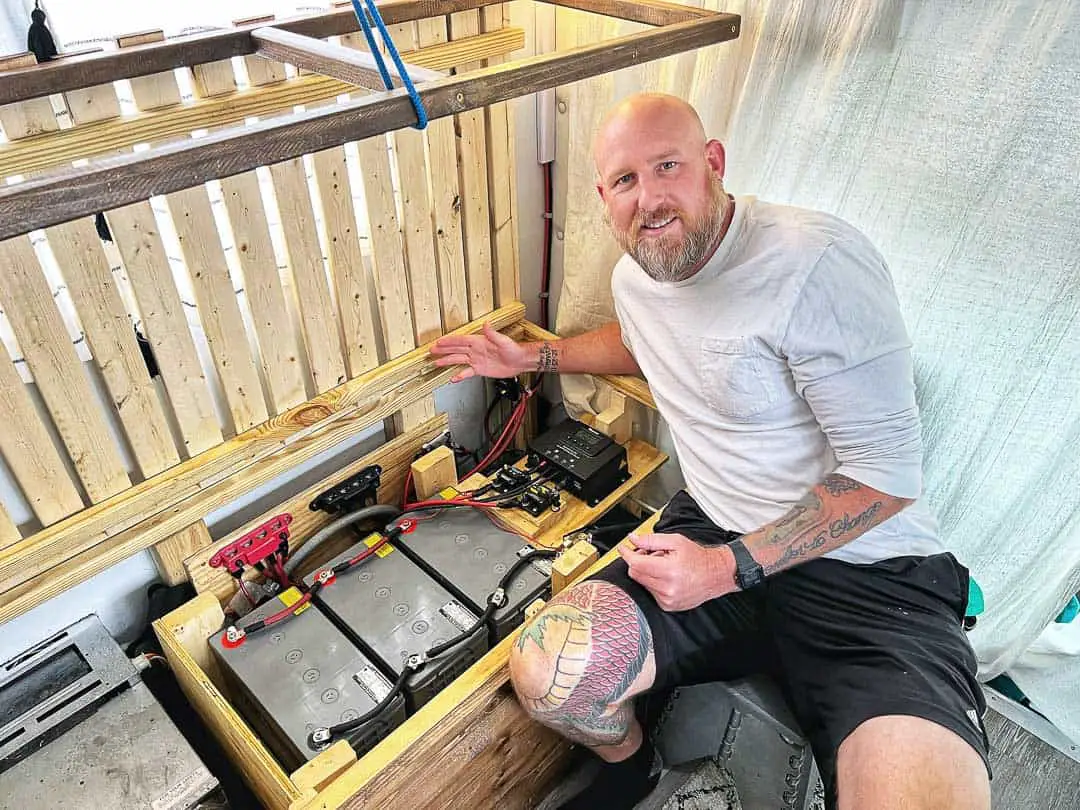
Also included in our RV remodel cost was an upgrade to the power system inside the camper. This line item was divided into the power components – including batteries, battery monitor and inverter – as well as the different parts needed to connect the components.
Power is a priority for us as we spend most of our time dry camping where we rely on a substantial battery bank with AGM batteries and a robust solar power system. So we made sure to buy the best components we could afford as well as the top-quality parts used to tie the power system together.
Note that we did not actually rebuild the entire power system (though we ended up replacing the power converter, which integrated a 30-amp automatic transfer switch to enable us to be able to use all of our power outlets whether we were plugged into shore power or not).
We also purchased almost exclusively Renogy power components because we have had great success with Renogy products and they are a great value over often lower-priced and cheaper power components.
SAVE 10% MORE when you shop directly at Renogy.com and use our coupon code “CALLEDTOWANDER” at checkout! Note: Discount does not apply to sale items or batteries.
An exception is that we opted for secondhand AGM batteries that were used as backup batteries in a hospital computer system. We got such a great deal on each of these (140 amp hours for $80 each) that we decided to give it a try. The only downside to these batteries is that they will have to be replaced sooner than their lithium alternative.
In fact, the only upgrade expense we would consider with our power system would be to go with lithium batteries in the future. Lithium batteries have a high up-front cost but a much longer lifespan and overall storage capacity, making them the best overall value when it comes to batteries.
However, we could not afford lithium batteries at the time (as they have recently come down several hundred dollars) so we would consider upgrading these in the future.
| POWER | $1,020.65 |
| * Components | $629.98 |
| * Parts | $390.67 |
READ MORE: Start your RV renovation planning right by shopping for the best lithium RV batteries.
For a more specific project breakdown, see the following budgetary line items.
| SPECIFIC PROJECT | PRODUCT | QTY | PRICE | TOTAL |
| Batteries | 140 Ah AGM Battery | 3 | $80.00 | $240.00 |
| Battery Monitor | Renogy Battery Monitor | 1 | $89.99 | $89.99 |
| Inverter | Renogy 2000W Inverter | 1 | $299.99 | $299.99 |
| $629.98 | ||||
| Battery Connection | AWG 2 Lugs (8 pieces) | 1 | $9.99 | $9.99 |
| Battery Connection | AWG 2 Lugs (10 pieces) | 1 | $10.69 | $10.69 |
| Battery Connection | Crimping Tool | 1 | $29.99 | $29.99 |
| Inverter/Battery Connection | 200 Amp Breaker | 1 | $30.99 | $30.99 |
| Battery Connection | AWG 2 Wire (15 feet x 2) | 1 | $73.86 | $73.86 |
| Battery Connection | 5/16″ Power Distribution Block | 1 | $39.99 | $39.99 |
| Auto Transfer Switch | 30 Amp Auto Transfer Switch | 1 | $87.27 | $87.27 |
| Battery Connection | Various Lugs | 1 | $25.59 | $25.59 |
| Battery Connection | 6 AWG Wire (5 ft x 2) | 1 | $22.77 | $22.77 |
| Battery Cooling | Fan Switch – Power Setup | 1 | $9.99 | $9.99 |
| Battery Cooling | Cooling Fan – Power Setup | 1 | $8.99 | $8.99 |
| Battery Connection | 8 AWG Wire (15 ft x 2) | 1 | $40.55 | $40.55 |
| $390.67 |
Solar – $817.89
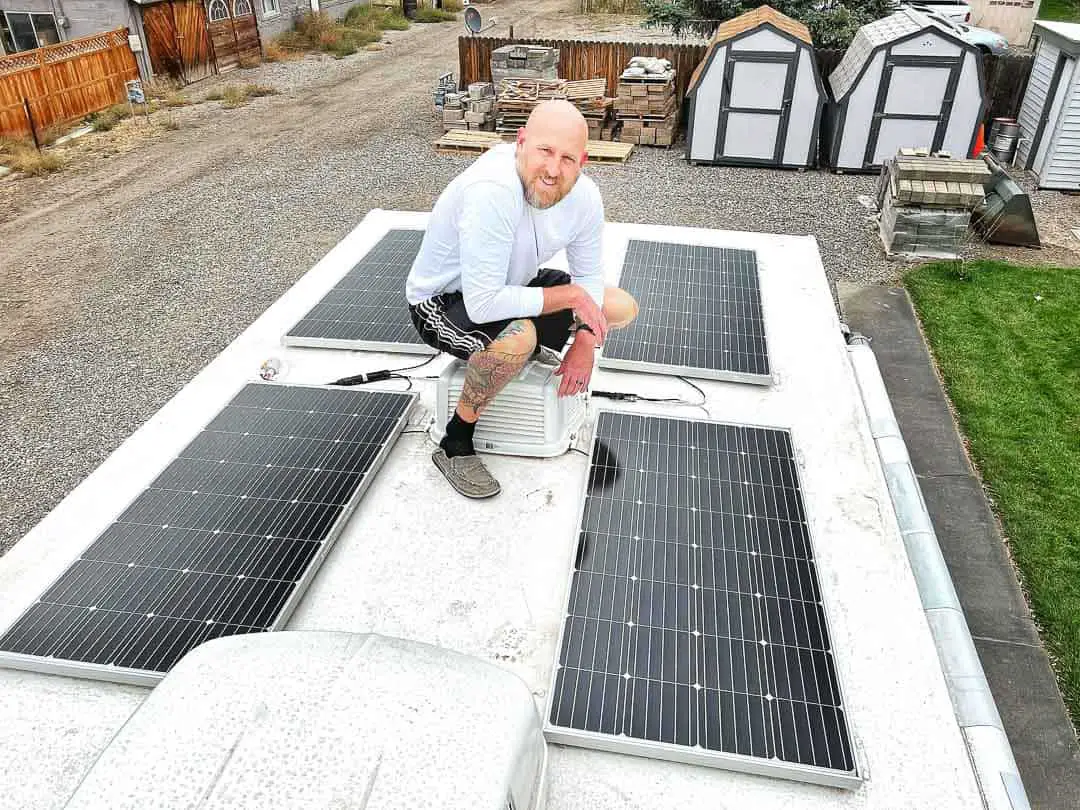
Next to our general power setup, our solar power system was very important to us. The bulk of these expenses were for the components – 4 x 160-watt monocrystalline solar panels and a 40 amp MPPT charge controller. Once again we went with Renogy for these components as they are high quality and worth every dollar when it comes to performance and efficiency.
We also purchased other parts needed to tie the solar system together. This included properly sized wiring and breakers as well as parts to connect the solar panels on the roof to bring them into the camper itself.
We have no regrets with our 640 watts of combined solar panels that keep our 420 amp hours of AGM battery bank topped off typically before noon each day.
SAVE 10% MORE when you shop directly at Renogy.com and use our coupon code “CALLEDTOWANDER” at checkout! Note: Discount does not apply to sale items or batteries.
| SOLAR | $817.89 |
| * Components | $639.95 |
| * Parts | $177.94 |
For more specific project breakdown, see the following budgetary line items.
| SPECIFIC PROJECT | PRODUCT | QTY | PRICE | TOTAL |
| Solar Panels | 160 Watt Monocrystalline Solar Panel | 4 | $119.99 | $479.96 |
| Solar Charge Controller | Renogy 40 Amp MPPT Controller | 1 | $159.99 | $159.99 |
| $639.95 | ||||
| Solar wire cable entry gland | Solar Cable Wire Entry Gland | 1 | $11.56 | $11.56 |
| Controller/Battery Connection | 40 Amp Breaker | 1 | $26.99 | $26.99 |
| Solar/Controller Connection | 10 AWG Solar Wire (20 ft) | 1 | $31.99 | $31.99 |
| Solar/Controller Connection | 30 Amp Breaker | 1 | $26.99 | $26.99 |
| Solar Panel Connection | Y Branch Connectors | 2 | $7.49 | $14.98 |
| Solar to Roof Mount | Renogy Z Brackets (4 count kit) | 1 | $35.45 | $35.45 |
| Solar/Controller Connection | 15 Amp in-line fuse | 2 | $14.99 | $29.98 |
| $177.94 |
READ MORE: Check out this post to find the best RV solar panels for your renovation or remodel!
Roof – $789.64
The final exterior project in our RV renovation was tending to the roof. This included general maintenance we performed to keep the roof in great shape. There was no existing water damage from leaks in the roof and we intended to keep it so.
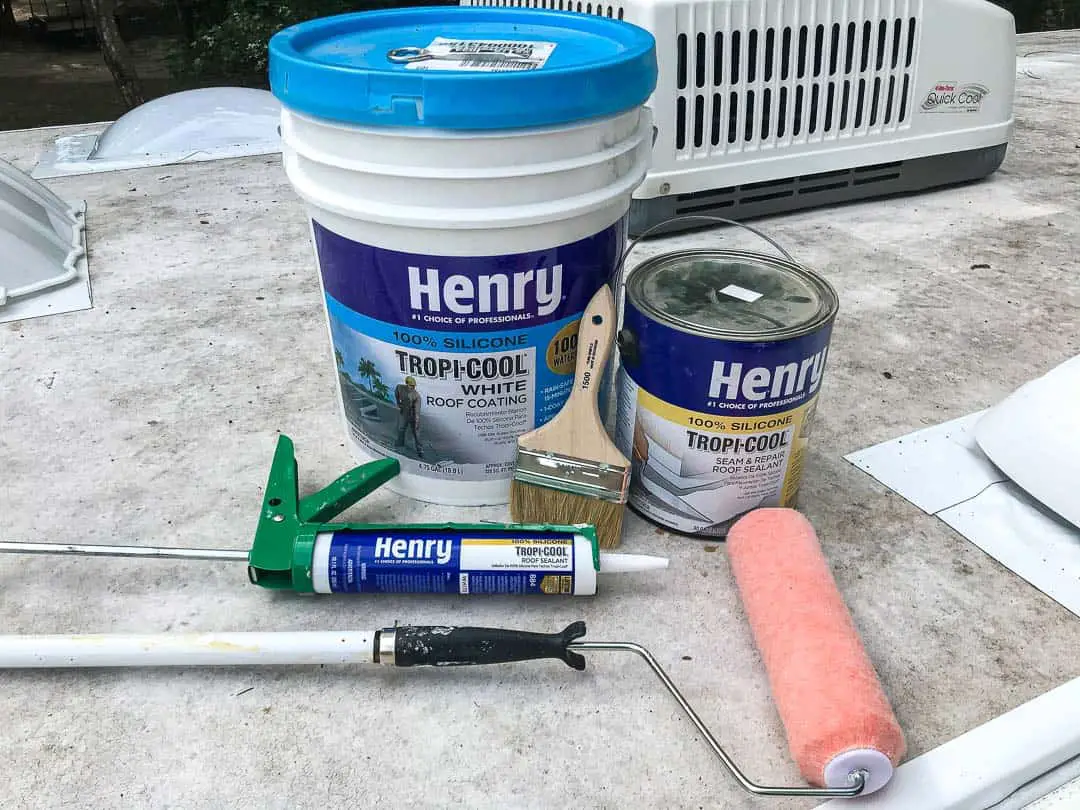
As such, we invested in resealing all of the vents and covers on the roof as well as coating silicone white paint on the existing EPDM roof.
While the roof maintenance was something that every used RV owner should do, we opted for a creative and budget-friendly solution for resealing our RV roof. For this, we spent just under $500, which is a fraction of the cost of replacing the roof or having an RV roof professional seal the roof.

It is perhaps our most budget-friendly project, although we can say it was not a fun part of the RV renovation! For this, we used Dicor self-leveling lap sealant, Eternabond tape and Henry Tropi-Cool silicone roof sealant and we couldn’t be more pleased with the results.
Aside from keeping water from ever leaking through our roof, the white paint makes hot temperatures less hot inside the RV and it gives the roof an entire new RV look. We think we did a phenomenal job investing in this solution.
| ROOF | $789.64 |
| * Maintenance | $298.78 |
| * Coating/Sealing | $490.86 |
For a more specific project breakdown, see the following budgetary line items.
| SPECIFIC PROJECT | PRODUCT | QTY | PRICE | TOTAL |
| Roof | Eternabond Tape | 1 | $108.80 | $108.80 |
| Skylight | Roof Skylight | 1 | $89.55 | $89.55 |
| Butyl for appliances | Butyl Tape | 1 | $16.29 | $16.29 |
| Fridge vent cover | Fridge Vent Cover | 1 | $28.63 | $28.63 |
| Vent fan cover | Fan Vent Cover | 1 | $19.47 | $19.47 |
| Roof Sealant | Dicor Lap Sealant | 4 | $9.01 | $36.04 |
| $298.78 | ||||
| Henry Tropi-Cool | Henry Tropi-cool (5 gal) | 1 | $445.00 | $445.00 |
| Henry Tropi-Cool | Henry Tropi-cool (10.1 oz) | 1 | $21.98 | $21.98 |
| Paintbrush | Paintbrush | 1 | $8.98 | $8.98 |
| Roller Pads | Roller Pads | 1 | $7.98 | $7.98 |
| Roller Extension | Roller Extension | 1 | $6.92 | $6.92 |
| $490.86 |
READ MORE: Check out this post to learn everything you need to know about resealing your RV roof.
Repairs and Upgrades – $824.18
As with any used RV, there were some repairs and necessary upgrades that came as part of the “as is” conditions of the sale. Most of these were plumbing-related, in our case, as we are fairly certain the pipes froze at some point in the RV’s recent past.
But as you look at these itemized expenses you will find that they likely will not apply to your RV renovation. You may have other expenses that we did not have. Or, hopefully, none at all!
We grouped these separately from the specific rooms they are in because we felt these repairs and upgrades had to be done just for us to be able to use the RV. The other projects made the RV a more comfortable home on the road. But these expenses were necessary and known to us with the purchase of the RV.
| REPAIRS/UPGRADES | $824.18 |
| Repairs/Upgrades | $697.55 |
| Safety Features | $126.63 |
For a more specific project breakdown, see the following budgetary line items.
| SPECIFIC PROJECT | PRODUCT | QTY | PRICE | TOTAL |
| Fridge (Repair) | Fridge Controller | 1 | $30.32 | $30.32 |
| Fridge (Repair) | Fridge Motherboard | 1 | $119.67 | $119.67 |
| Water Heater (Repair) | Hot Water Heater Anode | 1 | $15.95 | $15.95 |
| Water Heater (Repair) | Electric Water Heating Element | 1 | $15.90 | $15.90 |
| AC air filter (repair) | AC Air Filters | 1 | $7.51 | $7.51 |
| Refrigerator (Repair) | Thermistor | 1 | $48.90 | $48.90 |
| Water Pump (Repair) | Water Pump | 1 | $60.35 | $60.35 |
| Vent Fan (Replace) | Fan- Tastic Fan | 1 | $168.89 | $168.89 |
| Power Converter (Repair) | Power Converter | 1 | $230.06 | $230.06 |
| Repairs/Upgrades | $697.55 | |||
| Safety | Fire Extinguisher | 1 | $21.37 | $21.37 |
| Safety | LPG Alarm | 1 | $52.76 | $52.76 |
| Safety | Smoke Alarm | 2 | $26.25 | $52.50 |
| $126.63 |
Tools – $1,445.53

Finally, we did not count our tools as an extra cost to all of the others because we had most of the tools already in our RV tool kit. However, there were some that we purchased just for the RV renovation that we have since added to our toolkit.
Because they have become a part of our everyday life in traveling and because your personal toolset (or access to borrowing tools) may vary, we did not count these expenses toward the total RV renovation cost. In fact, most of the pricing of the following tools is retail pricing and we have almost always been able to find lower pricing for tools we have needed over time.
But to give you an idea of how much it may cost to acquire all the tools you will use throughout your RV remodel or camper renovation, we have included all the details so you can have a total cost for the whole process.
While we had almost all the tools on this list (and thus not a current expense for our RV renovation costs), if we factor in the ones we did buy, we would still be under $8,000 total cost for everything involved in the camper renovation.
Also note that you can save money and find tools at a great price if you buy comprehensive sets that will also often go on sale, particularly around the holidays.
For a more specific project breakdown, see the following budgetary line items.
Wrapping Up Our Under-$8,000 RV Renovation
Rv renovations are as customized as each person who wants to renovate them. Whether you’ve got a vintage camper you’re looking to restore, a used fifth wheel or travel trailer that needs some attention or a motorhome that you plan to totally redo from the inside out – we hope that this post has shed a light on how you can complete most of the major projects on a very tight budget.
We’re incredibly proud to say that our RV cost less than $20,000 in total and had less than 50,000 miles on it when we finished our remodel. It truly feels like a new RV, an incredibly comfortable and enjoyable tiny home on the road.
We found that we could save lots and lots of money by learning how to do each project ourselves and so there is nothing on this list that required us to pay anyone a single dollar in labor to do for us. It took us more time to learn to do each project ourselves. But for us, saving money was more important than the speed at which we completed the RV renovation.
If you have any questions or other tips on how to complete any of the renovation projects we did on an even tighter budget, please let us know your top tips and tricks!
NOT SURE WHERE TO BEGIN WITH YOUR RV REMODEL?
No worries! We can help you get started on your RV remodel! From offering counsel and assistance in picking out the best RV to remodel to walking you through some of the major and minor tasks you may want to complete, we offer RV remodeling consultation to suit your needs!
Rates start at $50/half hour and consultation packages can be tailored to your wants and needs!
Contact us via email to arrange an initial consultation and discuss consultation packages available!
NOTE: Due to the nature of our travel schedule, we do not offer remodeling services outside of a consultation.