
Last Updated on September 2, 2022 by Chris and Lindsay
If you are looking for ideas and inspiration for your RV remodel or renovation we’ve got some simple, budget-friendly and relatively easy-to-do-yourself projects that have turned a 1999 Class C motorhome into our home.
Whether you own a travel trailer, van, fifth wheel or skoolie we have loads of simple ways to make the most of your living space. And to make this better, we did our entire renovation on a tight budget and have lots of cost-saving tips.
Plus, did we say this was our first camper remodel? If we can do what we’re about to show you, then so can you!
In this post, we’ll share with you our RV remodel before and after and let you decide which projects you think will spruce up your tiny home on wheels. We’ll break down the basics for each project and link you to all of our project details.
Rates start at $50/half hour and consultation packages can be tailored to your wants and needs!
Contact us via email to arrange an initial consultation and discuss consultation packages available!
NOTE: Due to the nature of our travel schedule, we do not offer remodeling services outside of a consultation.
Our Total Camper Makeover
We call our project an RV remodel rather than an RV renovation because most of the work we did on our camper was to create something new from the existing setup. We see renovation as a way to restore or bring back a worn-out version to the original.
In our remodel we did strip our camper down to the bare walls and floors. So in our case, we’re going to show you what we did from the ground up.
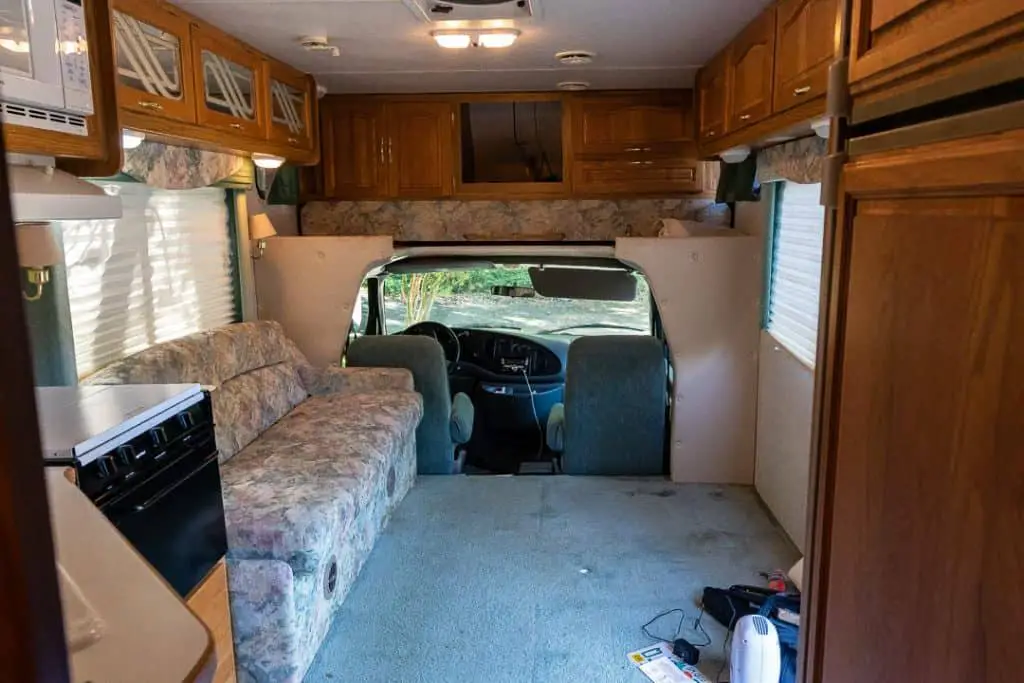
RV Renovation at a Glance: Before and After
While Pinterest and Instagram are full of great snapshots of makeover projects and ideas, we found they can create a sense of panic and leave you feeling overwhelmed.
If you are like us, you probably look at those examples and think:
Sure, those people did a great job. But where do I begin and how can I do this RV renovation or trailer makeover if I do not have a lot of DIY experience or a large budget?
So we thought we should say up front that if this is how you feel, we were right there with you.
But we also want to share that what we learned – both in studying other RV renovations and in making some mistakes of our own along the way – gave us complete confidence to share with you that we think all of the projects we’re about to share with you are completely within your ability.
None require technical skill and all can be completed with basic tools, a mind for safety, and on a budget.
If you’re up for the challenge, we hope this post will give you more than enough inspiration and ideas to complete your tiny home renovation.
Whether you’re sprucing up a pop-up camper or travel trailer, completely renovating a vintage trailer, building out a van or giving new life to a fifth wheel – you can use our examples to guide you to taking on and completing the projects you choose to do with your camper makeover.
That said, sometimes you have to start with the end in mind and find ways to hold on to those images of what the camper will look like when it is done when you are in the middle of a challenging project.
So, here’s a peek at each of the rooms in our motorhome before and after. We’ll reveal a few of the key projects in each room.
But be sure to continue reading this post and click on any resources we provide you on how to complete the specific jobs that may be of interest to you!
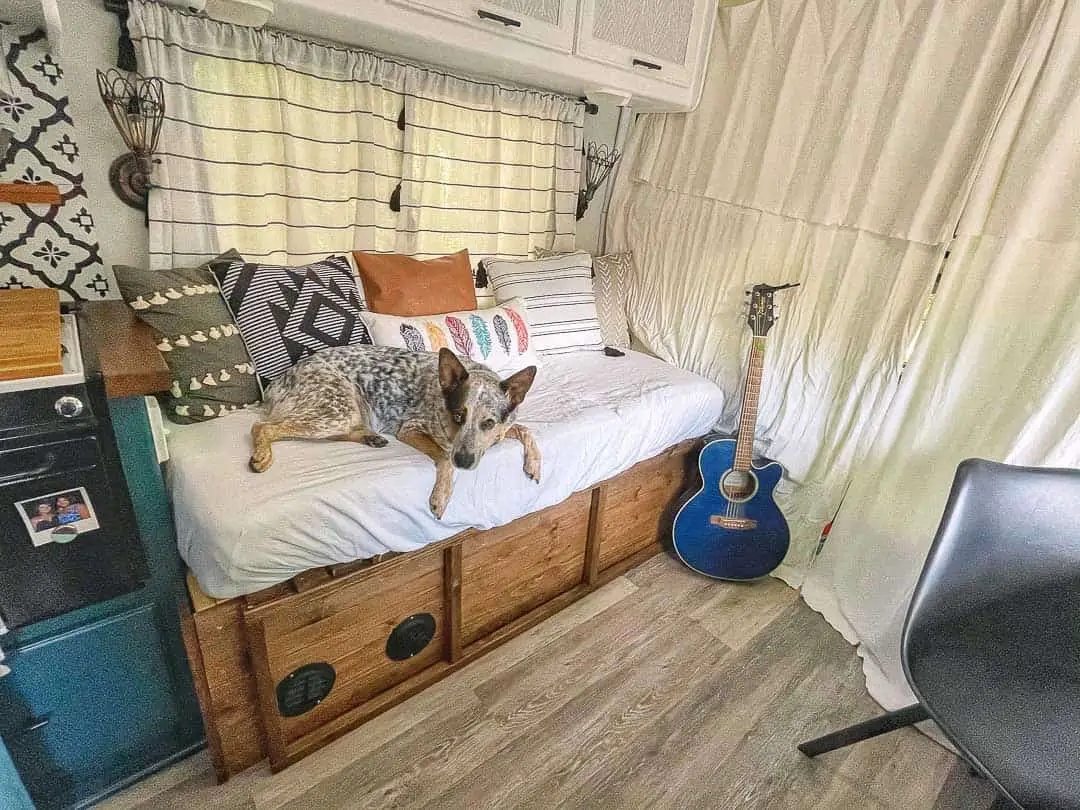
Our RV Living Room Remodel
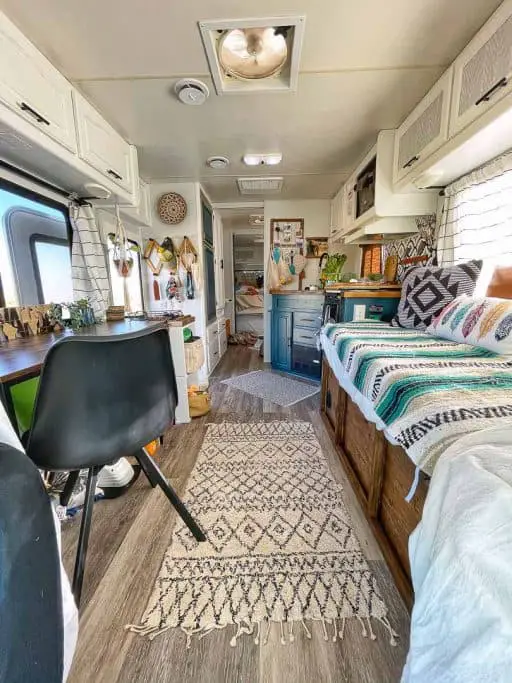
Key Features:
- Wall and cabinet paint
- Vinyl plank floors
- Custom-built sofa sleeper
- New vintage light fixtures
- Window curtains
- Dinette removed & Desk Installed
- Cube Box storage
- Entryway steps and floor mat
- Water dispenser storage
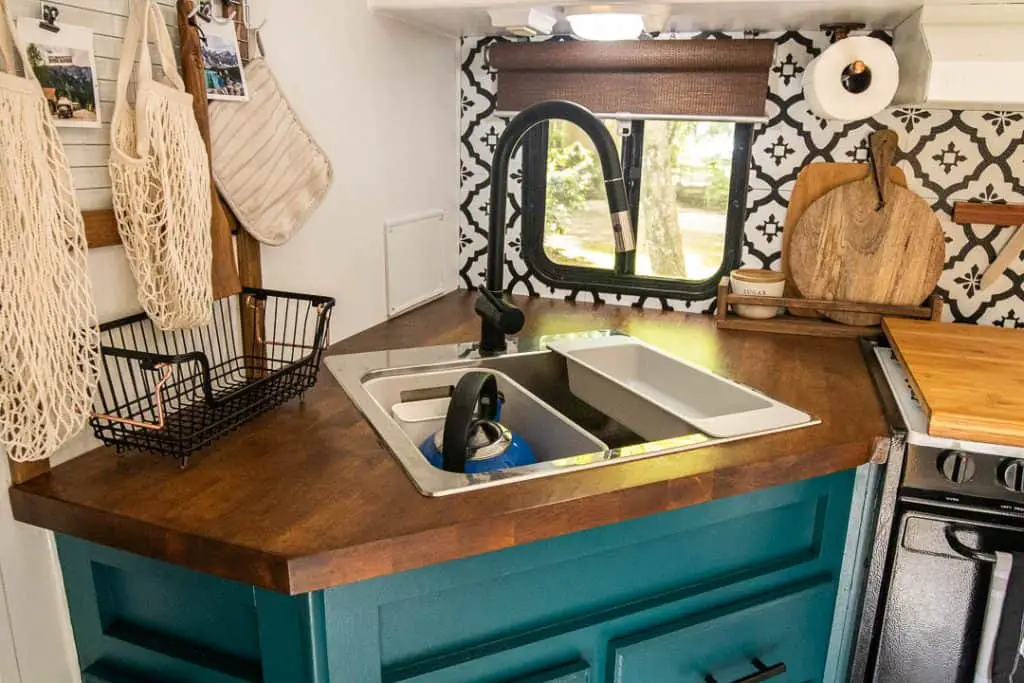
Our RV Kitchen Renovation
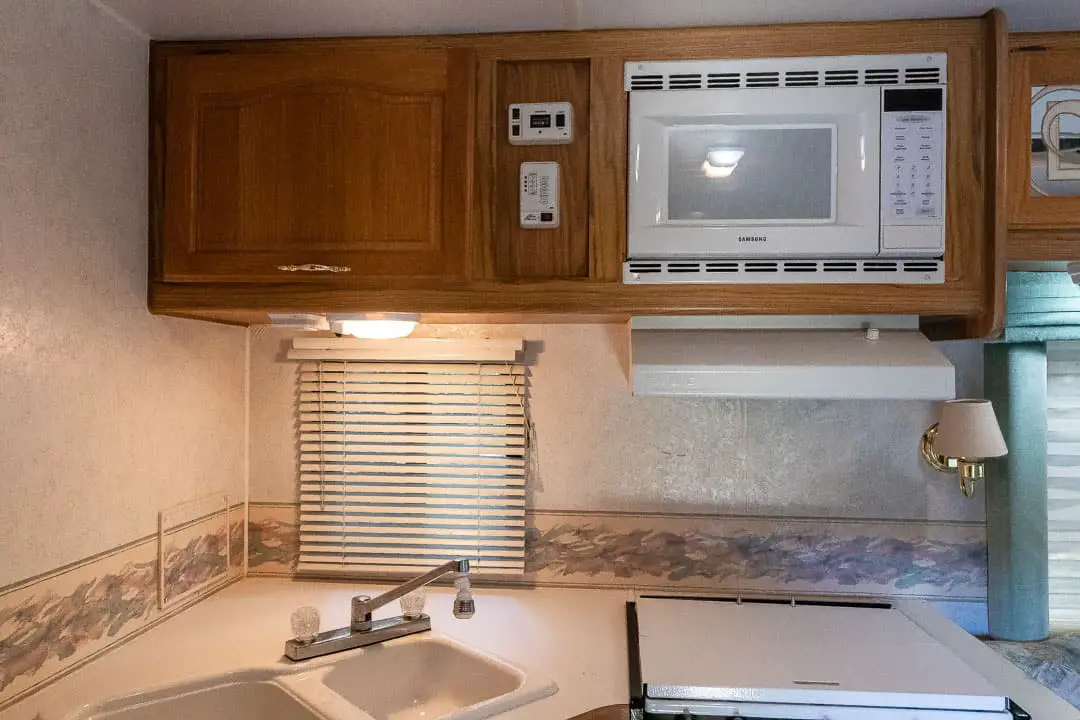
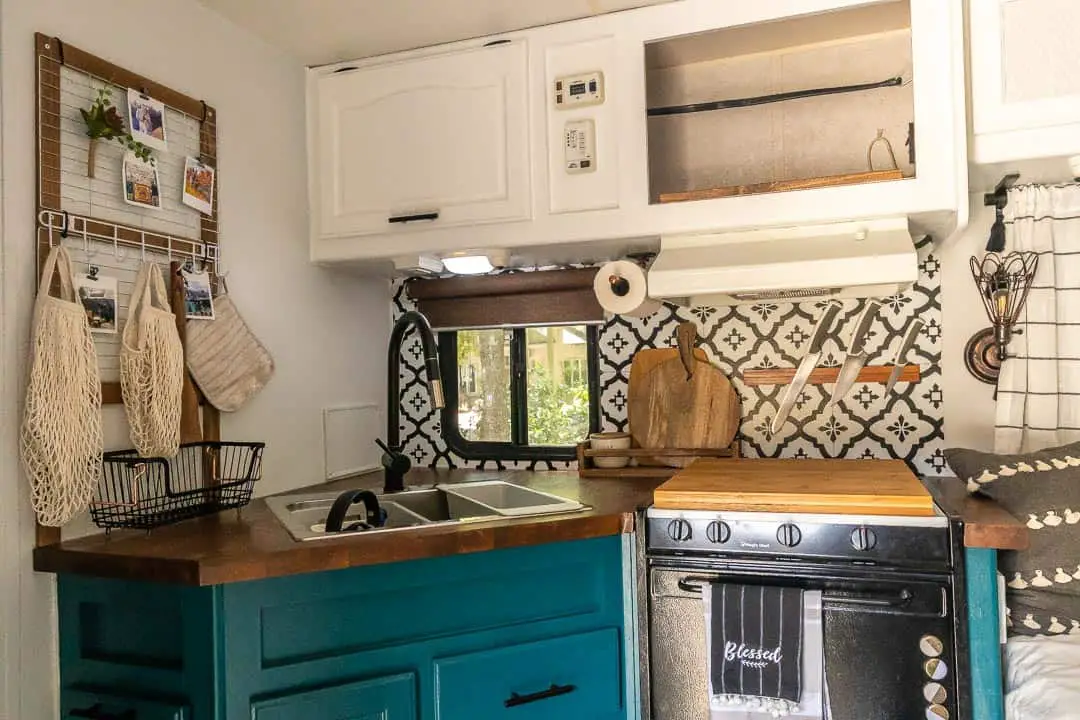
Key Features:
- Walls painted
- Peel and Stick Tile backsplash
- Butcher block countertop
- Residential sink and faucet
- Painted bottom cupboards teal
- Custom wall storage and decor
- Bamboo roll-down shade
- Bamboo stovetop cutting board
Our RV Bathroom Remodel
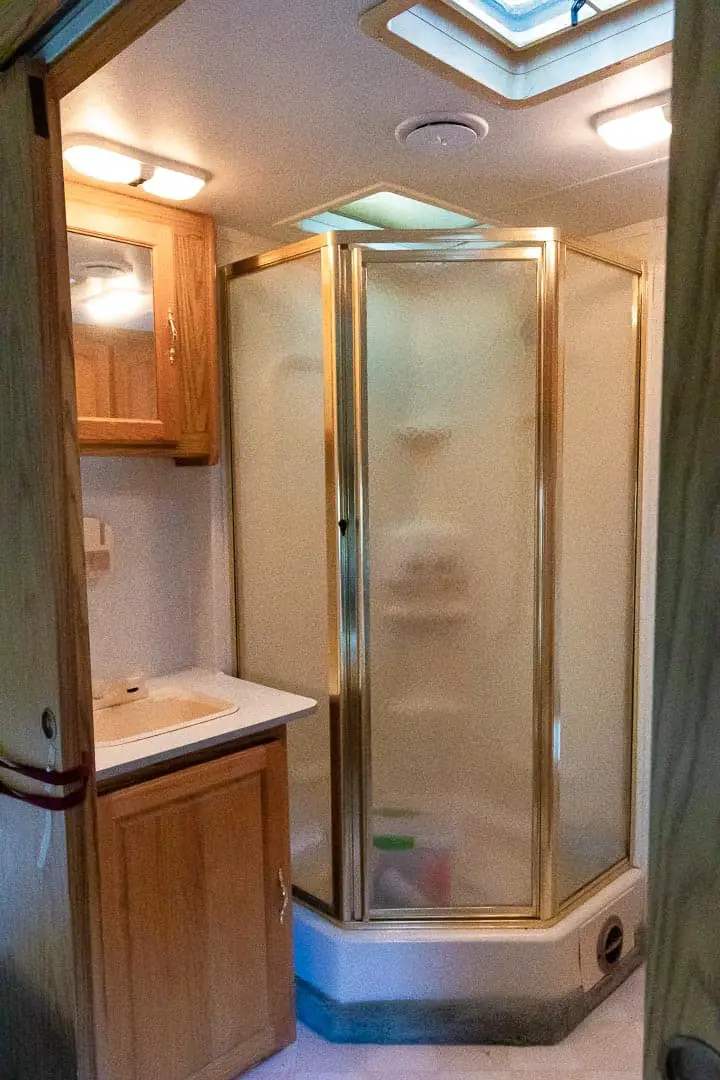
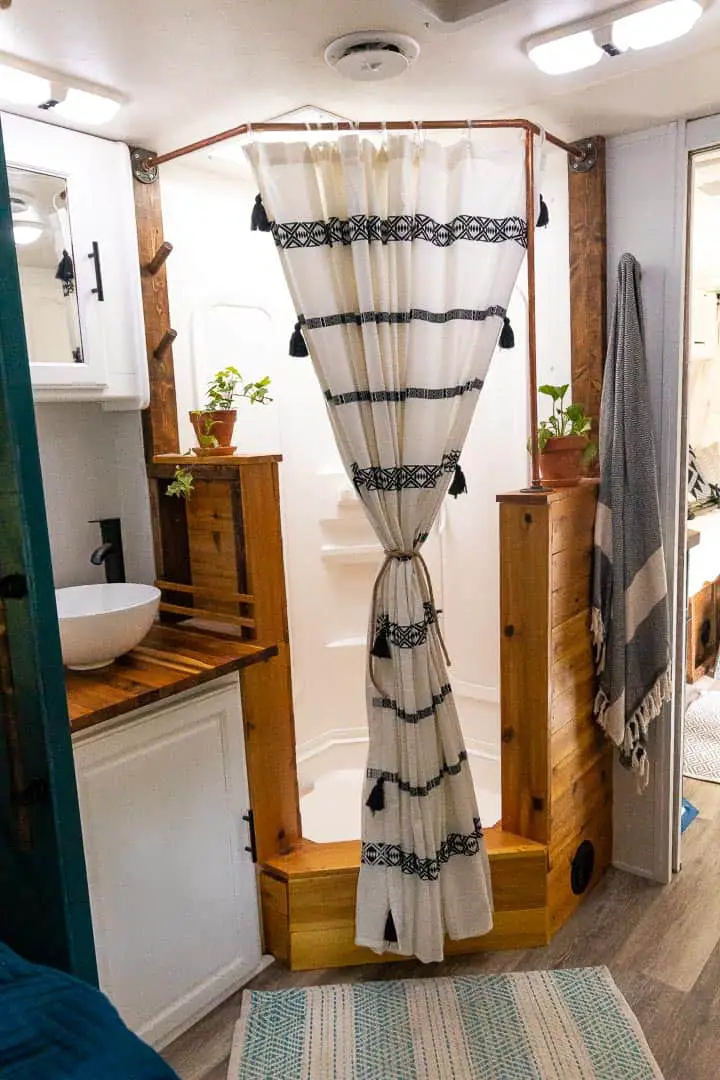
Key Features:
- Cedar shower rebuild
- Butcher block countertop
- Vessel sink and residential faucet
- Custom composting toilet
- Wall and cabinet paint
- Vinyl plank floors
- Copper toilet paper holder
- Wood dowel towel holders
Our RV Bedroom Renovation
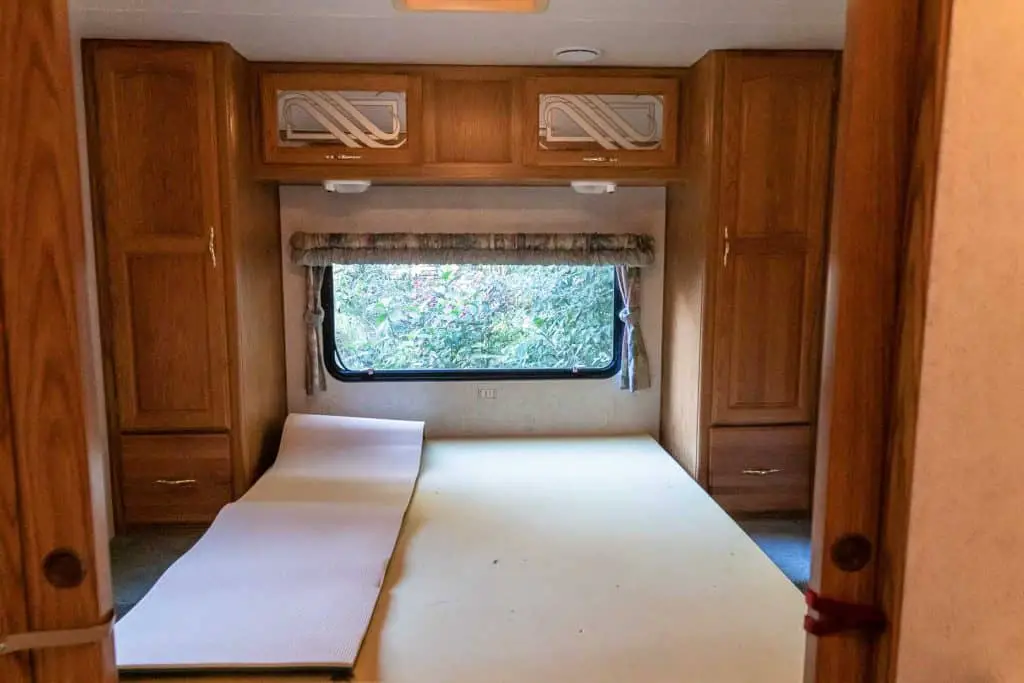
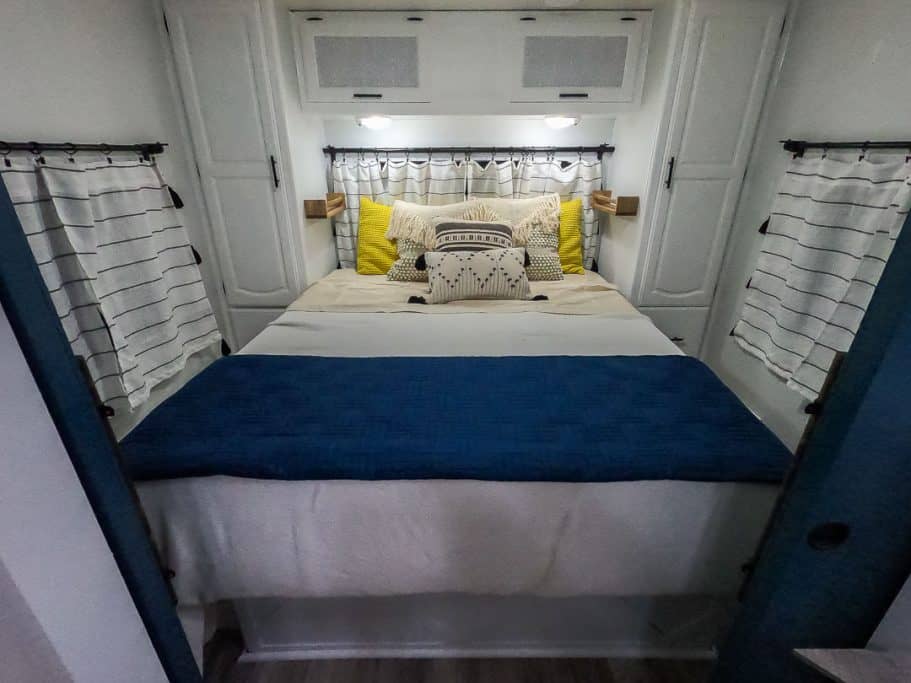
Key Features:
- Walls and closets painted
- Vinyl plank floors
- Window curtains
- Barn door design and painted teal
- Laundry chute
- Dog bed & Shoe Storage
Our Top RV Makeover Ideas
Although we’re proud of all of the transformations in our camper remodel, these are the things we’ve done that have made the biggest difference in turning an outdated motorhome into a brand new home on wheels.
Paint Interior Walls and Cabinets
Nothing will have as stunning an impact on a camper remodel before and after then taking the time and effort to paint the interior walls and cabinet. Older RVs typically have bland wallpaper pressed against the walls throughout the interior.
Wood cupboards are typically brown, boring and bare and the general look and feel throughout the entire interior tend to feel outdated, weary and not modern.
By painting your camper walls and cabinets a bright color – such as the white and light grey that we used – you really open up the interior, make it more modern, and give yourself room to make other features of your camper interior really pop.
Be warned, committing to this task is easier said than done. Because we wanted a consistent look and feel throughout the entire camper interior, we knew that we were undertaking a huge endeavor.
Not only did it take significant time to remove cabinet doors and hardware – including struts, latches and handles – but also prepping the interior for paint took significant time.
We had to use plastic to cover areas we did not want to get paint on, such as windows, countertops and appliances. And we ran blue painter’s tape around all edges of ceilings, fixtures, switches and other areas we wanted to trim with paint very carefully.
Of course, in thinking about the mess we could make on the floor we were certain that we wanted to replace the existing carpet and vinyl sticker floor. So we did not worry so much about dripping paint on the floor as we were concerned about getting it on things like our refrigerator, light switches and window frames.
The painting itself took multiple steps. We used a liquid sander to prep the interior for paint. This involved rubbing two layers of liquid sander on each surface.
Then we primed with Kilz primer. In most cases, this was also two coats. We used a paint gun for the first round of priming.
But we quickly realized that we were making too much of a mess and decided to hand paint and roll the second coat of primer. This step included trimming all corners and other delicate areas of the interior.
Finally, we added the paint to each surface by hand using brushes and rollers. We painted the walls a very light grey and the cabinet doors white.
We switched out the handles on all of the cabinets from tarnished bronze to a simple modern black. This contrast in itself really made the cabinet doors pop throughout the camper.
Installing Vinyl Plank Flooring
If adding paint throughout the interior was the single most impactful project for our RV makeover, installing vinyl plank flooring was easily the second most complimentary.
Because we lightened up the interior of the camper using white and grey paint, we went with a darker grey vinyl plank flooring to create a contrast between the floors and walls.
These two jobs together completely transformed the camper. And if we had chosen not to do anything more in our camper remodel, the paint and flooring would have given new life and a much more modern feel to the camper interior.
First, we removed everything from the floor of the camper that was not permanently fixed where we liked it. This included the sofa and dinette – both of which we intended to replace during our rv makeover.
Then we ripped out the existing green carpet from the living room and bedroom. This was not as challenging as we thought – though we did have carpet on the stairs and around cabinets that was a bit tough to remove.
From there it was a matter of snapping the vinyl plank flooring pieces together, positioning them on the floor as desired and then cutting them accordingly.
While there were some tight spots in some places the difficulty of the job was overcome by the immediate satisfaction in the transformation of the entire interior.
Building a Rustic Cedar Shower
Of all of the DIY projects we didn’t consider when we first began our RV renovation, building a cedar shower was at the top (shortly behind that was building a composting toilet and a sofa sleeper!).
However, as we began working on the flooring in the bathroom it became clear that the shower was going to be an eyesore in what was becoming an otherwise amazing makeover.
The shower lining was yellow from age. And there was a weary and outdated brass-colored siding that held the shower stall glass in place.
While we had always intended to repaint the shower with a bright white epoxy resin to give the stall new life, we had not intended to tear the whole thing out and rebuild it from scratch!
But that is exactly what we did! And what a transformation!
This project took more time in planning, measuring and thinking through the design than it actually took to build. As each shower stall is different, we consulted several online resources for ideas and inspiration.
But there were no exact plans that matched the needs of our shower stall or the wants we had in creating a vintage, rustic look to the camper interior.
Essentially we tore out the old glass shower walls, leaving the existing pan and plumbing in place, and then used wood to frame out the new shower walls. Once we had framed the shower walls we added cedar planks throughout to give it that rustic look.
We then sealed the cracks and crevices and painted the cedar with a waterproof coating that would prevent the wood from holding water. To add the final touches we built a shower curtain rod out of copper pipe and fittings and installed a few wood dowel towel holders.
Where the shower and sink meet we left a cubby shelf to be able to store soap, toothbrushes and other toiletries items next to the sink.
Constructing a Custom Composting Toilet
We didn’t realize we had a leak with our existing standard-issue RV toilet until late in our camper remodel. And once we started shopping for replacement parts and entire toilets we realized we may want to invest the money in a composting toilet.
But composting toilets are expensive. So we did a little research and came up with our own idea of what we could build ourselves. This by far was one of our most creative DIY RV reno projects.
After removing the existing toilet we had to cap the black tank, for obvious reasons. Once this was done we looked at the open area around where the toilet was, approximately 30 inches wide by 24 inches deep.
This was a blank slate for us, with the only catch being that we wanted to divert our urine into our black tank rather than into a reusable container.
With that restraint in hand, and knowing that we wanted to have a side of the toilet where we could store sawdust, spray bottles and toilet paper we set about to design the composting toilet.
Essentially we built the toilet using 2×4 and 3/4″ plywood and the requisite plastic diverter and bucket. We used a hose to connect the diverter to the black tank and installed a standard toilet seat on top.
Finally, we added piano hinges to allow the entire top of the toilet to lift up for us to be able to access the trash bags inside.
Designing and Building a Sofa Sleeper
When we purchased our old motorhome with the idea of completing a DIY camper makeover we knew we wanted to remove the old pullout sofa and replace it with one that had a little more function. Additionally, the existing cushions looked terrible and were not an option once we added paint and flooring to the camper interior.
So we tore the sofa out before we painted and spent the next little while considering the various designs we could come up with to replace it.
Of concern was the fact that our furnace was located beneath the sofa and was clearly not going to go anywhere. While we don’t typically use our furnace often, there was no sense in throwing it out.
But it was going to make the sofa design more challenging. A second complicating factor is that there were existing wires bundled up behind the sofa as part of the RV power system.
We already knew that we wanted to add additional battery capacity to our battery bank. And this gave us the idea to move our batteries inside the camper and install our solar controller and inverter beside the battery bank beneath the sofa.
With these criteria decided it was a matter of finding various examples of slide-out sofa beds that were not too complicated to replicate.
Of course, with our design nothing was standard. We had to move wires and build around the furnace. But ultimately we created a box to hold our batteries, inverter and solar controller and made the bottom of the sofa high enough to clear this and the furnace.
We built the sofa with slats that would allow it to pull out into a bed if needed but also put hinges on it so we could lift it up to access the area underneath.
We also repurposed the existing cushions by removing the outdated lining and sewing new covers made out of bleached canvass for a rustic look.
Installing butcher block countertops and residential kitchen sink and faucet
A dream of ours has always been to have butcher block counters in our camper. But when we lived full time in our truck camper there was little space with which to work with a new counter and it would have been very complicated and wasteful to cut out the holes needed for appliances.
However, with more counter space in our motorhome, we knew the minute we first saw the kitchen that we wanted to replace the outdated countertop, sink and faucet with a more modern, yet rustic farmhouse-looking setup.
Because of the size of the existing counter, we ended up purchasing a huge slab of butcher block that we measured and cut to fit the existing space.
We stained it to a natural dark brown to create a beautiful contrast between the white and grey walls and the dark grey flooring. The last step was going to be to find a proper sink and faucet that would match the transformation taking place in the kitchen.
Standard RV sinks turn yellow with age and our kitchen sink and faucet were no exception. So taking those out was easy.
But finding a deeper and wider residential sink was a challenge. We didn’t want to have to remove the existing drawers or do substantial changes to the existing plumbing. So when we found a great sink option we went with it.
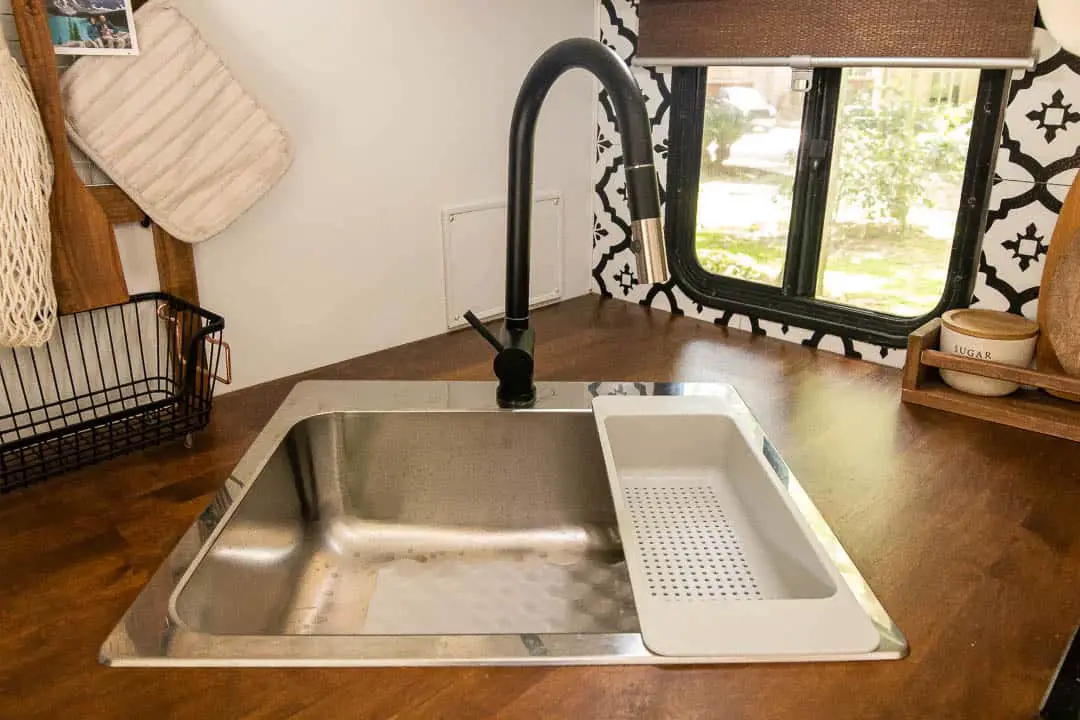
It took a little time to find the courage in ourselves to cut the sink and faucet holes in our new stained countertop. But once we made that commitment and the holes were cut the kitchen really came together to transform the interior.
We did find that this makeover to the RV kitchen caused the countertop to sit a little higher than previously. But there is no doubt that the job we did completely transformed this room in our motorhome and was worth the effort!
Installing butcher block countertops and vessel sink and faucet in bathroom
In a similar fashion to the renovations to our kitchen area, we decided to remodel the bathroom sink along with the same style.
Removing the old yellow sink and faucet was a joy. And after cutting and staining the kitchen counter it was much easier to install the bathroom counter.
We opted to go with a vessel sink that sits on top of the counter to add a more modern rustic look. Incidentally, this required less cutting as we only had to bore 2 holes in the countertop – one for the sink drain and one for the faucet hookups.
We also centered the sink so we didn’t have to do much work to the existing plumbing as well. This section of our bathroom, with the cedar-plank shower next to the sink, has quickly become our favorite part of our camper!
Other Great Budget-Friendly DIY RV Renovation Ideas
Although those are our top renovations that gave our camper a modern and brand new look and feel, these are some other budget-friendly DIY ideas for your camper remodel or RV renovation.
While your camper or travel trailer may not have all of the same space as ours, we think you’ll appreciate the inspiration these ideas will bring to help you turn your older camper into an amazing, modern and comfortable tiny home.
Custom Barn Door Decor
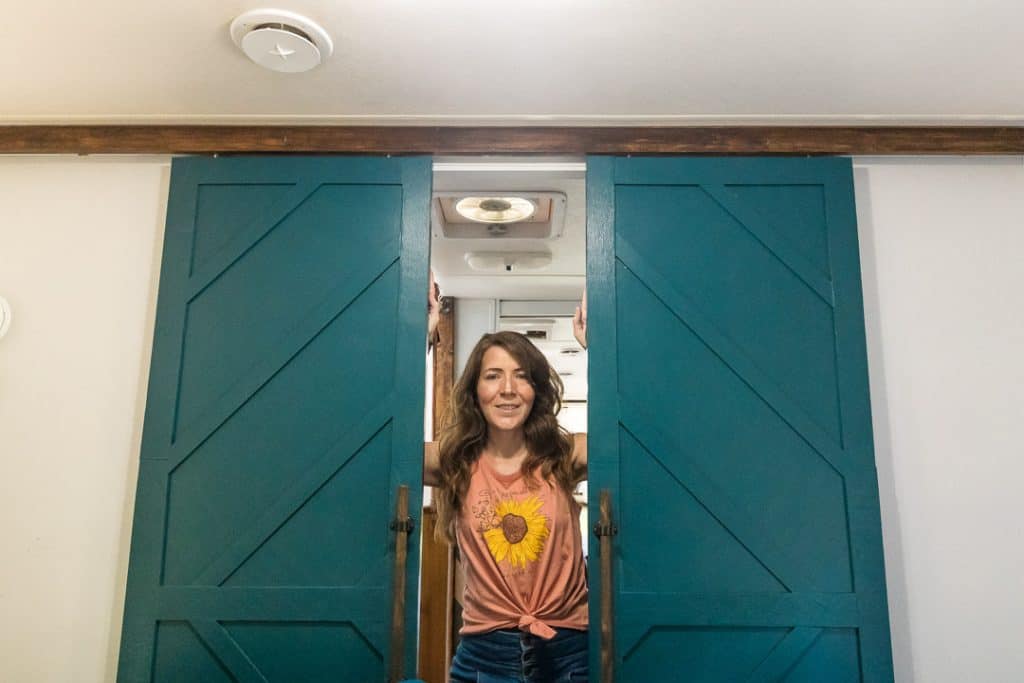
Some travel trailers, fifth wheels and motorhomes have curtains to separate rooms. Ours had a pocket door between the kitchen and bathroom and sliding farmhouse-style barn doors to close off the bedroom.
However, not only were these doors broken and off track. But also they were bland and boring in comparison with all of the other makeovers we completed.
So we took them down, added some creative designs using thin wood slats and repainted them to the look and feel we wanted.
Foldout Trash Can
OK, so this definitely isn’t necessary. But with two dogs that like to check out what’s in the trash can and not wanting to ruin the beauty of the rest of our RV reno, we decided that hiding the trash can in the kitchen was ideal.
For this, we simply converted a cabinet door from one that opened sideways to one that dropped open from the top with the hinge on the bottom. We installed a strut to help hold it in place when open and then screwed a small trash can into the door.
This incredibly simple project was an easy makeover and great use of space in our camper.
Laundry chute
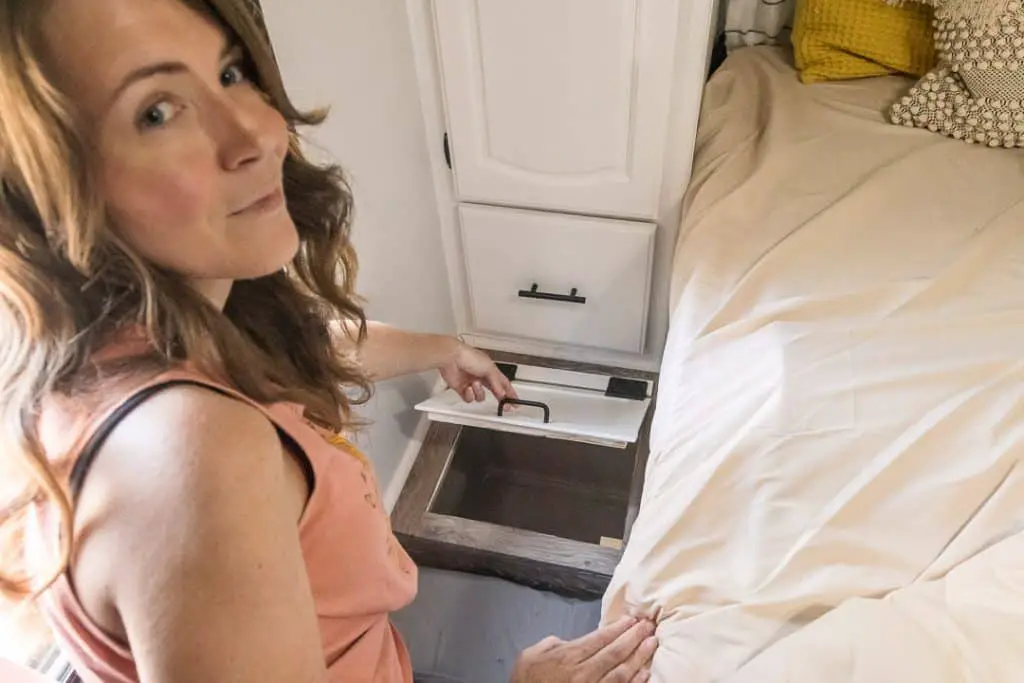
Dirty clothes always have a way of being in the way in a small camper. And with an outside storage bay projecting into our camper next to our bed we decided we’d make a simple modification to account for our dirty laundry.
From inside the bedroom, we cut a door in the storage bay and installed a hinge so the door would lift. Now we can simply grab the handle, lift the chute door and toss our dirty clothes into a hamper accessible from outside the camper!
Curtains
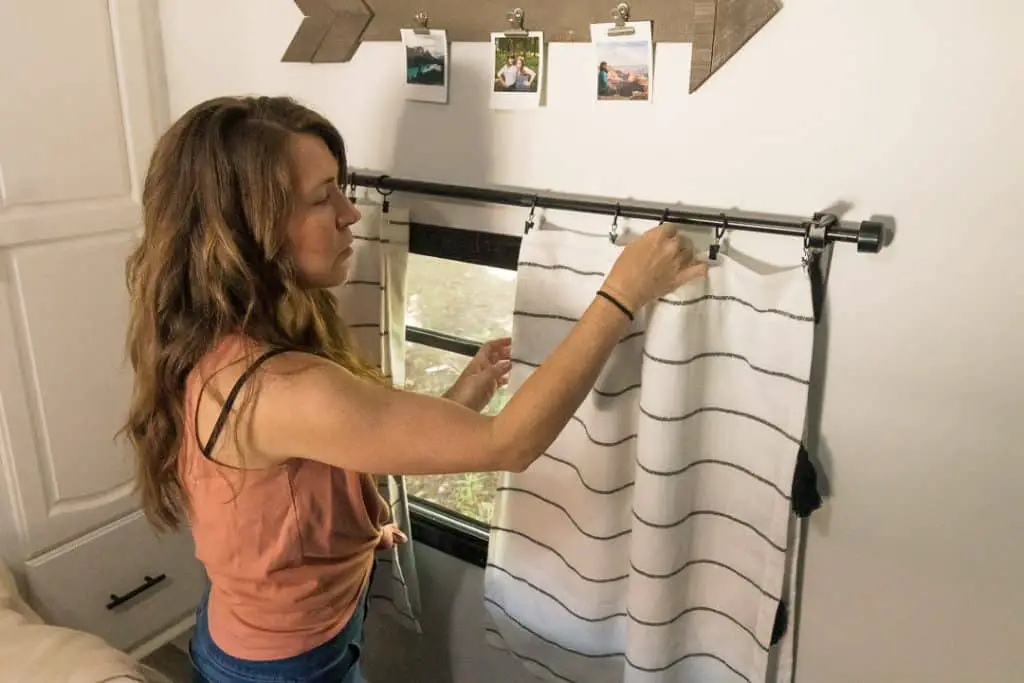
Adding or changing curtains in your camper is a great way to tie the room together while also providing the privacy you desire and blocking the sunlight when you want to cool the camper down.
Many campers come with pleated-style blinds that are not only unpleasant to the eye but also difficult to use and easy to break.
We installed simple curtain rods and sewed fabric to be able to easily slide over the rods and serve their purpose in covering the windows.
SOFA Cushions
Because we removed our old sofa and built a new one we had to find cushions that fit our new sofa dimensions. For this, we repurposed our old cushions but then spruced them up with some handmade canvas covers.
Simply soak canvas drop cloths in a bucket of bleach and water to uniformly color the cloth. Then sew the cushion covers accordingly. We added throw pillows as accents to tie the sofa into the rest of the living room interior.
Cube box storage
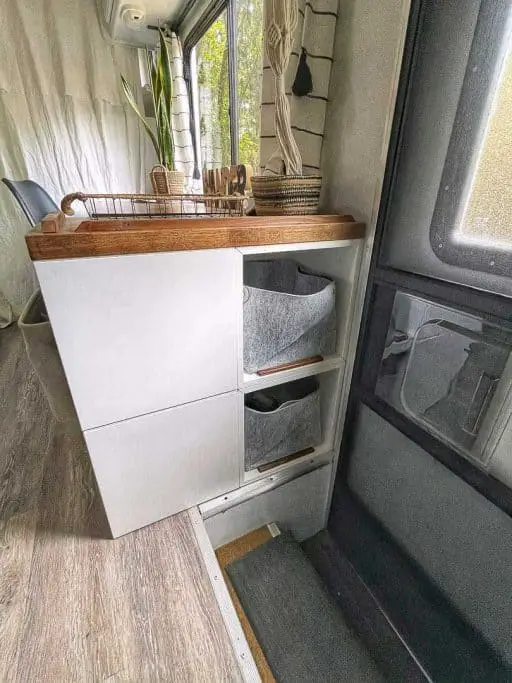
The entryway to our camper is a busy place. As such, we knew we wanted storage that would custom solve issues we faced in the past. We wanted to store shoes, dog leashes and quick-grab items like keys and headlamps in a way that did not conflict with the look and feel of our camper renovation.
While we considered building our own shelving and we experimented with some cheaply made shelves, ultimately we decided to go with 4 cubes from IKEA that we could face and secure in whichever direction we wanted.
This way we were able to have 2 cubes face the door for our shoes, 2 cubes face the living room for dog toys and then we cut a piece of butcher block counter for the top where we have baskets to store the grab-and-go items.
Water dispenser stand
After the dinette and carpet were removed there was a corner of the living room that was bare and empty. Knowing how valuable storage space is in a camper or van we knew we couldn’t waste this space.
So we built a small stand to hold our drinking water where we could also store our dogs’ food bowls beneath. It was a simple custom job that added to the interior makeover.
Standing desk
Most people would use the cabover space as an additional sleeping area. After all, that is its intent. However, we were more concerned with having a productive use of the space than an extra bed.
So we decided to convert the sleeping area into a standing desk that pulls out from underneath our cabover storage area. It is simple and very practical for our needs.
Front Door Entrance
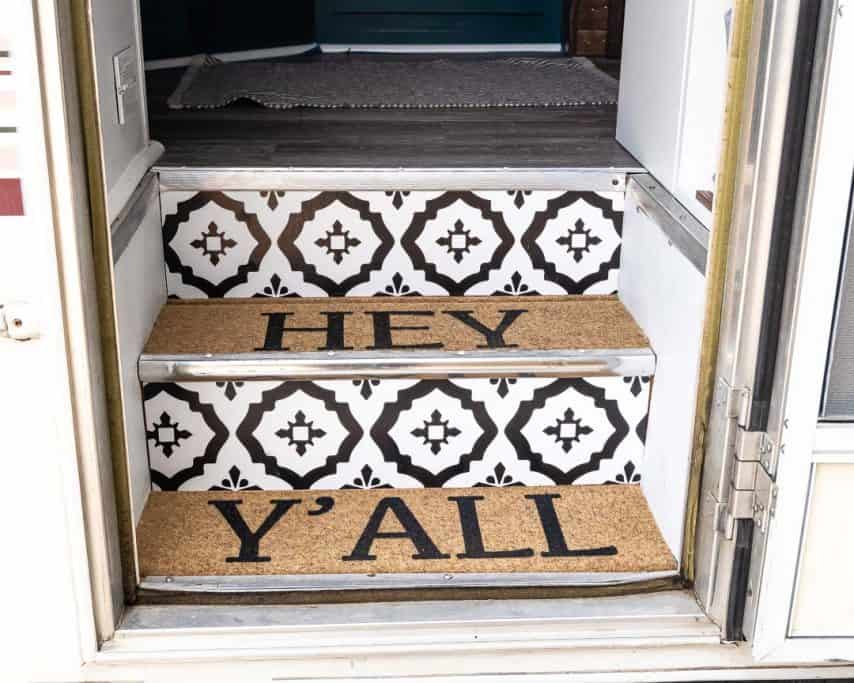

One last project we took on to complete the amazing transformation of our camper remodel was to makeover the front entrance to our tiny home. We inherited a doorway covered in the same green carpet we removed from the rest of the camper.
So it was immediately obvious that removing it would reveal all sorts of options beneath the carpet. We opted to add decorative vinyl stickers to the fronts of the steps, to paint the side wall white and to cut a standard welcome mat in half to fit on the bottom of the two steps.
This part of the RV reno restored a new modern look to the entrance making it very welcoming every time we open the door to our camper
Wrapping Up our RV Makeover
Our camper was probably a sight to see when it rolled off the dealer’s lot in 1999. While nobody could predict what would happen when the year turned, it is easy to look back on our motorhome and see that some things were destined to need to be changed.
When we began listing the things we wanted to accomplish in our RV makeover we couldn’t see all of the jobs and processes that it would take to reveal the new, second life of our full-time home on wheels.
But the further we wandered into the camper makeover the more we started to see the amazing potential a complete renovation would have on the camper.
We hope that this post has provided you with lots of great ideas and inspiration for how to makeover your RV while sticking to a budget or without having prior remodeling expertise.
We’d love to hear some positive feedback from you on what you like best about our camper makeover, answer any questions you have and, of course, hear how your RV renovation or makeover has gone! Leave us a comment or connect with us on social media to let us know!
NOT SURE WHERE TO BEGIN WITH YOUR RV REMODEL?
No worries! We can help you get started on your RV remodel! From offering counsel and assistance in picking out the best RV to remodel to walking you through some of the major and minor tasks you may want to complete, we offer RV remodeling consultation to suit your needs!
Rates start at $50/half hour and consultation packages can be tailored to your wants and needs!
Contact us via email to arrange an initial consultation and discuss consultation packages available!
NOTE: Due to the nature of our travel schedule, we do not offer remodeling services outside of a consultation.