
Last Updated on February 26, 2022 by Chris and Lindsay
Understanding an RV electrical system can feel overwhelming, especially if you have no previous experience working with them. But don’t be discouraged!
An RV power system is not an overly complex system and we’re here to break it down for you!
In this post you’ll learn the basics of RV electrical systems, including solar power systems for RVs, which will give you the confidence to design a power system that gives you the most safety and comfort no matter where the road takes you!
We’re also going to share information about our truck camper electrical system. We’ll break down the evolution of our RV power system from the most basic starter kit to a little more advanced RV solar power system that provides us more than enough energy for all of our needs.
We weren’t experts when we began our full-time RVing experience. But what we have learned will help you plan, fix or upgrade your RV electrical system at any level of understanding.
NOTE: We include affiliate links for products we recommend through our affiliate relationships with Amazon and Renogy. We only recommend the products we own and use ourselves so read on to see why we think they are an important part of your RV electrical system design!
RV Electrical Systems 101
All RV electrical systems are broken down into 2 types of electrical power:
- “Shore Power” (110/120 volt AC)
- “Battery Power” (12 or 24 volt DC)
Without getting too deep into the details of each kind of power system, you should know that you will have and use both in any RV. But you will use them (or not!) at different times.
Shore Power
RV “Shore power,” which draws on a 110/120 volt AC (alternating current) source, is the source of energy that makes you feel like you’re at home. This requires that your RV is “plugged in” to a power outlet of various size.
Without getting into those details, you may use a normal power extension cord (20 amp) or the thicker 30 or 50 amp power cord that attaches to your RV power distribution system.
Whatever cord you are using, when you are plugged into shore power you are drawing power in your RV the same as you would if you were inside a home. To this end you can use appliances the same as if you were at home.
Note that you do not necessarily have to be plugged into the power grid to be on shore power. If you have a generator (either built in or external) then you will be generating 110/120V power that will enter your RV the same as an electrical outlet at an RV park or house.
If you are looking for the best external RV generator we own and recommend Honda 2200.
Advantages:
- “Unlimited” power,
- Can use larger electrical appliances,
- No adaptations required inside the RV
Disadvantages:
- Require you to be “plugged in” (usually RV park or home) thus limiting your camping options
Battery Power
Battery power, on the other hand, relies on energy created externally and stored inside your RV batteries. This will either come in the form of either 12 or 24 volts DC (direct current) from your battery bank. When someone says “off grid” they are referencing this type of power, which is not dependent upon being connected to a local power grid.
Unlike RV shore power, battery power in an RV electrical system is dependent upon the size, efficiency and health of your battery (or batteries). You are essentially storing power as you travel and, since you use it when you are not plugged into shore power, you are limited in the amount you can store and use.
Because there are limitations on the amount of energy you can use, you will lose the ability to use many of the larger power appliances that you may be accustomed to at home. Things like microwaves, air conditioning units and even refrigerators are huge power consumers and require massive amounts of battery power to operate when you are not plugged into shore power.
In many cases RV electrical systems are not designed in such a way that you can use your 110v power outlets to plug in appliances when you are operating on battery power. To do so requires that you have an “inverter” which takes 12 or 24v battery power and converts it into 110/120v power.
Advantages:
- Can provide “free” and “unlimited” power when adding solar panels to RV,
- Allow you to camp virtually anywhere in the world
Disadvantages:
- Limited amounts of power,
- Can be reduced greatly by inclement weather,
- Requires the purchase and use of an inverter to use standard 110/120v appliances.
RV Electrical System Components
Remember, RV electrical systems are not complex. There are really only a few key components and then all of the wiring in between. Of course if you take apart your breaker box and peek around at all of the wires running in different directions you will realize that RV power systems do involve a certain level of proficiency before you go poking and prodding around.
But when it comes to an RV electrical design, whether you intend to do the work yourself or hire a professional to do it for you, these are the key components in any RV electrical system of which you should be aware.
Of course, we are oversimplifying components of your RV electrical system that are “built in” to your RV. There are power distribution centers, power converters, buss bars and fuses all over the place.
What we’re talking about in this section are the components that will tie into the “guts” of your RV of which you can design, modify and upgrade to suit your own energy use needs.
A basic understanding of these components will give you the ability to plan out which of the following components you want, and the level of quality/size you desire.
RV Solar Power System
Although RV solar power is a subset of the RV electrical system, in itself it is also a mini-power system that involves several components.
The purpose of the solar power system in your RV is singular: to capture and convert energy from the sun into energy that can be stored in your battery(ies) for later use.
When planning your RV solar power system you should take into consideration whether, and how much, you intend to be away from places where you can use your RV shore power.
At this point in time RV solar power is incredibly affordable, efficient and reasonably easy to install and understand. There is really no reason why you should drive one mile in your RV without having some level of solar power built into your RV power system.
Here are the key components for any RV solar power system:
Solar Panels
Once bulky and inefficient, solar panels are now reasonably priced, relatively small and lightweight and can generate more than enough power for even the largest power consumers.
For RVs, most solar panels will either be Monocrystalline or Polycrystalline. Monocrystalline solar panels provide the best value when it comes to RV solar systems. They are a little more expensive than polycrystalline but they also have longer lifetimes and about 25% higher efficiencies.
There are also varieties of thin film solar panels that are even more inexpensive. These are often used in flexible systems such as those you can set out and move around your RV rather than affixing panels to your RV. But they are lower quality with shorter lifespans and usually less than half of the efficiency of either mono or polycrystalline solar panels.
Regardless of which solar panels you choose, there are several other components you need to complete your RV solar power system.
SOLAR Charge Controllers
A charge controller does just that: it controls the charge that comes in from the solar panels and goes to your batteries.
You must have a charge controller in your RV solar power system or else your system will not operate (and you will create a dangerous situation).
Essentially the solar panels connect to your charge controller, which is normally mounted inside your RV as it has a display panel indicating various features of your solar power system. From the charge controller, energy from the solar panels is regulated (voltage and current) and sent to the batteries at a level that will not lead to overcharging the batteries.
Even on cloudy days solar panels generate large amounts of energy captured from the sun. So the purpose of the charge controller is to ensure that just the right amount of energy is delivered into the storage capacity of the batteries.
There are 2 main types of charge controllers: PWM and MPPT.
PWM charge controllers are less expensive and thus lack efficiency and longevity that MPPT charge controllers offer. Without getting into the technical details, MPPT charge controllers are typically between 95-99% efficient, which is leaps and bounds above PWM controllers.
Most of the basic RV solar power system kits include a PWM charge controller with either type of solar panel because the average person will not likely notice much difference in the rates of charge.
However, if you require more battery discharge and/or quicker recharge times then you will want to consider investing a little more in a MPPT charge controller.
To learn more of the differences between the two types of charge controllers read more here.
Inverters
Inverters take 12 or 24 volt power from your RV battery bank and convert it into 110/120 volt AC power so that you can use appliances in your RV. These are measured by the amount of Watts they output.
Very simply put, you will need an inverter of some size in order to plug in devices to use the energy that you are storing in your batteries with your RV solar power system
However, determining the size of the inverter can be a complex mathematical equation requiring you to add up all of the electrical devices you could possibly consider using at one time, the storage capacity of your batteries and the size of the wires connecting everything together.
As a rule of thumb, you can avoid the most difficult math by looking at the appliances you want to use the most, reading the back of the box and determining if it is ludicrous to consider using the appliance based on the Watts it consumes.
For instance, most smaller flatscreen televisions use very few watts to run. However coffee makers and hair straighteners use large amounts of energy.
You will find that most of the things you will want to plug in to use in your RV will run on less than 1000 watts. And without doing the complicated math, a battery bank of 2 batteries at 80-100 Ah each should handle these loads within reason.
Battery(ies)
Although we’re including this component last, your battery(ies) is really at the center of any RV electrical system. After all, unless you are constantly plugged into shore power (and thus more of a “mobile home” than an “Recreational Vehicle” you will draw energy from your batteries anytime you are not plugged in.
We should clarify here that we are referring to your RV “house battery” with all information below. This would be separate from any battery you have designated to start your RV, or vehicle battery. Your house battery will run all of your power inside your RV itself (as opposed to starting your RV or tow vehicle).
House RV batteries can range from relatively affordable to borderline criminal in their pricing. But, as they say with anything as critical as an RV battery, you get what you pay for. Or, you pay for what you get.
Either way, it is not worth knowing all of the details of the type of battery and how each works. If you’re that interested in your RV electrical design then this post is not going to satisfy you.
However, for the average person trying to understand their RV electrical system, this is what you need to know about batteries.
- Capacity. Batteries store energy. The more energy they store, the more you can use. Some batteries store more energy and/or recharge more efficiently than others. Battery capacity is most commonly measured in “Amp-hours,” which tells you roughly how long your battery will last when under load. For example, a 100 Ah battery drawing a 2 amp load would have 100 Ah / 2A = 50 hrs of capacity. This is oversimplified – but just to give you an idea.
- Type. Batteries come in different types (and sizes). RV batteries (like boat batteries) are considered “deep cycle,” meaning they are designed to be run down, then recharged and then run down again over and over again. A car battery, on the other hand, is designed to never run down below a certain point. RV deep cycle batteries tend to be bigger, heavier and often more durable than their counterparts. And while there are many different kinds, these are the basics.
The 3 main types of RV batteries at this point in time are flooded lead acid, AGM and Lithium Ion.
Flooded Lead Acid
Flooded lead acid batteries are the most primitive, affordable and thus most common type of deep cycle RV battery. You can usually find a 100 Ah battery for around $150 and they are likely what you think of when you think of RV batteries because they are very similar to the standard lead acid car battery.
In simplest forms, these batteries have cells that require consistent water levels in them to operate. Over time the chemical reactions release gas and thus these batteries have vents and you should check water levels on a fairly regular basis as it discharges over time.
AGM Batteries
Absorbant Glass Mat (AGM) batteries are a step above flooded lead acid batteries in that they are sealed and thus considered “maintenance free.” For this luxury, they are more expensive than lead acid batteries but are considerably more durable.
You can mount them horizontally and they can handle being bounced around wherever you may drive. AGM batteries are also more efficient when it comes to recharging and are considered an “upgrade” from the flooded lead acid. You can typically find AGM batteries in the $200-$250 price point for 100 Ah.
Lithium Ion
Lithium batteries are all the rage in the RV community. These are currently the most long-lasting, durable and efficient batteries for general consumer use. Considered an upgrade to AGM batteries, lithium batteries can be discharged to nearly nothing (as opposed to 50% minimum discharge recommendation with flooded and AGM).
Lithium batteries have been around for a while for use in cameras and other small electronic devices. But recently their technology is advancing to the point they are becoming more common in RVs.
However, you’re going to spend quite a bit more for lithium batteries, with prices rarely below $750-$800 and very easily over $1,000 per battery for higher quality batteries.
Our RV Electrical System: Version 1
We have a used 2004 Lance 845 slide in truck camper that sits on our 2002 F250. Our RV would be considered relatively small compared to larger Class A and Class C motorhomes. But the electrical system we built around our needs took into consideration the following;
- The amount of space we had for batteries and other components
- Our budget for purchasing modifications and upgrades to the existing system
- Expected energy consumption
When we first set out on the road we would have to consider ourselves novices at best. We had no prior RV experience before we went full-time!
Instead, we had friends help us put together the RV based on their experiences and recommendations. This led us to opt for the basics when it came to our batteries, inverter and solar power system.
Here’s what we chose:
Batteries
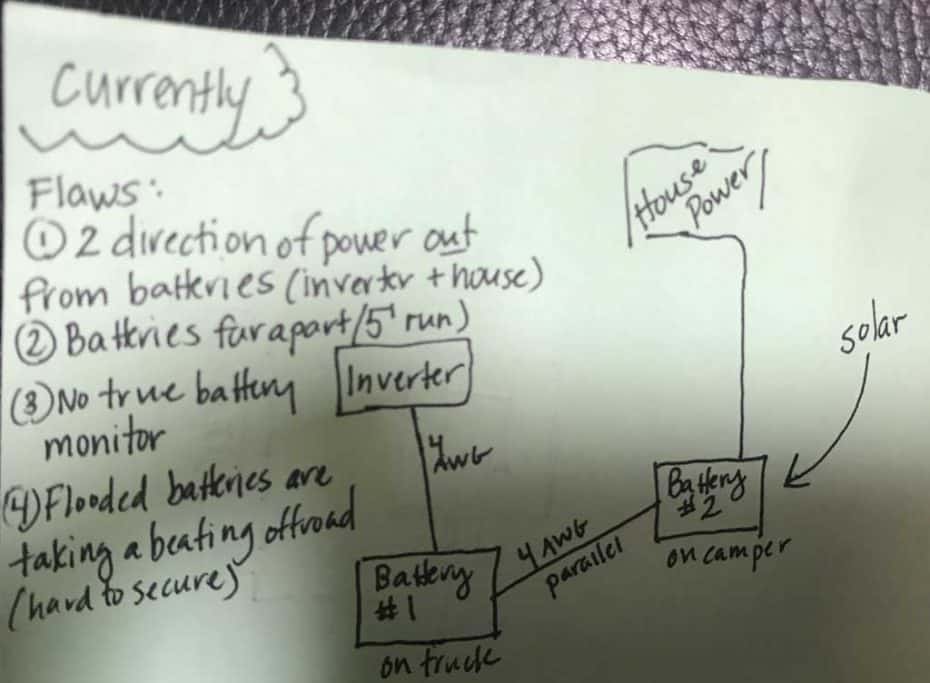
We purchased two Interstate brand deep cycle flooded lead acid batteries. Each battery had approximately 80 Ah in capacity. Because we could not fit both batteries inside our camper battery compartment we placed one battery in the camper and one on our truck bed. We then connected the batteries in parallel so we had twice the storage capacity.
Our Main Issue: The flooded lead acid batteries we purchased did not enjoy the many offroad adventures we made. We often found the cells were low on water, a sign indicating that we were wearing out our batteries faster than most. By the end of two years on the road we didn’t trust our batteries to hold their charge after the sun went down (when we did a lot of our work requiring computer recharge).
Solar Power System
Our camper came “pre-wired” for solar. This meant there was wiring between the battery compartment and the roof and all we had to do was add solar panels and connect them to the pre-wired connection at the roof.
With simplicity in mind, and not knowing anything about solar panels prior to our purchase and install, we bought a plug-and-play solar kit offered through Renogy. This kit included 2 x 100W solar panels (each approximately 2’ x 4’ in size), a basic PWM controller, the mounting kit for the panels and some wiring components.
We had to purchase a few additional components to make this pre-wired system work. But it was incredibly simple and with no prior experience we were able to safely and correctly install our RV solar power system in true DIY fashion.
Our Main Issue: While the 200 watts of solar power was great, the PWM controller lacked in its ability to keep up with our energy consumption. It turned out that we used more energy on the road than we thought when we first began.
Inverter
At the advice of several people with truck campers, we selected a Xantrex 600W inverter for our journey (great brand and value!). Based on this advice we were told we would not use more than 600 watts in most situations.
Further, because we also carried 2 Honda 2000 generators (to power our air conditioner as needed), we were advised that if we ever needed more than 600 watts of power we could simply fire up one of our generators.
This turned out to be true. And we thoroughly enjoyed the use of our 600 watts of power most days. But many days it was not enough.
Our Main Issue: We needed to keep 2 MacBooks continuously charged, along with a variety of camera gear and other electrical devices, in order to run our travel website from the road. As such, we found ourselves constantly unplugging some devices so we could plug in others. We needed more power accessible at all times throughout the day.
Our RV Electrical System Modifications and Upgrades
Based on the shortfalls of our first version of our electrical system, we are investing in several modifications and upgrades that will greatly enhance our ability to continue to live on the road without worrying too much about our energy consumption. These are the changes we are making to address our previous concerns:
- AGM batteries. In the 3 years that have passed since we purchased our flooded lead acid batteries the price of AGM batteries has reduced significantly. They are still a stretch on our budget. But their durability and maintenance-free nature is worth it to us now. Plus the 100 Ah storage capacity will be more trustworthy in combination with our other modifications. We’ll feel comfortable drawing power on our batteries well into the night without worrying about dead or dying batteries in the morning.
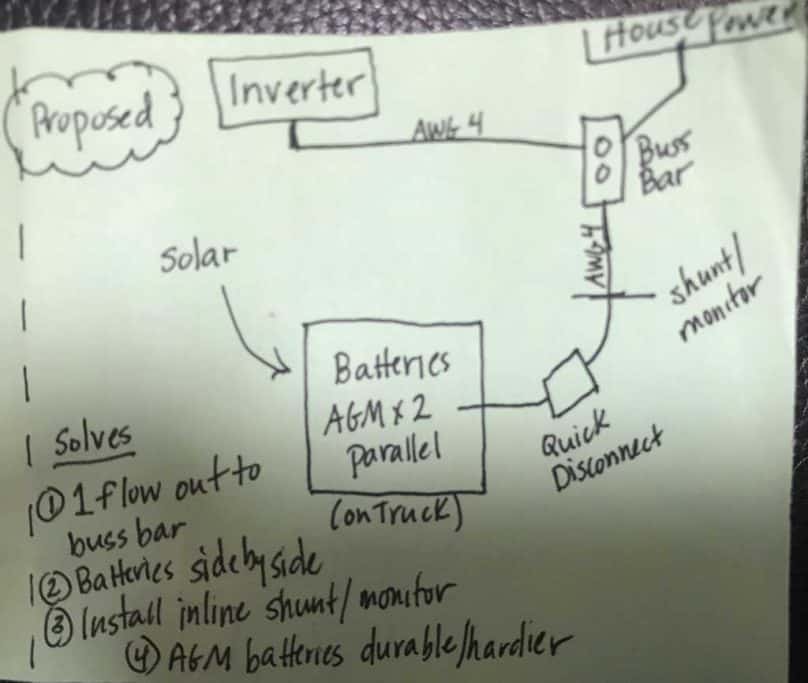
- Battery mounting. We are mounting both of our AGM batteries side-by-side on our truck where we can connect them in parallel much easier. From there we will run a single set of wires to our camper, rather than the birds nest of wires that we currently have tying our batteries and other camper electrical components together.
- MPPT Controller. We are upgrading from our PWM controller to a more efficient MPPT controller so ensure a quicker and more efficient recharge of our batteries.
- Inverter. We are upgrading from 600W Xantrex to a 1000W Renogy inverter. While it’s only a 400W addition (66% increase for us!) this will be more than enough power for what we need to do. We won’t have to increase our battery bank to support any larger inverter and the inverter itself is nearly exactly the same size as our existing inverter. NOTE: We have nothing against our Xantrex Inverter. It is a great product, but just did not fit our needs well enough.
- Battery Monitor. Currently we have no way to monitor the state of charge in our batteries. We’re going to install a battery monitor so that we will always know exactly how much energy we have used and how much we have left.
Our Solution: Renogy
Because we heavily researched various RV solar power systems prior to purchasing our initial system we know that Renogy is a leader in high quality and affordable solar power systems. We reached out to Renogy to let them know that we wanted to use their products to upgrade our entire solar power system and they were pleased to hear that.
As such, we purchased each of the following components from Renogy and speak highly of each. We are working with Renogy to offer you 10% off the purchase of any products on their page if you use coupon code “CalledToWander” at checkout.
NOTE: We are affiliates for Renogy because we believe in their products and have purchased and used them in our system as described above. We wouldn’t have worked to provide you this discount if we didn’t own and use their products ourselves!
- 2 x AGM Batteries (100 Ah)
- 1000W Inverter (new edition)
- MPPT Charge Controller (40 Amp)
- Battery Monitor