Last Updated on December 9, 2021 by Chris and Lindsay
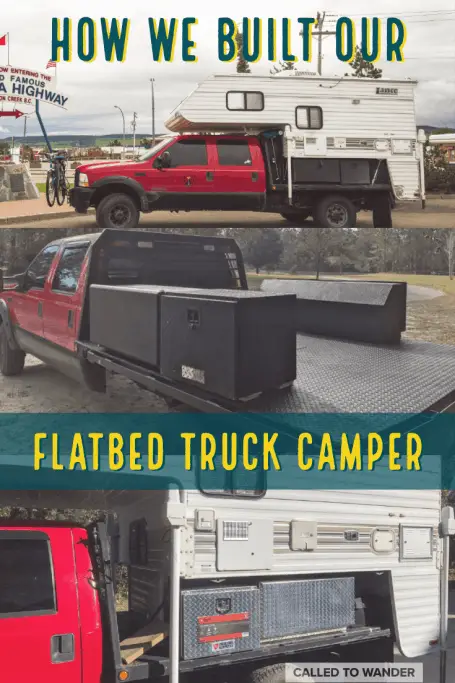
If you have ever wondered how to build out your own custom built flatbed truck camper you are not alone! But just thinking about it can be overwhelming – especially if you have little to no experience in working with your hands!
But don’t worry, we didn’t really know what we were doing when we began to convert our flatbed truck camper.
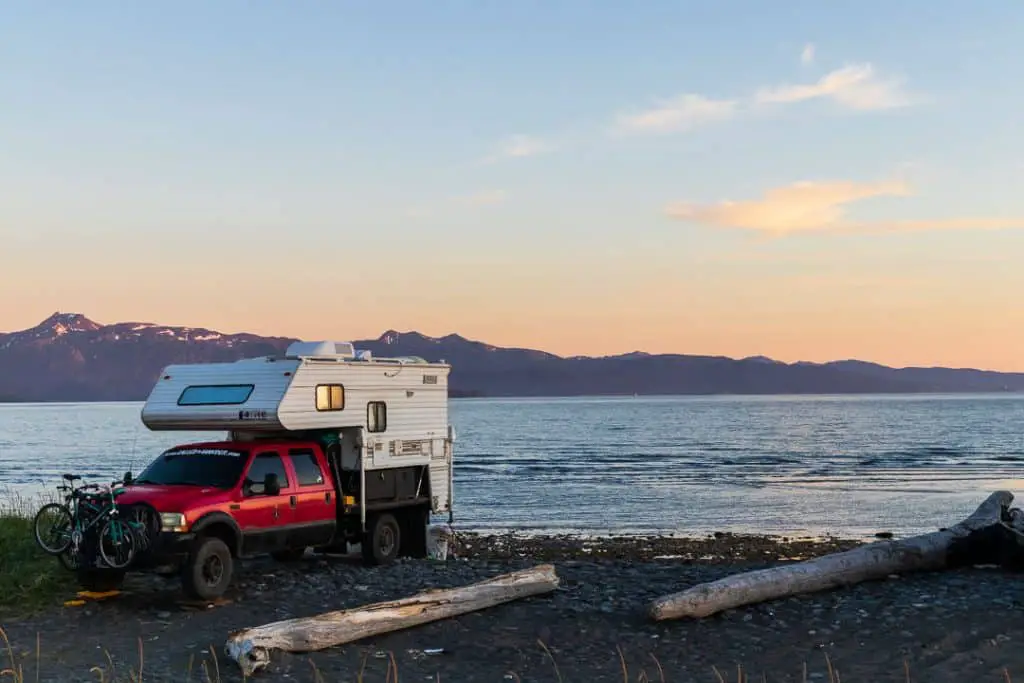
After three years of living in our truck camper, we still found things that we wish we did differently and we were always looking at ways to make the truck and camper safer and more comfortable. In over 50,000 miles of traveling with months spent in Alaska, Baja and dozens of states in between, we’ve learned a lot about what we like and don’t like with truck campers.
And in this time we’ve found that we built one of the most unique flatbed truck campers in existence and we’ve been able to help hundreds of people make decisions about how to custom build their own truck campers.
Now to help you build your own flatbed truck camper!
| In this post we’ll show you: * How to build out your own flatbed truck camper on a very tight budget (under 20K) * Things to consider when purchasing a flat bed truck and camper * Basic modifications you can do yourself to build a flatbed truck camper * Essential items that will help you complete this project on your own |
Affiliate Disclaimer: We do include Amazon affiliate links for products we recommend you consider in your truck camper build. We only recommend the items we use ourselves!
Finding The Truck and Camper
NOTE: If you already have your flatbed truck camper picked out or purchased feel free to scroll down to the truck camper modifications section where we show you how we converted our truck camper into our home.
There are LOTS of different combinations for truck campers. In fact, the versatility of a truck camper setup is one of the biggest advantages of owning a truck camper. You can have any number of different kinds and sizes of trucks combined with almost equally various camper models depending on criteria like space, weight and amenities.
So before you can modify the flatbed truck camper you first have to find the truck and camper!
We had a total budget of $20,000 for our entire truck and camper outfit. That meant we needed to make this money stretch to cover the cost of the truck, camper, repairs/maintenance and upgrades/outfitting.
This was definitely difficult. But it was possible with enough searching… and patience.
OUR TOP TRUCK CAMPER RESOURCES | |
Choosing the Right Truck Camper
When we began planning for our journey we did not have either a truck or a camper. We just knew that a truck camper would be the best overall vehicle to handle off roading and the unknowns of the Pan American highway.
So we began by searching for what we thought would be the harder of the two to find: the ideal truck camper.
This is the criteria we used in determining which slide in truck camper we wanted to purchase:
- Lightweight with no slide outs, to allow for mobility on the road
- Short bed style, to allow space between the truck cab and the camper
- Wet bath, to comfortably suit traveling with Crohn’s Disease
- Hard side, to prevent weather from ruining our trip and to add to space
We actually narrowed our search for 2 specific types of campers. After searching all across the US we happened to find the exact model we wanted to purchase just 15 minutes away from us!
It was also well within our budget and would allow us to make the modifications and upgrades we wanted to make!
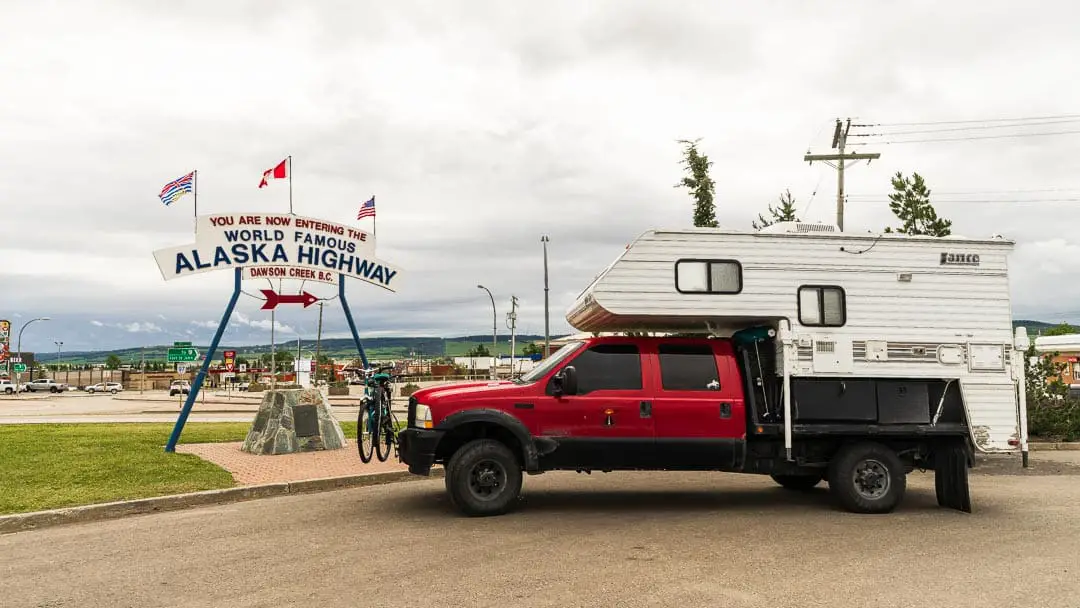
We purchased a 2004 Lance 845. This is a lightweight, short-bed camper that had everything we wanted in a traditional truck camper.
Choosing the Best Truck
Then we began our search for the matching truck. Here was our criteria:
- Reliable truck, even at high mileage
- Long bed truck, to allow us to build additional storage between the cab and the camper
- Flat bed, to allow us to customize the storage space beneath the camper and reduce the wasted space of a normal truck bed
- Single rear wheel axle, ¾ or one ton truck crew cab, to give us the size and strength we wanted without the dual rear wheels that can cause issues and cost more in tolls along the Pan American Highway
- 4 x 4 capability with high clearance for difficult roads in Central and South America
- Diesel truck on a Ford chassis capable of consuming sub-par fuel (in other words, no EGR or DEF fluid!)
As we were living in Florida at the time we searched for trucks as far north as New York and as far west as Texas.
Just like the camper, we ended up finding our truck, Rocket, just three hours away!
We bought a used 2002 F250 Crew Cab 4×4 with the famous 7.3L diesel engine.
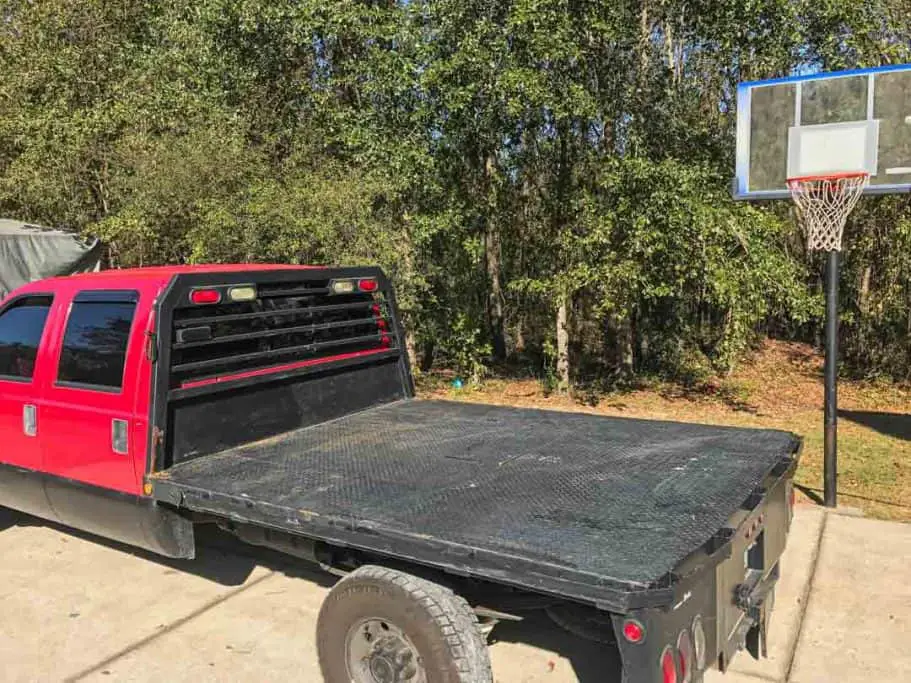
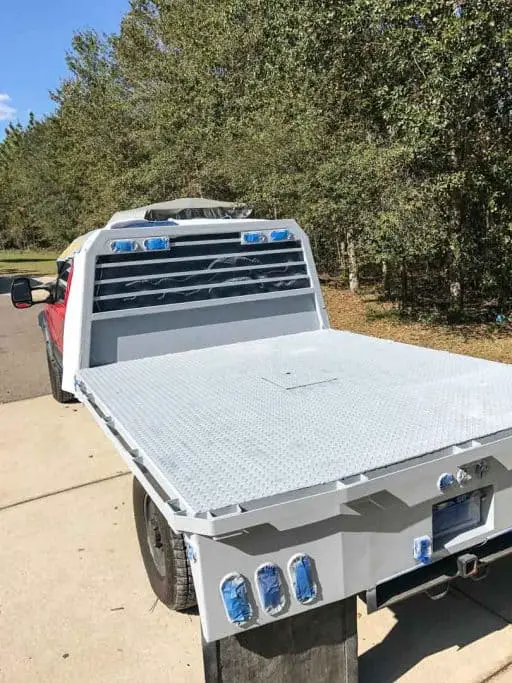
Modifying The Flatbed Truck Bed
What truck and camper combination you purchase is up to you. Most people will opt to put a short bed truck camper on a short bed truck. Or they’ll load a long bed truck camper on a long bed truck.
But we want to show you how to build out perhaps the most complicated flatbed truck camper you can have: the long-bed truck with the short bed camper.
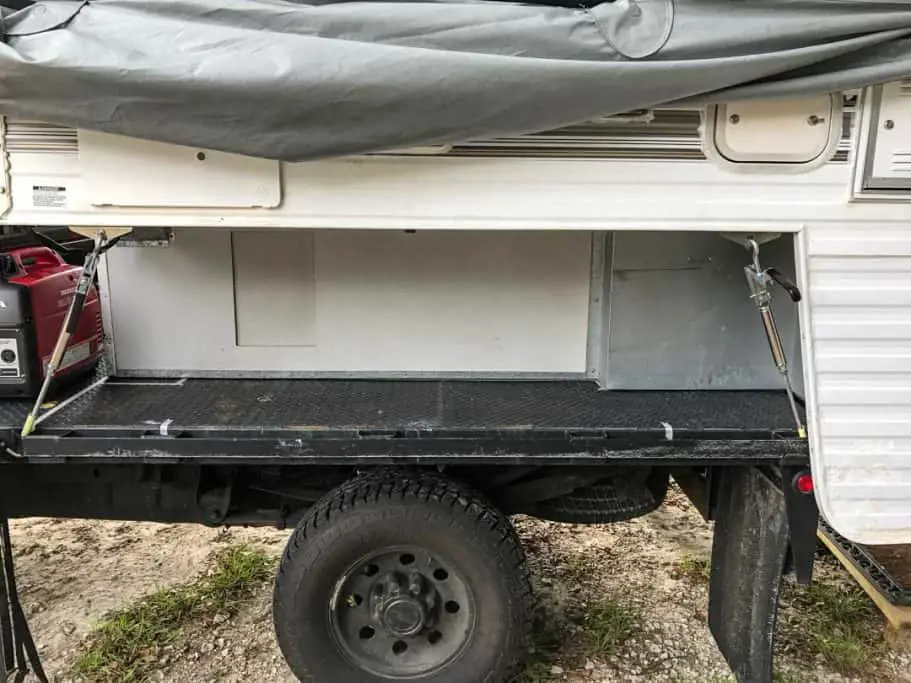
The biggest advantage of this combination is quite simple: You can create the maximum amount of storage space by creating a “bonus space” between the truck and camper.
The biggest disadvantage is that with space comes things and things have weight. So this flatbed truck camper combination is going to be on the heavy side.
Since we planned to live full-time in our flatbed truck camper for 3-4 years as we attempted to drive from Alaska to Argentina we were more concerned about storage than weight.
While we did opt for a 4×4 capable truck, we knew the weight would limit our offroad excursions. But we were OK with this tradeoff since we did not foresee vast amounts of off-road adventures.
READ MORE: Upgrade your camper or RV with these 10 easy and affordable upgrades!
Flatbed Truck Camper Modifications
NOTE: Many of the “customizations we did were relatively simple processes we can recommend almost anyone can do because they do not require technical expertise or expensive tools and hardware. For example, we did not custom weld boxes to our flatbed truck camper for a variety of reasons.
First, we did not know how to remove the truck bed nor could we afford to have someone do this for us. Likewise, we had no idea how to properly mount the camper directly on the frame of the truck once the bed was removed. This is a great example (Phoenix pop up campers) of a company that custom builds these chassis-mounted truck campers.
Second, we did not know how to weld boxes flush from the truck frame to the underside of the camper. Nor could we afford to have someone do this for us. We have seen some very good-looking custom-welded truck camper rigs. That was not within our budget nor our desire based on our third criteria.
And third, we did not want to permanently mount our camper on our flatbed truck. We wanted to be able to use our truck separately, at times, and mounting the camper directly to the truck with the custom welded boxes would eliminate our ability to use the truck by itself.
But as you will see, we did have a friend help us custom weld a few sections of our storage area.
| Items You Will Want to Have With Your Flatbed Truck Camper: * Renogy 100aH AGM batteries * Aluminum Storage Boxes * Happijac Qwik-Load Turnbuckles * Honda 2200 generator(s) |
Determine The Under-Camper Space
With a flatbed truck camper determining the amount of storage space you can build out it quite simple.
Just set the camper on the back of the truck the way it will sit when you are driving and then trace the outline of the camper on the truck bed using a metallic marker pen.
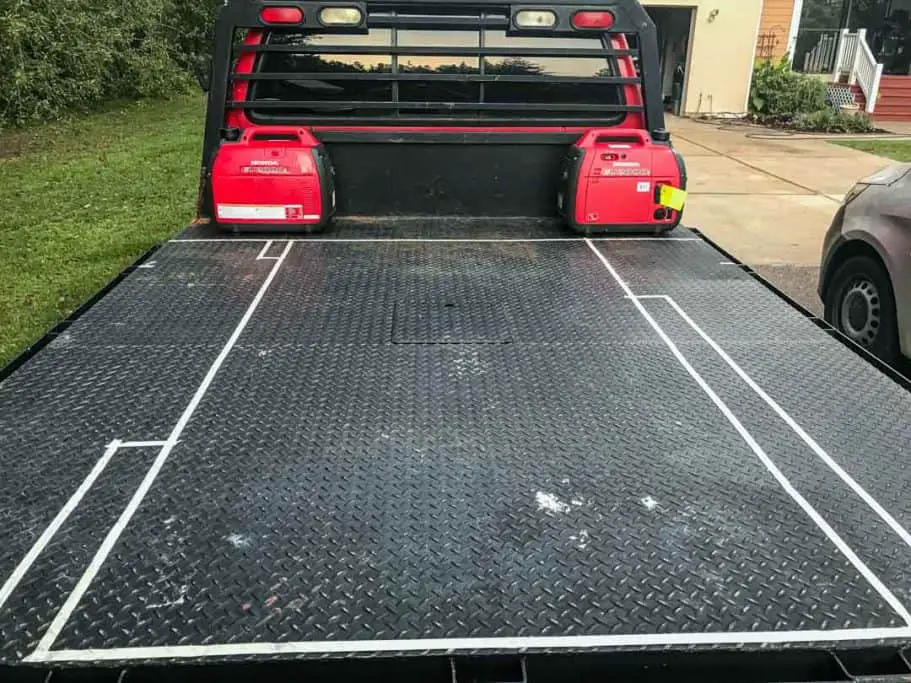
We used tape to then make the outline more visible for the purpose of testing a variety of different storage boxes.
NOTE: Be sure to outline any surfaces that would interfere with storage boxes. This includes any “appendages” to the camper that might hang down from the sides or top of the camper. (In our example we had two areas – one on each side – which we had to account for in our outline.)
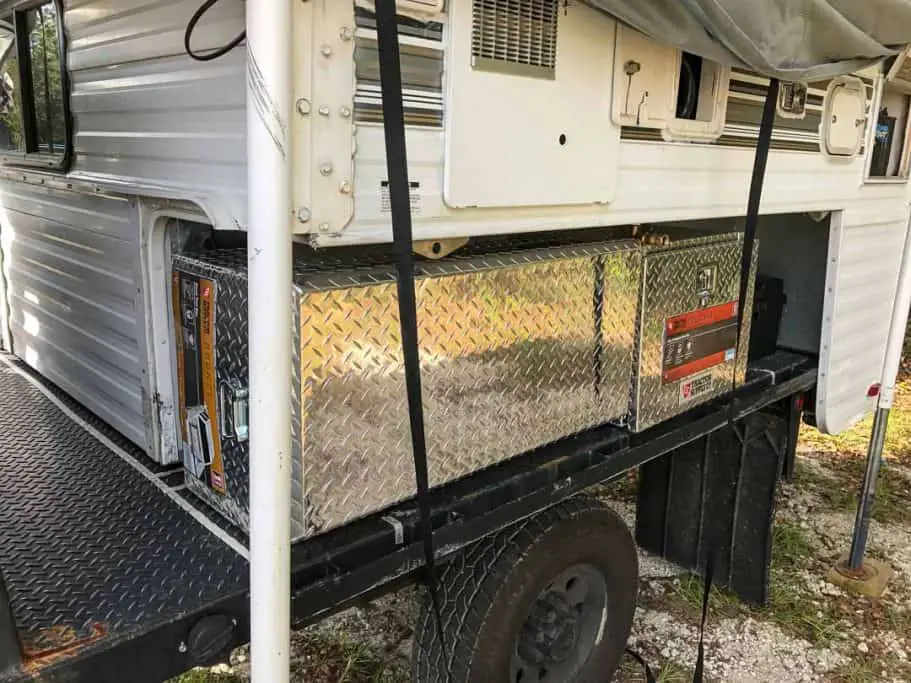
Additionally, we specifically wanted to store our two Honda 2000 generators in the space between the truck and camper. This was our primary reason for using a short-bed camper on a long-bed truck.
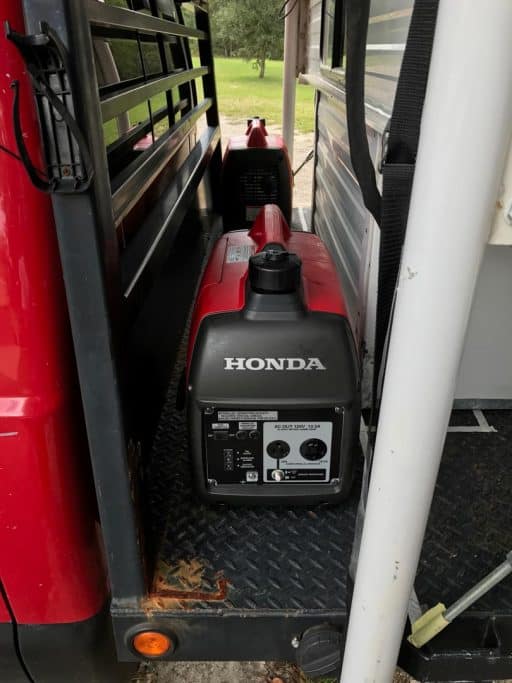
So before we got too far along we made sure that the generators fit nice and snug.
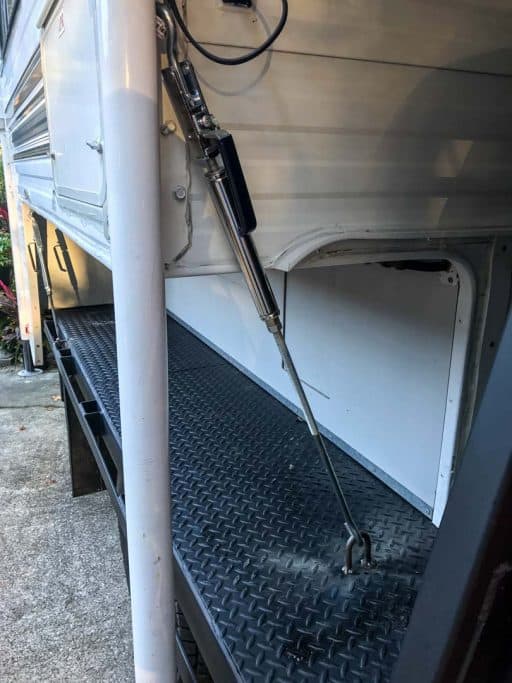
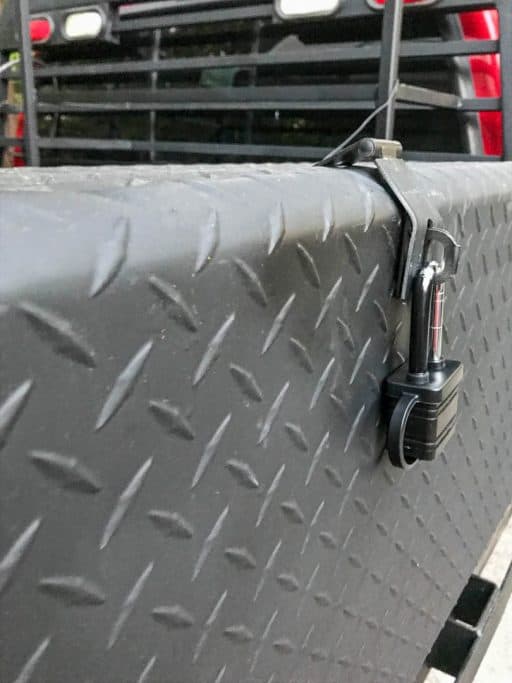
Also, you will want to make sure that you attach your tie–downs between the camper and the flatbed as they will be when you are driving.
Depending on where/how you attach your tie-downs you may limit your storage space and/or access to your storage boxes.
This is a simple remedy: you just have to remember to detach/reattach the tie downs every time you access your boxes.
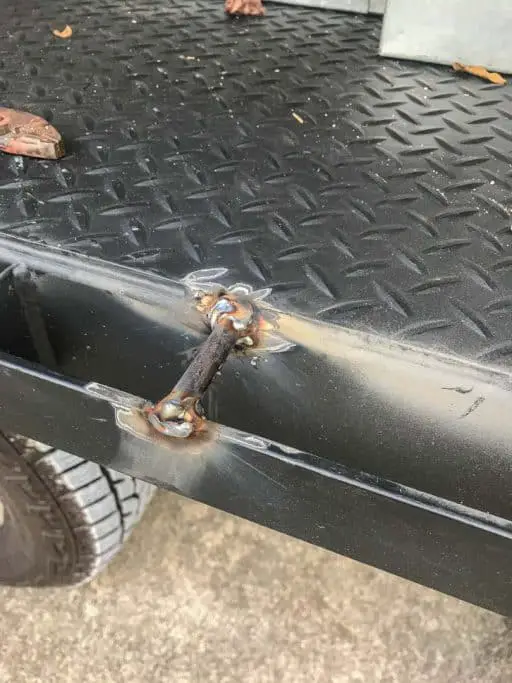
NOTE: Because of the utility of our flatbed and because we had a friend who could weld for us, we actually created our own tie down locations to attach the truck to the camper. We studied how the camper would ride on the flatbed and then modified the tiedown location accordingly.
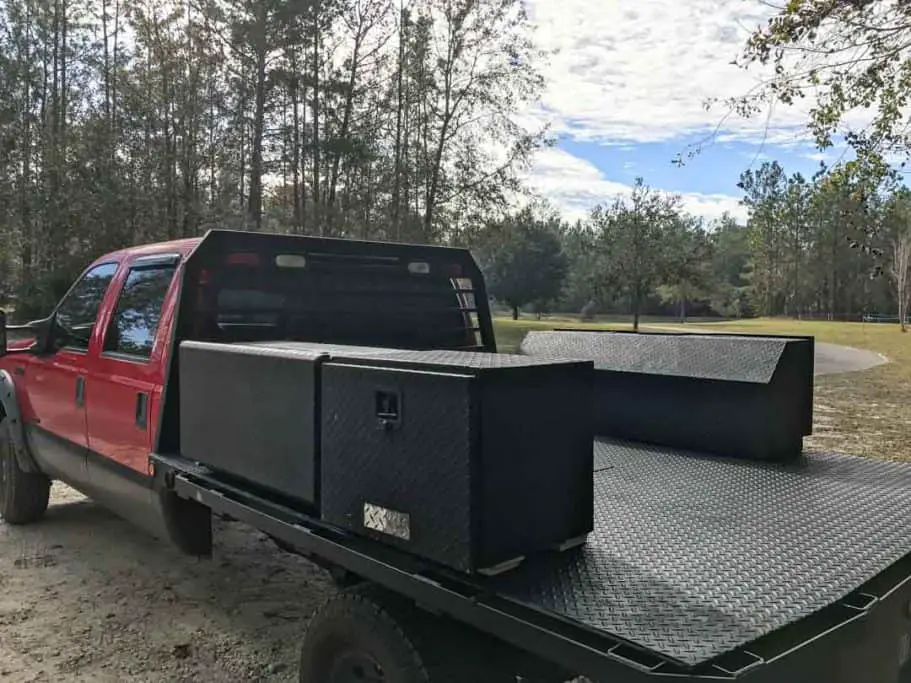
Shop For Storage Boxes
After taping off the storage space we actually put the dimensions on paper so we could take them with us as we shopped for different boxes. As mentioned above, we did not want to install custom boxes for a variety of reasons.
When we purchased our truck we were given two decent steel storage boxes. However, we knew that weight would be an issue so we wanted to switch from steel to aluminum.
Our first stop was the Tractor Supply Company. We knew we would have plenty of options for aluminum boxes of various sizes that we hoped we could “mix and match” to fit our storage space.
NOTE: Underbody truck boxes are ideal for custom storage solutions on your flatbed truck camper. However, they are typically smaller in dimension – and also costly.
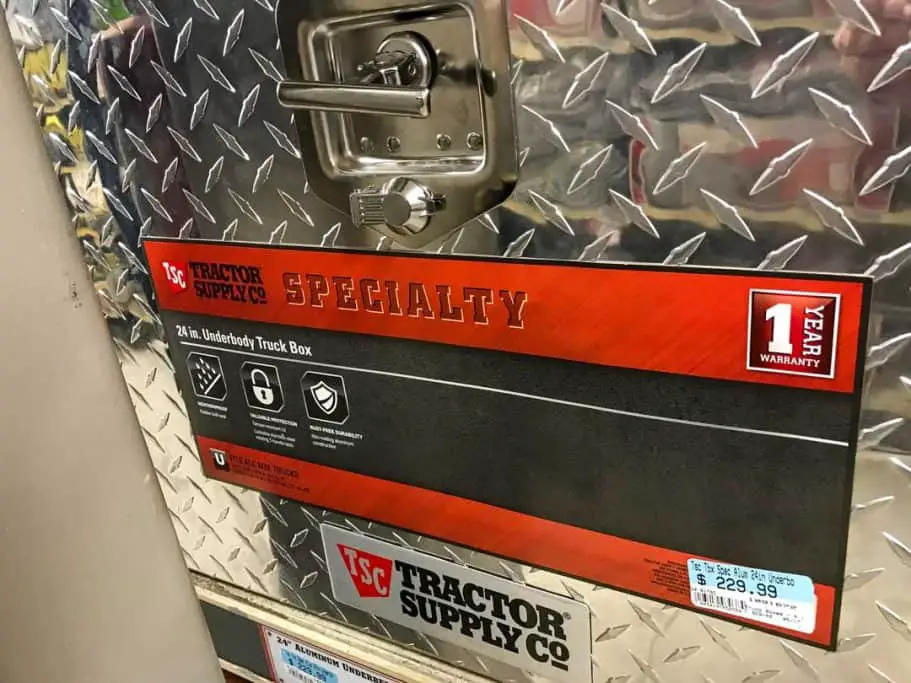
We went with one underbody truck box because it fit one side of the truck’s storage space.
In theory, we could have purchased three more of the same kind and bolted them all together.
But this would have been costly. Plus we wanted to have longer runs of space that the smaller underbody truck boxes would not provide.
One thing we discovered is that only the underbody truck boxes actually open up correctly.
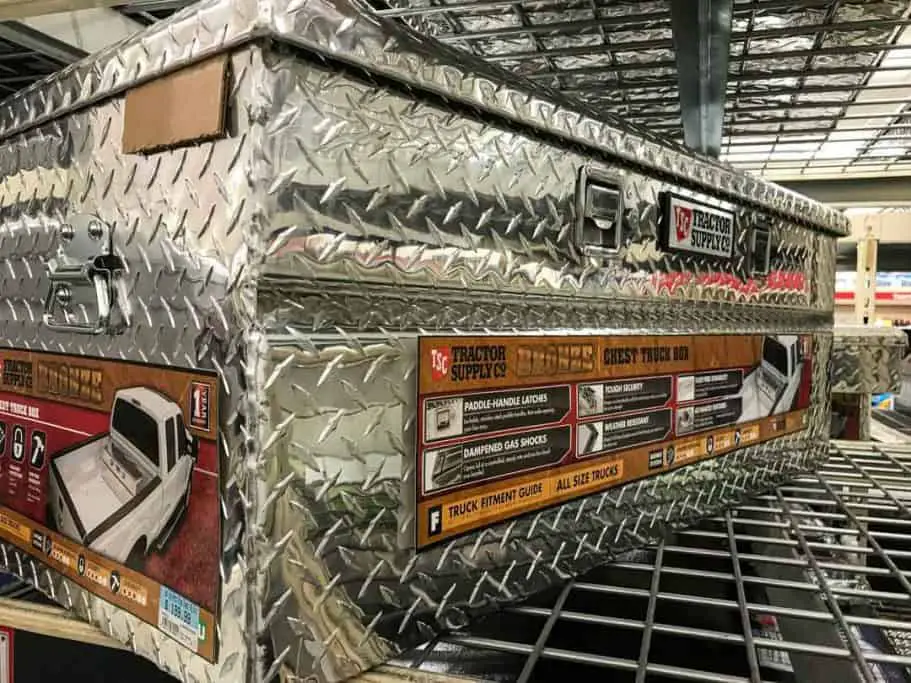
Traditional chest truck boxes open up – which will not work when your camper is sitting on top of it! However, we did discover that you can take the traditional chest truck box and tilt it 90 degrees on its side and instead of opening up it will open out!
While Tractor Supply Company was a great place to start, we ended up resorting to shopping on Amazon because we had very specific dimensions for which we were searching.
After shopping online for a few days we narrowed down our choices based on the quality of the boxes and our budget.
We had two silver aluminum boxes shipped to accompany the underbody box we purchased from Tractor Supply Company.
NOTE: Color was not important to us at this point. We planned to paint the entire bed and boxes flat black anyway.
If our math was correct, everything should fit as planned.
Test The Location Of The Storage Boxes
But it didn’t! We had forgotten about one of the “appendages” on the camper – a storage area that seemed perfect for a few fishing poles, but which certainly prevented our boxes from fitting!
After removing a few rivets and screws we removed the appendage. We played around with a few different combinations of box locations and settled on one that left us the least amount of ‘dead space.’
We did want to add two compartments to our flatbed that would be beyond the scope of the boxes.
The first was a second battery we wanted to mount beneath the camper. (Our camper battery compartment was only big enough for one battery. We wanted two.)

The second was an outside storage space for our jerry cans and other items we wanted to keep outside of the truck cab, yet still accessible if needed.

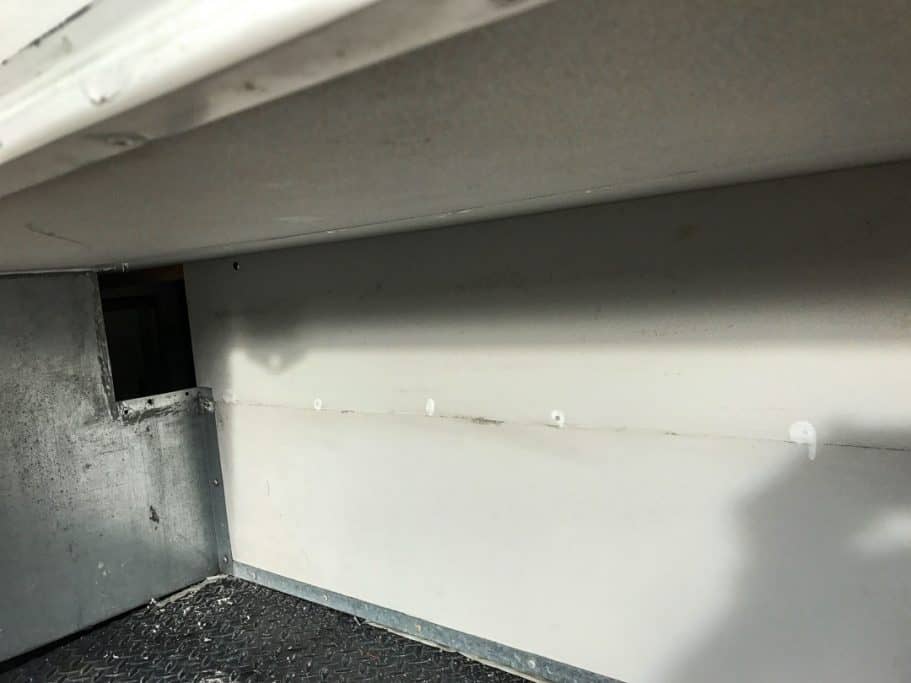
NOTE: Once we positioned the boxes where we wanted them we let the camper sit fully on the flatbed. As it came to a rest the true measurements of the boxes were tested.
We ended up with approximately 2” of space between the top of the box and the bottom of the camper. Some would say that fit like a glove!
We were just grateful that we could slide our hand between the two in order to pop open the top/side of the box.
Prime And Paint The Boxes And The Flatbed Truck
At this point we were committed to the boxes and their position on the truck. It was time to paint everything black!
For this we purchased a dozen cans of Rust-oleum Primer and Rust-oleum Flat Black spray paint.
We taped off the parts of the boxes and truck bed that we did not want black.
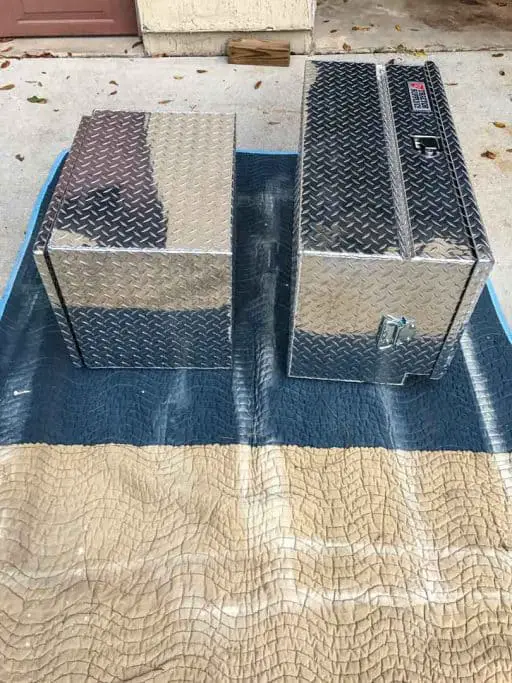

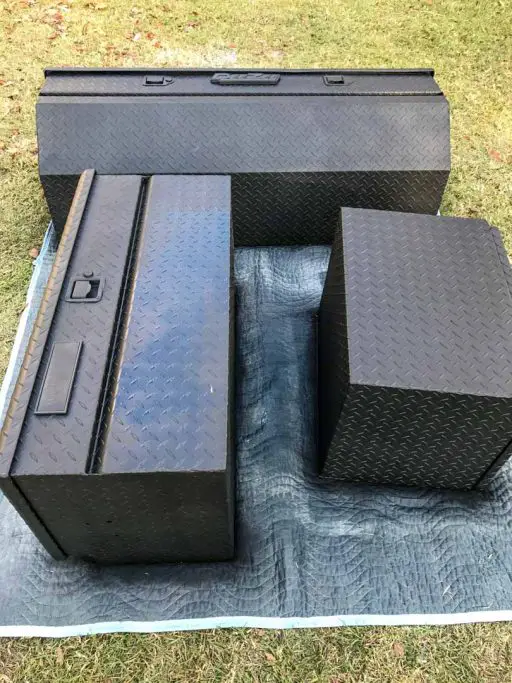
From there it was a simple process of spraying the primer first, letting it dry for a few hours and then going back over everything with the flat black spray paint.

Attach The Boxes To The Flatbed Truck
After the flatbed truck and boxes are painted it was time to attach them together. This was a relatively simple process.
First we put the boxes back in their place on the flatbed.
Using a titanium multiple hole drill bit we punched holes through both the box and the flatbed. We did this near each of the 4 corners of each box and then in the center of our two longer boxes.
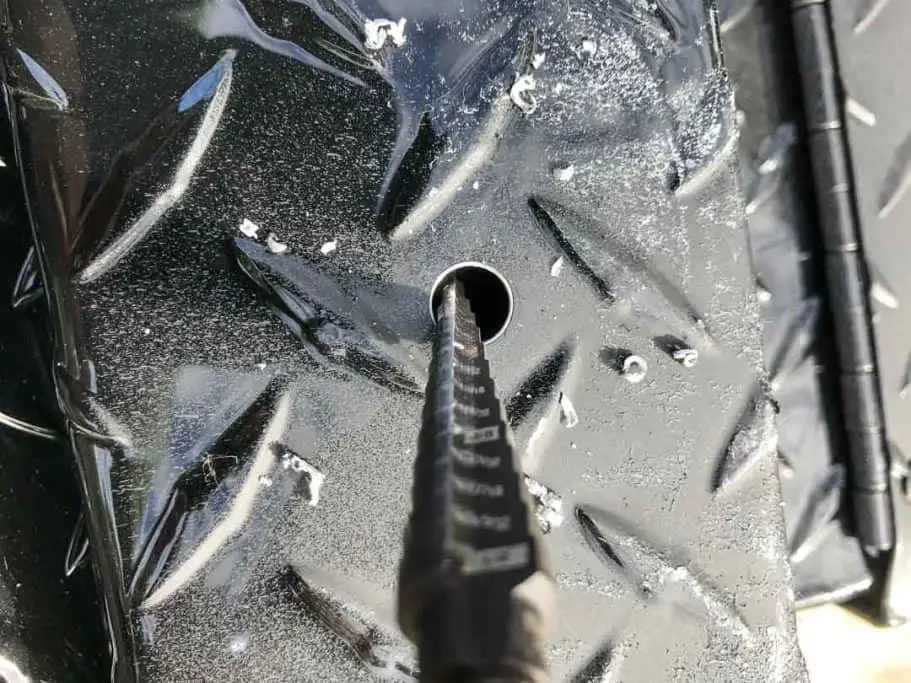
We bored holes that were ⅜” in diameter so that we could use corresponding washers, bolts and nuts to secure the boxes to the flatbed.
At this point the boxes have been securely attached to the bed and will fit perfectly between the flatbed and the camper.
Fine Tune The Boxes For Utility And Security
Now that we had the boxes open sideways we wanted to secure chains between the box and the lid to create a horizontal “tabletop” with the open lid. This was relatively easy to do as well.
We purchased some chains and screws and attached the chain to both the box and the lid using the screws.
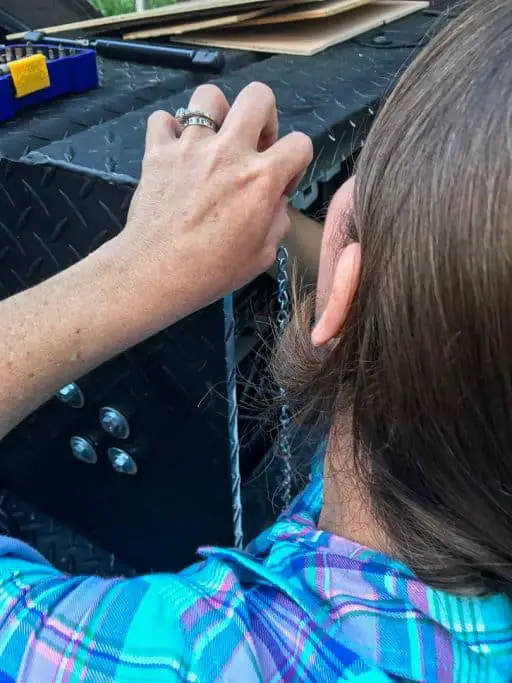


This was trial and error as we forgot to make sure that the chain fit properly inside the box when we shut the lid!
This way when we wanted to open the box the lid would hang parallel to the ground creating a tabletop on which we could set items as needed.
Custom Weld The Storage Space Between The Truck Cab And The Camper
With the boxes securely attached to the flatbed truck beneath the camper, the last step in our process was the most difficult.
We needed to (borrow our friend too!) weld specific frames onto the flatbed and build steel cages behind which to secure our stored items.
We had three sections of the truck bed that needed these custom welds.
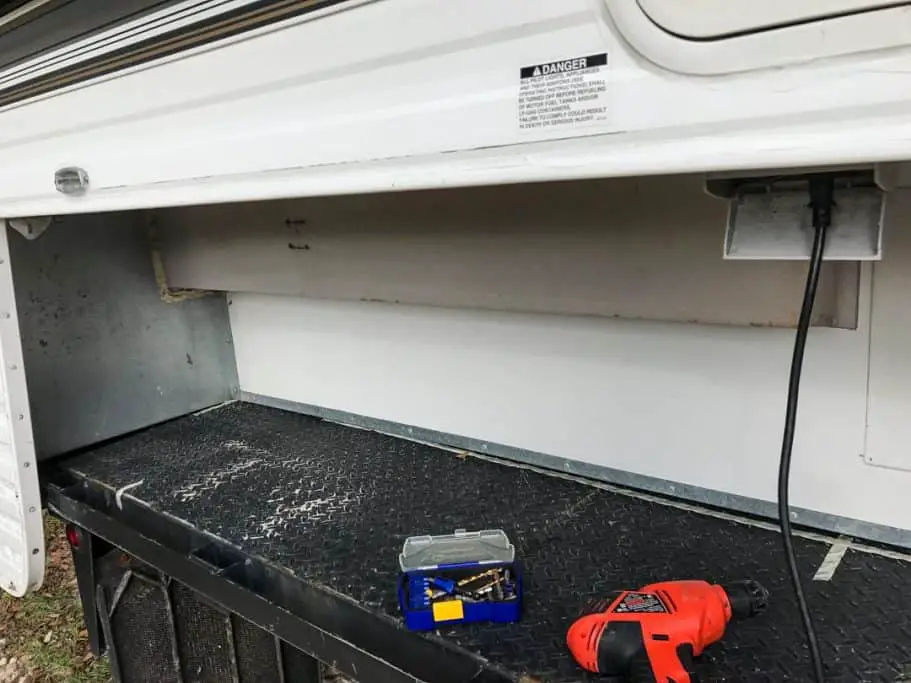
Our second battery compartment at the rear of the driver’s side. This was located directly beneath our primary camper battery so a short run of wiring could connect these batteries in parallel quite easily.
It was also located within three feet of where we planned to mount our inverter inside the camper.

Our outside storage for jerry cans, fluids and leveling blocks. We wanted to carry two 5-gallon diesel jerry cans for the truck and one 5-gallon gasoline jerry can to power our generators.
But we didn’t want to store them inside the truck cab and we didn’t want to simply try to tie them down somewhere outside on the camper. This space, at the rear of the passenger side of our truck bed, was perfectly situated at the end of one box and beneath the wing of the camper.
The larger, more involved storage space between the truck cab and camper where we planned to store our generators, extra water cans and other miscellaneous items that could withstand the outdoors.
This was a more involved process as it did take the welding expertise of our friend and it required several trips back and forth to a wholesale metal dealer to ensure I purchased the correct types and lengths of steel
(NOTE: Even as a DIY this steel was not cheap, so every cut and weld mattered!)
To summarize:
For the battery compartment, we built a simple caged door from a 4steel tube and diamond plate steel which we secured to both the truck bed and storage box.
This was done in such a way that the battery was entirely enclosed when the camper was on the flatbed truck.
However, if the camper was not on the truck then the battery was not securely protected by this cage.
For the jerry can storage, we did a similar design using angle iron and diamond plate steel. This we fastened using a hinge such that the door could swing open… as long as the rear tie-down was not attached.
This tie-down turned out to be the limiting factor in both rear storage compartments.
In order to access either the battery or the jerry cans, we had to detach the tie downs – which really is not that big of a deal when you have the Happijac Qwik-Load Turnbuckles.
For the larger space between the truck cab and camper, we measured the space that we wanted to use to stack the generators on top of each other.
In order to use them together in parallel, we needed to have them within 3 feet of each other.
So while we initially thought they would be on opposite sides of each other, it turns out we had to build the storage frame such that they stacked on top of each other.
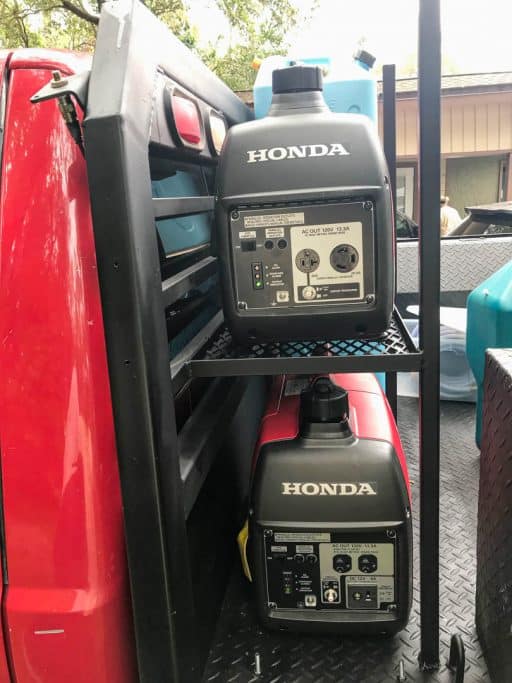
We placed them on the driver side of the flatbed truck camper such that they could easily be connected to the camper power cord also located on that side.
NOTE: We use these storage spaces to house the generators. Our intention is to ensure proper ventilation to be able to run them in place. But for the time being, we simply pull the generator out of the storage space and place it on the ground when we want to run it.
Securing All Storage Areas
Now that we had all of our storage either attached or custom-built to fit perfectly under and around our flatbed truck camper the last thing we needed to do was to ensure that we could lock each of the compartments separately.
For the boxes that we bought and attached to the flatbed, designing a locking mechanism was relatively easy. For our one underbody box, we could use the key because it opened to the side naturally.
But the two other chest truck boxes that we tilted at 90 degrees to open sideways could not lock using the key because the lock was directly beneath the camper.
Instead, we purchased a latch and a lock and secured the latch to the box such that it could easily be locked from the outside.
We purchased a set of waterproof locks with the same keys so accessing these boxes would be quick and mindless!
For the custom welded spaces we ended up needing to weld larger bolts to the storage spaces. Before welding these bolts we drilled holes in them wide enough to latch a lock through.


Once the bolts were welded into place a nut would ensure that the steel door closed flush and the lock would then secure the storage space.
Major Upgrade to our Power System
After our first 2 years on the road we realized how much we did not like having one battery on the truck and one on the camper. This made battery maintenance incredibly difficult. And it made separating the truck and camper quite tedious.
As such we decided to sacrifice some storage space inside our truck camper in exchange for having both batteries inside the camper. This was a GAME CHANGER for us in terms of peace of mind and ease of use.
Additionally, we upgraded our batteries to AGM and added an extra solar panel. And our favorite power upgrade for our truck camper was the addition of a simple transfer switch so that we could run all of our outlets off of shore power or battery power.
Be sure to read this post about how we upgraded our truck campers’ power system.
In Conclusion: Building Out Your Flatbed Truck Camper
How you build out your flatbed truck camper is totally up to you. We learned in the process that we did some things well, while others we would do differently now that we have lived in our truck camper for three years.
How you modify your flatbed truck camper is entirely a function of your budget and your expertise (and/or how willing you are to learn how to do things you would like to do to your rig!). We are certainly no experts at building out flatbed truck campers!
However, we are 90% happy with both the process and the cost of our buildout. The 10% that we would change does not impact the function of our flatbed truck camper and the storage we built.
Instead, it would just make things a little bit easier when it comes to accessing items within our storage boxes.
If you have learned anything in the process or have any ideas for how we might improve on our flatbed truck campers setup, please be sure to get in touch and let us know!